How to assemble a TIG torch: Safe Beginner Setup and Use Basics
A TIG torch looks simple from the outside, but its small parts have specific jobs. The tungsten electrode must be held securely without being crushed, shielding gas must flow around the electrode, and the torch connection must match the welding machine. A misplaced collet or loose fitting can cause an unstable arc, poor shielding, or damage to the torch.
The good news is that how to assemble a TIG torch is a manageable task for a beginner when the torch is disconnected and the parts are identified first. Most air-cooled torches use the same basic arrangement: torch body, collet, collet body or gas lens, ceramic cup, tungsten, and back cap.
This guide explains how to identify compatible parts, assemble the torch in the correct order, connect shielding gas and the power lead, and check the finished setup before striking an arc. It also covers electrode stickout, common assembly mistakes, gas leaks, and when a torch should be serviced instead of forced back into operation.
At a glance
- Disconnect welding power and close the argon cylinder before assembling or changing torch parts.
- The collet grips the tungsten, while the collet body and ceramic cup direct shielding gas around it.
- A correct setup has a centered tungsten, secure fittings, unobstructed gas flow, and no damaged insulation or ceramics.
How to assemble a TIG torch safely: a complete beginner method
The exact torch style and connection vary by welder, so use the torch manual when its parts differ from this sequence. The method below applies to common air-cooled TIG torches that use a threaded back cap, a separate collet, and a ceramic cup.
Before beginning, place the torch on a clean, dry work surface. Keep steel dust, grinding grit, and small metal particles away from the collet and torch head because contamination can interfere with gas flow and prevent the tungsten from seating evenly.
Tools you will need
- Compatible TIG torch and welding machine, with the correct torch lead and power connection
- Matching collet, collet body or gas lens, ceramic cup, and back cap
- Clean tungsten electrode in the diameter required by the welding procedure
- Argon cylinder, regulator/flowmeter, and suitable gas hose
- Wrench or torch accessory tool for snug fittings; avoid using excessive force
- Optional: dedicated tungsten grinder or fine abrasive wheel for preparing the electrode
Step 1 Make the machine and gas supply safe
Turn the welding machine off, unplug it when practical, and make sure the torch trigger or foot pedal cannot start an arc. Close the argon cylinder valve before working on the torch, and release pressure from the gas line according to the machine manufacturer’s instructions.
Do not assemble a torch while it is connected to an energized welding circuit. TIG equipment can produce dangerous arc energy even when the torch appears idle. Also allow a recently used torch to cool before touching its cup or front-end parts.
Success at this stage means the torch is cool, the machine is off, the cylinder valve is closed, and no gas or electrical energy is being released from the equipment.
Step 2 Confirm that the torch parts match
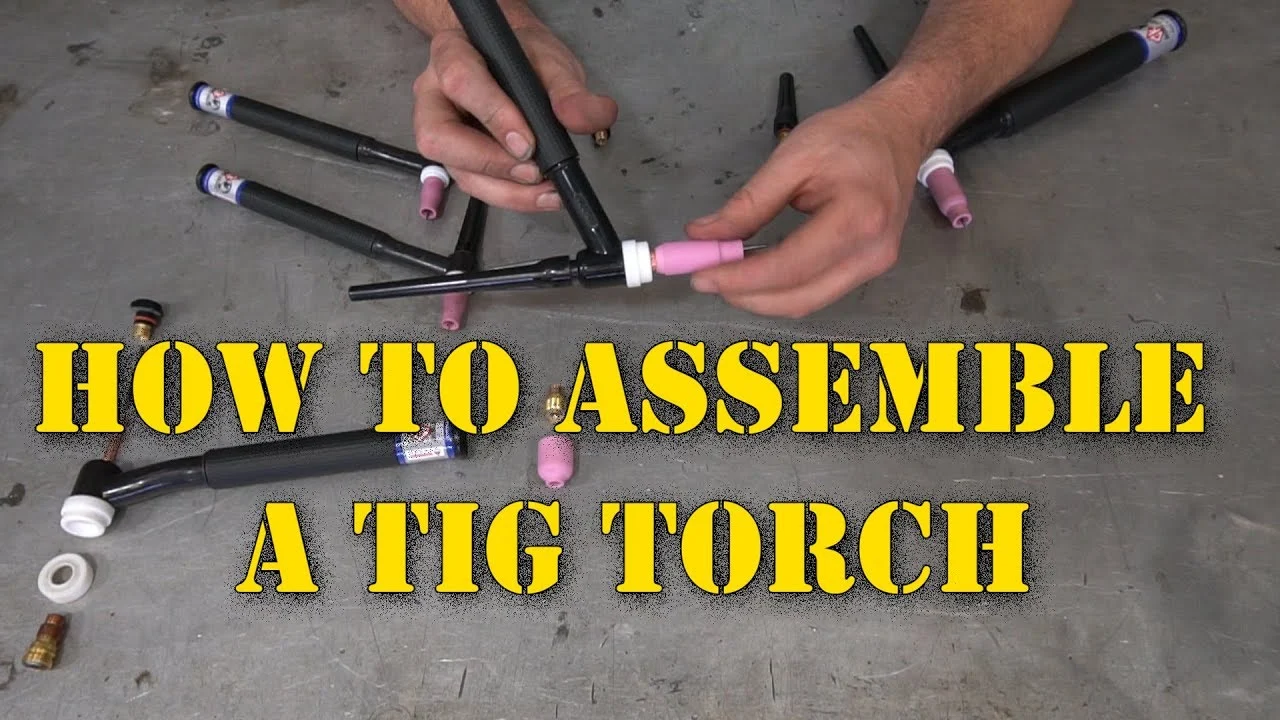
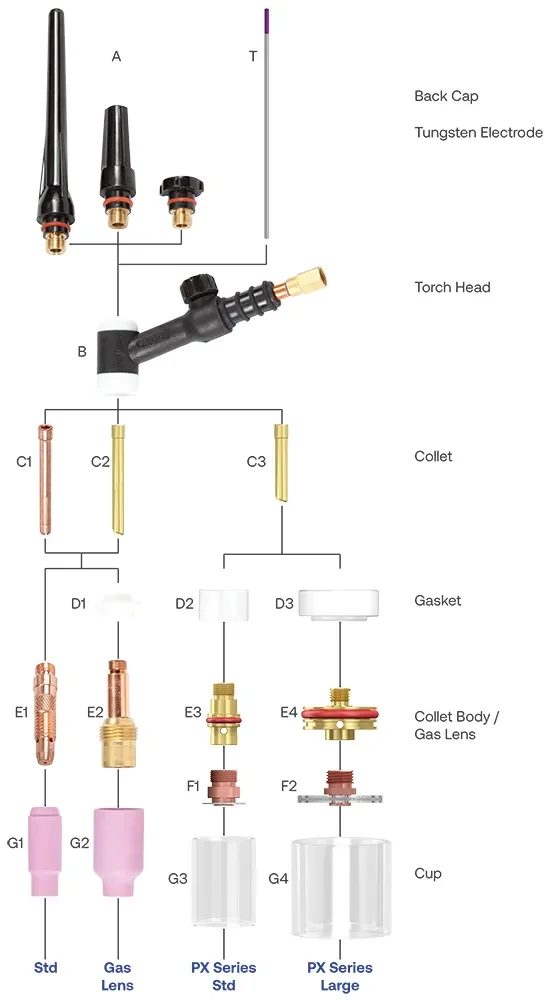
Separate the front-end pieces and identify them before putting anything together. From the torch body outward, the usual order is collet body or gas lens, collet, tungsten electrode, ceramic cup, and back cap. Some torch designs use a short gas nozzle or an integrated collet body, so do not force a part that does not have the correct thread or shape.
The collet is a slotted metal sleeve that grips the tungsten when the back cap is tightened. The collet body holds the collet and provides the gas passage; a gas lens performs the same basic mounting function while using a screen to smooth gas flow. The ceramic cup screws onto the collet body or gas lens and shapes the shielding-gas coverage around the electrode.
Check the tungsten diameter against the collet size. A 1/16-inch tungsten needs a 1/16-inch collet, for example; a loose or mismatched collet will not hold the electrode properly. The cup, collet body, and back cap should also be designed for the same torch series.
Important
Never substitute a part merely because its threads seem to start. Different torch families can look similar while using different thread sizes, seals, gas passages, or heat ratings.
Step 3 Inspect and clean the front-end components
Look over the collet for bent slots, deep scoring, discoloration, or metal buildup. Inspect the collet body or gas lens for blocked gas holes and damaged threads, and check the ceramic cup for cracks, chips, or a loose fit. Replace damaged parts rather than trying to make them work by tightening harder.
Wipe reusable metal parts with a clean, lint-free cloth. Do not use oily rags, cutting fluid, or dirty shop towels because TIG shielding gas can carry contamination into the arc area. If the torch head has visible spatter or debris, clean it only as the torch manufacturer permits.
A clean part should have open gas passages, readable threads, and smooth contact surfaces. A ceramic cup does not need to be perfectly bright, but any crack that could let it break during welding is a reason to replace it.
Step 4 Install the collet body or gas lens in the torch head
Insert the collet body or gas lens into the front of the torch head and thread it in by hand. Keep the torch straight while starting the threads so the brass or copper fitting does not cross-thread the softer torch-head material.
Once it is fully hand-started, snug it with the appropriate wrench or torch tool. It only needs to seal and remain stationary; excessive force can damage the threads, deform the gas passage, or make later tungsten changes difficult.
When installed correctly, the fitting sits squarely in the torch head and does not wobble. Do not proceed if it bottoms out unusually early, leaves a large gap, or requires force before the threads engage smoothly.
Step 5 Fit the correct collet into the collet body
Slide the matching collet into the collet body from the rear of the torch. The collet has a tapered end that seats inside the matching taper of the body. On common torches, the collet is captured by the back cap once the assembly is tightened.
Make sure the collet is not sitting at an angle and that its slots are free of dirt. Do not clamp the collet empty by tightening the back cap hard; an empty collet can be distorted, especially if the torch design does not call for that procedure. A useful way to approach how to assemble a tig torch is to check your progress after each stage.
The visible sign of correct placement is a collet that enters the body smoothly and remains centered. If the collet drops too far through the body or will not seat, stop and verify that the body and collet have the same diameter and torch series.
Step 6 Prepare and insert the tungsten electrode
Choose a clean tungsten electrode suitable for the welding current and material. A common starting choice for many DC steel and stainless-steel jobs is a 2-percent lanthanated tungsten, but electrode selection depends on the machine, current type, amperage, and welding procedure.
If the electrode requires grinding, use a dedicated tungsten grinder or an uncontaminated abrasive wheel. Grind from the electrode body toward the tip so the grinding marks run lengthwise. Avoid using a wheel that has previously ground steel, aluminum, or other materials, because embedded particles can contaminate the tungsten.
Slide the tungsten through the back of the torch and collet. Leave the intended amount of electrode extending beyond the cup; the appropriate stickout depends on the cup, gas lens, joint access, and welding procedure. For a beginner’s general setup, a modest stickout is safer than an unusually long one because excessive extension is easier to bend, overheat, or expose to air.
The tungsten should move freely before tightening and should appear centered when viewed from the front. Do not use a contaminated or mushroomed electrode simply because it is already installed; remove it and prepare a clean replacement.
Step 7 Install the ceramic cup and back cap
Thread the ceramic cup onto the collet body or gas lens by hand. Turn it gently until it is seated; ceramic is brittle, so do not use pliers or a wrench on the cup. If the cup has an O-ring or retaining feature, make sure it is present and clean.
Next, place the back cap over the rear of the collet and thread it into the torch body. Tighten it by hand until the tungsten is held firmly. If the design requires a tool for final tightening, use only a light snug fit.
The goal is to grip the tungsten without crushing it.
Test the electrode by attempting to move it gently with clean fingers after the torch is fully assembled. It should not slide in or out during normal handling. If it slips, tighten the back cap slightly or check for the wrong collet; do not solve the problem by applying excessive torque.
Step 8 Connect the torch lead and shielding-gas line
Connect the torch lead to the welding machine’s TIG torch connection, following the machine’s polarity and connector instructions. Many DC TIG setups use the torch on negative polarity, but AC machines and specialized equipment can differ. Use the connection diagram supplied with the welder rather than guessing from connector appearance.
Attach the shielding-gas hose to the machine or torch gas inlet as designed. Confirm that the hose is rated for shielding gas and that its fittings are clean. If the torch uses a separate control plug, connect it to the matching remote, trigger, or foot-pedal socket.
Make each connection hand-tight first, then snug fittings that are designed to be tightened with a wrench. Avoid twisting the hose or torch lead sharply. The lead should curve naturally, with no crushed section near the connector or torch handle.
Step 9 Open the cylinder and set up gas flow
Stand to the side of the argon cylinder outlet, confirm the regulator is installed correctly, and open the cylinder valve slowly. Set the regulator or flowmeter according to the welding procedure and cup design. Gas-flow requirements vary with cup size, gas lens use, joint shape, drafts, and welding current, so a machine manual or qualified welding procedure is the best reference.
For a beginner check, activate the gas test function if the machine has one, or use the torch control without initiating an arc. Listen for a steady flow and watch the flowmeter. A flowmeter reading that does not settle, a hiss around a fitting, or gas that continues flowing when the control is released indicates a connection or valve problem.
Do not use compressed air or an oxygen-containing gas as a substitute for argon. TIG shielding requires the correct inert gas and a clean delivery path; an incorrect gas can create an unstable arc, excessive oxidation, or a dangerous equipment condition.
Step 10 Perform a final torch and gas-flow check
With the machine still not welding, inspect the assembled torch from front to back. The cup should be intact and firmly seated, the tungsten should be centered, the back cap should be secure, and the torch lead should not show cuts, exposed conductor, crushed insulation, or overheated areas.
Apply gas flow briefly and check the fittings for leaks using an approved leak-detection solution if one is available. Never check for a gas leak with an open flame. Bubbles or a persistent hiss require closing the cylinder, releasing line pressure safely, and correcting the fitting before welding.
Understanding how to assemble a tig torch also means recognizing the limits of the method.
Finally, confirm that the work clamp is attached to clean metal and that the welding area is prepared for the intended test. A successful assembly check produces a centered electrode, quiet and consistent shielding-gas flow, no visible leaks, and no movement of the tungsten when the torch is handled normally.
Check your result
Before striking an arc, confirm five things: the correct collet is installed, the tungsten is clean and centered, the ceramic cup is undamaged, argon flows only when commanded, and the torch lead has no exposed or damaged insulation.
What each TIG torch part does
Understanding the parts makes troubleshooting much easier. If the arc is unstable, the gas coverage is poor, or the tungsten slips, you can inspect the component responsible instead of replacing unrelated pieces.
The torch body and torch head
The torch body is the handle and connection point for the control cable, power lead, and shielding-gas passage. The torch head contains the front-end threads and the internal path that carries current and gas toward the electrode.
Air-cooled torches release heat through the handle and surrounding air. Water-cooled torches use a cooler and circulating coolant, so their leads and maintenance requirements are different. Do not connect a water-cooled torch to a cooling system unless the torch and cooler are designed to work together.
The collet and collet body
The collet is the gripping part. Tightening the back cap pushes the collet into a taper, causing its slotted fingers to close around the tungsten. It must match the electrode diameter closely enough to grip evenly.
The collet body holds the collet and directs gas toward the cup. A gas lens replaces or incorporates the standard collet-body function and can produce smoother shielding coverage, particularly with longer stickout or difficult access. It is not automatically necessary for every weld.
The ceramic cup and back cap
The ceramic cup surrounds the tungsten and distributes shielding gas over the weld area. Larger cups can cover more area, while smaller cups may improve access in tight joints. Cup numbers and outside diameters are not universal across every torch, so match the cup to the torch front end.
The back cap compresses the collet and closes the rear of the torch. Some back caps are long, some short, and some flexible. Use the one intended for the torch and cup arrangement; a cap that cannot provide proper compression may allow the tungsten to move.
How to verify the assembled torch before welding
A visual inspection catches many assembly errors, but a controlled gas test gives more useful information. Perform the checks below without touching the tungsten to the workpiece and without placing hands near an active arc.
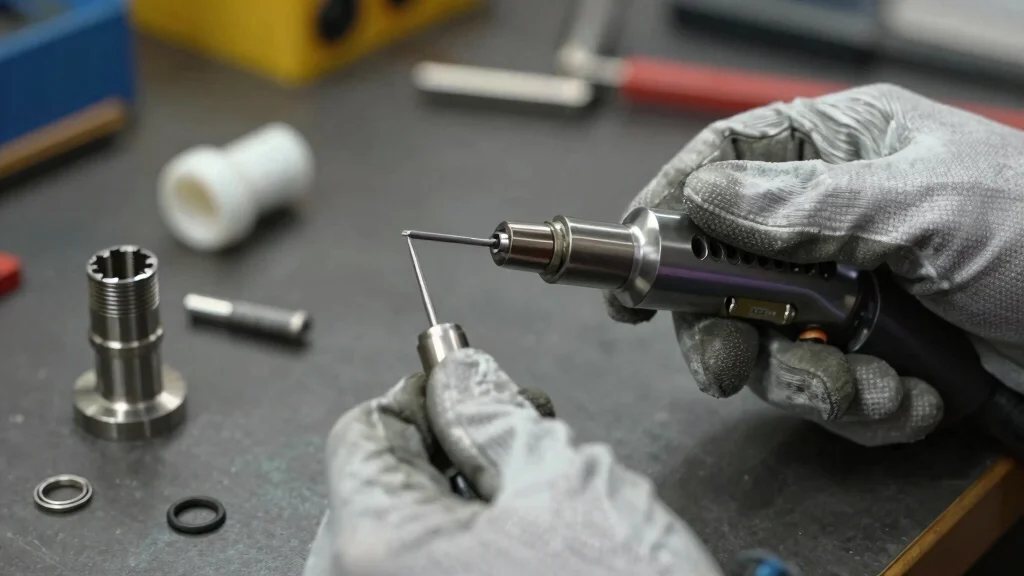
Use a simple inspection checklist
- The torch connector is fully seated in the correct machine socket.
- The power and control connections match the machine instructions.
- The argon hose is attached to the correct gas inlet and is not kinked.
- The collet diameter matches the tungsten diameter.
- The tungsten extends from the cup at a deliberate, moderate length.
- The ceramic cup has no crack, chip, or loose fit.
- The back cap holds the tungsten without crushing or slipping it.
- The torch lead and handle have no cuts, burns, exposed conductors, or melted insulation.
Run a gas-only test
Use the welder’s gas-test button when available. Let the gas flow long enough to observe whether the flowmeter remains steady and whether the torch produces a smooth, unobstructed stream. The gas should not sputter because of a partially blocked passage or an almost empty cylinder.
Gas flow that is too low may fail to protect the molten weld pool. Gas flow that is unnecessarily high can create turbulence, pulling surrounding air into the shielding envelope. If the flow changes when the torch lead is bent, inspect the hose and connections for damage.
Troubleshoot common TIG torch assembly problems
Most first-use problems come from mismatched front-end parts, contamination, a loose connection, or an incorrect gas setting. Turn off the machine and close the cylinder before taking the torch apart to correct any problem.
| Symptom | Likely cause and correction |
|---|---|
| Tungsten slips | Wrong collet size, dirty taper, or loose back cap. Match the collet to the tungsten and clean the seating surfaces. |
| Arc wanders | Contaminated or poorly ground tungsten, loose collet, or damaged front-end part. Prepare a clean electrode and inspect the grip. |
| Black or gray weld area | Insufficient shielding, gas leak, excessive draft, contaminated material, or an incorrect cup setup. Check flow and all gas connections. |
| Gas keeps flowing | Trigger, solenoid, or machine-control issue rather than a cup problem. Stop welding and consult the machine manual or a qualified technician. |
| Cup becomes damaged quickly | Too much heat, contact with the workpiece, impact, or over-tightening. Replace the cup and review torch angle, stickout, and current. |
When to stop and get qualified help
Stop using the equipment if you smell burning insulation, see sparking at a connector, find exposed conductor, hear abnormal electrical buzzing, or cannot identify the correct machine connection. Also stop if the cylinder regulator is damaged, the hose leaks after proper tightening, or a gas valve does not shut off.
Do not open the welding machine, repair a pressurized regulator, or modify a torch lead unless you are trained and the manufacturer permits that repair. A welding supplier or qualified service technician can identify compatible parts and test electrical and gas systems safely.
TIG torch assembly FAQs
These answers address the questions that commonly arise when a beginner is assembling a torch for the first time.
Which way does the tungsten go into a TIG torch?
Insert the tungsten through the rear of the torch, through the back cap and collet, so its sharpened or prepared end projects through the ceramic cup. The collet grips the straight body of the electrode, not the sharpened tip.
How tight should the TIG torch back cap be?
Tighten it enough to hold the tungsten firmly without movement during normal handling. Start by hand and use only the light final tightening recommended for the torch. Excessive force can damage the collet, threads, or tungsten.
Can I use any ceramic cup on my TIG torch?
No. The cup must match the torch front-end design and the collet body or gas lens. Similar-looking cups can have different threads or seating dimensions, so use the torch parts list or manufacturer’s compatibility information.
Why does my TIG torch need argon?
Argon shields the hot tungsten and molten weld pool from oxygen, nitrogen, and moisture in the surrounding air. Without effective shielding, the arc can become unstable and the weld can develop discoloration, porosity, or contamination.
How far should the tungsten stick out of the cup?
There is no single length for every torch and joint. Use the welding procedure and cup or gas-lens guidance, choosing the shortest extension that provides the access you need. A very long extension is more vulnerable to bending, overheating, and poor shielding.
Do I need a gas lens to assemble a TIG torch?
No. A standard collet body is sufficient for many TIG jobs. A gas lens can improve gas distribution and may help with longer stickout or sensitive welds, but it must match the torch and requires a compatible cup.
Finish with a safe, verified TIG torch setup
Learning how to assemble a TIG torch becomes straightforward when the parts are kept in order: match the collet to the tungsten, install the collet body, seat the electrode, attach the cup and back cap, then connect the torch and argon supply according to the welder’s instructions. Clean parts and gentle tightening matter more than force.
Before welding, verify the tungsten is centered and secure, the cup is undamaged, the gas flow is steady, and the torch lead and connections are safe. If any fitting, electrical connection, regulator, or torch part is uncertain, pause and get the correct documentation or qualified assistance rather than testing a questionable assembly under arc power.