How to Weld Titanium With TIG: A Beginner’s Guide
Titanium can produce strong, attractive TIG welds, but it is far less forgiving of contamination than ordinary steel or stainless steel. A weld that looks acceptable while it is hot may become brittle if oxygen, nitrogen, moisture, oil, or grinding dust reaches the molten metal or the cooling weld. The main challenge is not simply creating an arc; it is keeping the titanium protected until it has cooled enough to resist atmospheric contamination.
For a beginner, the most attainable goal is a small, low-stress joint on clean titanium sheet or tube, made with direct current electrode negative, high-purity argon, and shielding that covers the weld pool and the hot metal behind the torch. Preparation, fit-up, and gas coverage matter at least as much as amperage.
This guide explains how to weld titanium with TIG from preparation through inspection. You will learn how to identify compatible material, clean and fit the joint, set up the torch and purge, control the arc, interpret weld color, and decide when a weld should be cut out rather than trusted. If you cannot provide reliable shielding or verify the material, stop before striking an arc.
At a glance
- Titanium must remain clean and shielded while it is hot, not only while the arc is on.
- Use DCEN, high-purity argon, a gas lens, and a trailing shield or enclosed purge for the cooling weld.
- Bright silver to light straw is generally a better visual result than blue, purple, gray, or chalky white contamination.
How to weld titanium with tig
Titanium TIG welding is a controlled gas-tungsten-arc process. The torch establishes the arc, but the shielding system protects the weld pool and the heated titanium from reactive air. For a first project, choose clean, accessible material and a simple butt or lap joint rather than a heavily restrained or safety-critical assembly.
The instructions below assume a conventional TIG power source and a joint that can be reached by both the torch and a separate shielding or purge arrangement. Follow the welding machine, gas regulator, and consumable manufacturers’ instructions where they differ. Do not weld an unknown alloy, a pressurized component, or a part whose failure could cause injury without qualified welding supervision and an appropriate procedure.
Tools you will need
- TIG power source with high-frequency start, DC output, and a stable low-current control
- TIG torch with a gas lens, ceramic cup, and a clean, properly sharpened tungsten electrode
- High-purity argon supply with regulator and flowmeter
- Trailing shield, enclosed chamber, or other arrangement that protects the hot weld after it leaves the torch
- Argon purge setup for the back side when the joint is open to air or the root must be protected
- Dedicated stainless-steel brush reserved for titanium and lint-free, residue-free wipes
- Compatible titanium filler rod, if the joint design requires filler
- Face shield or welding helmet, safety glasses, flame-resistant clothing, welding gloves, and suitable ventilation
- Clean clamps, fixturing, and a noncontaminating work surface
- Optional: temperature crayons or a noncontact thermometer for monitoring the workpiece between passes
Step 1 Confirm the titanium and joint are suitable
Identify the base metal before preparing it. Commercially pure titanium and common titanium alloys do not automatically share the same strength, ductility, filler selection, or heat-treatment requirements. A stamped part number, material certificate, or reliable supplier record is more useful than color or weight alone.
Start with material that is free of coatings, plating, adhesive, paint, and unknown residue. Remove parts from service if they have held flammable liquids, toxic chemicals, or pressurized contents unless they have been professionally cleaned and declared safe. Titanium welding is not a sensible experiment on an unidentified vessel, aircraft component, medical part, or load-bearing assembly.
Keep the joint simple and accessible. A close, even fit-up reduces the amount of heat and filler needed; a wide or irregular gap encourages a large molten pool that is harder to shield. Tack or fixture the pieces without trapping contaminants in the joint.
Step 2 Prepare a clean work area and dedicated tools
Set up away from grinding, sanding, oiling, and compressed-air blowoff that can move dust onto the joint. Use a clean table and tools that have not recently handled carbon steel. Iron particles can cause surface contamination, while oil and shop dirt can release fumes or leave defects in the weld.
Put on eye protection before brushing or wiping the parts. Use a stainless-steel brush reserved for titanium; do not use a brush that has touched steel, paint, or other materials. Wipe the joint and the adjacent surfaces with a suitable residue-free solvent on a lint-free cloth, then allow the solvent to evaporate completely.
Do not handle the cleaned joint with bare fingers. Skin oil can become a source of contamination, especially along the bevel or edge that will enter the weld pool. If the pieces are touched, clean them again rather than assuming the arc will burn the residue away.
Step 3 Fit, bevel, and tack the joint without contaminating it
Machine or dress the edges according to the joint design and material thickness. A square edge may suit thin sheet, while thicker material may need a bevel and a root opening that match a qualified procedure. Avoid excessive grinding heat, and remove all burrs and abrasive residue before assembly.
Align the pieces so the joint remains stable during heating. Make small, clean tacks using the same shielding discipline as the final weld. A tack that turns gray, blue, or chalky is not a harmless cosmetic mark; it can indicate that the material was exposed to air while hot and should be removed or evaluated before proceeding.
Make sure the back side can receive purge gas when the root is exposed. Seal an enclosure or use dams that allow argon to displace air without creating pressure that blows through the molten root. A small vent is often necessary so the purge flows through rather than ballooning the enclosure.
Step 4 Install and sharpen the tungsten
Use a clean tungsten electrode suitable for your machine and follow the electrode manufacturer’s guidance. A 2% lanthanated tungsten is a common general-purpose choice; the important points are that the electrode is uncontaminated, correctly sized for the current, and sharpened consistently.
Grind the tungsten lengthwise on a dedicated wheel rather than across the electrode. A longitudinal grind gives the arc a more predictable path. Keep the point intact and use the electrode size and tip geometry recommended for the current range and joint access.
Extend the tungsten only as far as the cup and joint require. Excessive stickout makes the arc less stable and places more demand on shielding. If the tungsten touches the workpiece or filler, stop, remove it, and regrind or replace it; do not continue with a contaminated electrode.
Step 5 Set DCEN and establish shielding gas
Set the TIG machine to direct current electrode negative, usually shown as DCEN or straight polarity. Titanium is not normally TIG-welded with the alternating-current cleaning action used for aluminum. Use high-purity argon and confirm that the regulator, hose, torch, cup, and fittings do not leak.
A useful way to approach how to weld titanium with tig is to check your progress after each stage.
A gas lens can produce smoother coverage around the electrode than a standard collet body. Begin with the flow recommended by the torch and cup manufacturer, then adjust only as needed for the cup size, joint access, and surrounding air movement. More flow is not automatically better: excessive flow can create turbulence that pulls air into the shielding envelope.
Arrange a trailing shield so argon continues covering the weld and heat-affected zone after the torch passes. For tubing, pipe, or a joint with an exposed root, purge the back side as well. The shield should cover the metal while it is visibly hot; moving it away as soon as the arc stops can still leave the cooling titanium contaminated.
Important
Titanium welding requires effective ventilation as well as shielding. Do not weld in an oxygen-deficient or poorly ventilated space, and never use argon in a confined area without a professionally designed atmosphere-monitoring and ventilation plan. Argon can displace breathable air without an obvious smell or warning.
Step 6 Set conservative heat input and test the setup
Choose a current appropriate for the material thickness, joint type, tungsten, and welding position rather than copying a single universal number. Use a foot pedal or hand control when possible so you can reduce heat at the end of the weld. Keep the arc short and stable, and use high-frequency start to avoid touching the tungsten to the work.
Before welding the real joint, make a test bead on a clean offcut of the same material and thickness. Check that the arc starts without a scratch, the gas begins before the arc, the pool responds smoothly, and the trailing shield continues to cover the cooling bead. If the test piece shows gray or purple contamination, correct the gas coverage and cleanliness before changing the amperage.
Watch the puddle rather than trying to force it to move with excessive current. A small, controlled pool is easier to protect. Excessive heat can enlarge the heat-affected zone, increase distortion, and keep the titanium reactive for longer.
Step 7 Start the weld and maintain a small protected puddle
Position the torch so the electrode is centered over the joint and the cup is close enough to provide coverage without touching the work. Start the shielding gas before the arc according to the machine’s preflow setting, initiate the arc without contact, and form a small puddle.
Move steadily, keeping the torch angle consistent and the arc length short. Add filler only at the front edge of the puddle, dipping it within the shielding envelope rather than waving it outside the gas. Keep the filler rod clean; if its tip touches the table, glove, or an unclean surface, set it aside and use a clean section or rod.
Do not whip, weave, or make a wide decorative bead to compensate for poor fit-up. A narrow bead with controlled travel usually reduces heat and makes shielding easier. If the pool becomes too large, pause the filler, increase travel slightly, or reduce current while preserving complete fusion.
Step 8 Finish the bead under continued shielding
As the joint ends, reduce current gradually if your machine allows it. This helps fill the crater and reduces the chance of a shrinkage crack or pinhole at the stop. Keep the torch and trailing shield in place during the post-flow period and until the weld is no longer visibly bright.
Do not fan the torch away or blow on the joint to cool it. Forced cooling can expose hot titanium to air and may increase contamination or distortion. A properly protected bead should cool under argon without being disturbed.
When the joint has cooled enough to handle safely, release the purge only after the root is no longer at risk. If the weld is part of a tube or enclosed assembly, confirm that trapped argon can escape before the part is moved or heated again.
Step 9 Inspect the completed weld before cleaning it further
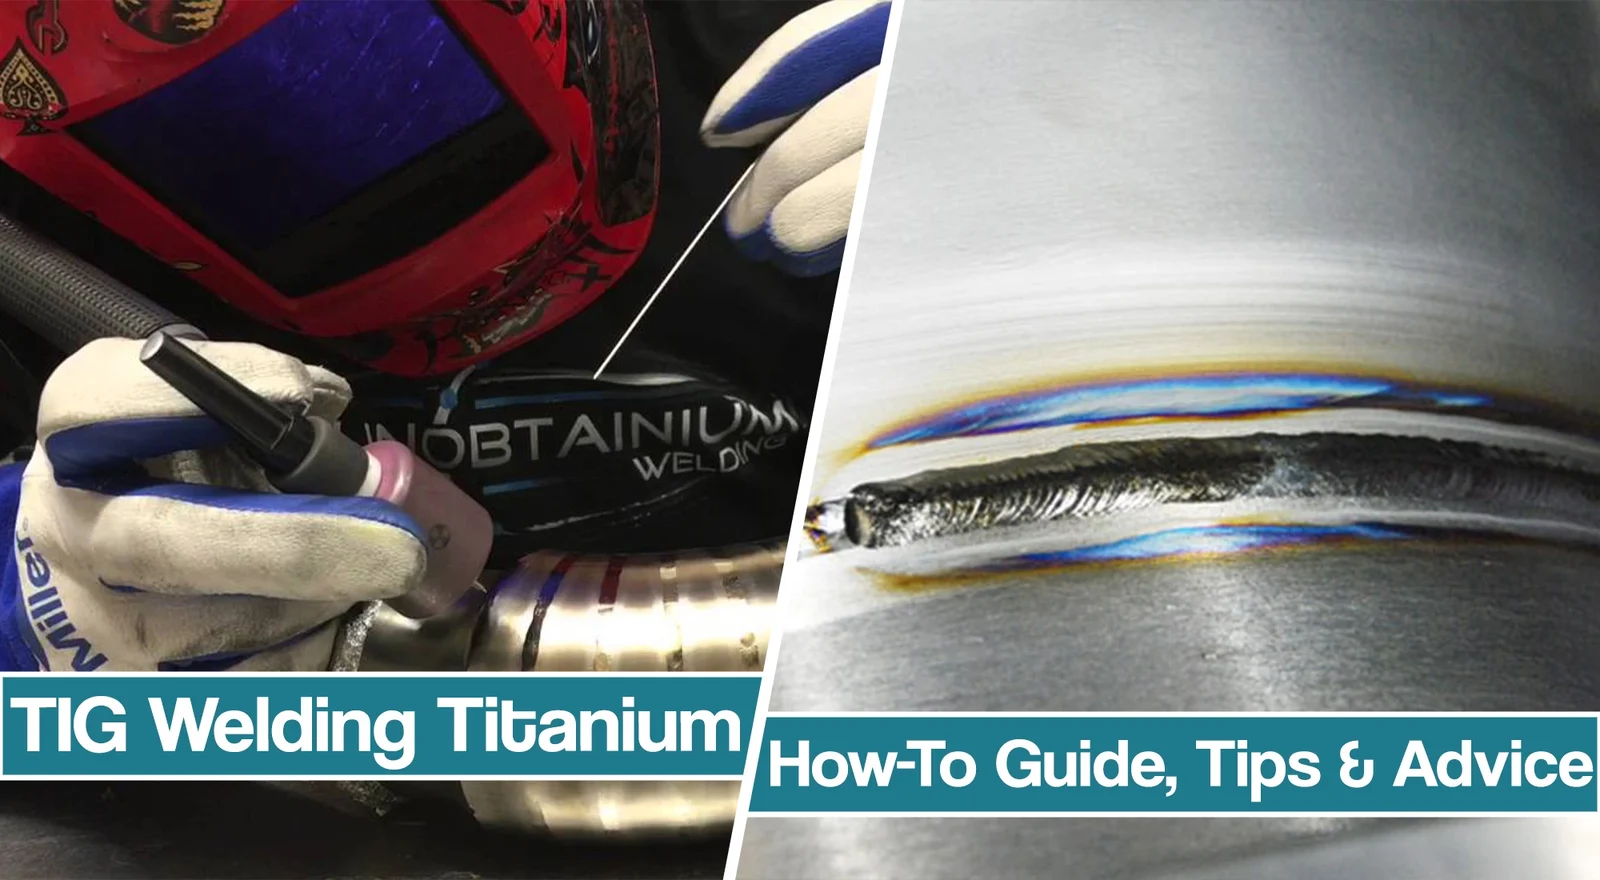
Look at the bead and the adjacent heat-affected zone under good lighting. Sound titanium weld metal commonly remains bright silver to light straw, although exact color can vary with shielding, surface condition, and lighting. Dark blue, purple, gray, powdery, or chalky areas are warning signs of excessive exposure to air while hot.
Check that the bead is continuous, fused at both edges, and free of visible pores, cracks, undercut, excessive convexity, and crater damage. Examine the back side when accessible. A root that is heavily oxidized may require removal even if the front bead looks smooth.
Do not scrub away discoloration and assume the weld is sound. Surface cleaning can improve appearance but cannot reliably restore ductility or remove contamination that entered the weld metal. When the application matters, use the inspection method and acceptance criteria specified for that component, such as dye penetrant inspection by a qualified person.
Understanding how to weld titanium with tig also means recognizing the limits of the method.
Check your result
A useful first check is consistent, metallic-looking color across the bead and nearby hot zone, with no powdery oxide, visible porosity, cracks, or un-fused edges. If the color changes abruptly, investigate gas coverage and contamination before trusting the joint.
Why titanium TIG welding needs stricter control
Titanium reacts readily with oxygen, nitrogen, and hydrogen at welding temperatures. The weld pool and nearby heat-affected zone can absorb these gases, changing the metal’s properties even when the surface appears smooth. This is why a clean torch cup alone is not enough: the cooling bead needs protection too.
Shielding covers more than the arc
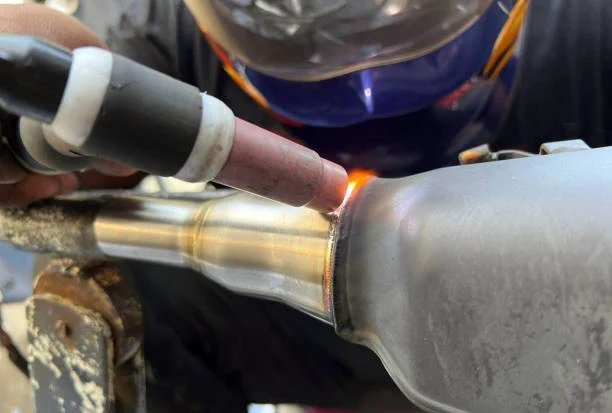
The primary torch shield protects the electrode and molten puddle. A trailing shield extends that protection behind the torch, while a back purge protects the root. The correct arrangement depends on the joint, but an exposed hot surface should not be left in ordinary air.
Drafts, fans, open doors, and leaks can disturb the argon envelope. Conversely, too much gas flow can cause turbulent mixing. The goal is calm, continuous coverage rather than the highest flow setting available.
Color is a useful clue, not a complete test
Color can help a beginner identify a shielding problem quickly. Bright silver or light straw is generally more encouraging than blue, purple, gray, or white contamination, but color alone does not prove strength, fusion, or freedom from internal defects.
Surface appearance also depends on viewing conditions and the exact alloy. Treat unexpected discoloration as a reason to stop and diagnose the process, not as an invitation to polish the bead and continue.
Filler metal must match the application
Use filler selected for the base alloy, service conditions, and required mechanical properties. A filler rod that merely melts and produces a pretty bead may be unsuitable for corrosion, temperature, fatigue, or strength requirements.
For a noncritical practice coupon, the material supplier may provide a compatible filler recommendation. For a production or safety-related joint, use a qualified welding procedure rather than making an informal substitution.
How to judge the result and document the process
Verification should combine appearance, process records, and—when the joint matters—appropriate nondestructive or destructive testing. A beginner can perform a useful visual screen, but visual inspection cannot establish the internal quality of a critical titanium weld.
Use a simple visual inspection checklist
- The bead is continuous and attached to both sides of the joint.
- The weld and nearby heat-affected zone do not show chalky, powdery, heavily gray, blue, or purple oxidation.
- There are no visible cracks, open craters, pinholes, or clusters of porosity.
- The bead width and profile are reasonably consistent rather than extremely wide or sunken.
- The back side, if accessible, is protected and free of severe oxidation or excessive melt-through.
- The tungsten and filler were kept free of contact contamination during the weld.
Record the alloy, thickness, joint type, tungsten size and type, polarity, shielding arrangement, filler designation, and useful machine settings. Notes about gas flow, trailing-shield position, and observed color make troubleshooting much easier than relying on memory.
Know when visual inspection is not enough
Use a qualified inspector or welding technician when the joint carries a load, contains pressure, affects safety, or must meet a code, customer specification, or aerospace, medical, chemical, or food-service requirement. Dye penetrant testing can reveal surface-breaking defects, but it does not replace procedure qualification or tests for internal flaws.
If a weld shows severe oxidation, cracks, repeated porosity, or questionable fusion, do not put it into service merely because it passes a casual appearance check. Remove and remake a practice weld, or obtain a formal evaluation for a component that cannot be replaced.
Troubleshoot the common failures
Most titanium TIG problems trace back to contamination, inadequate shielding, unstable fit-up, or excessive heat. Change one variable at a time when testing so the cause remains visible.
| What you see | Likely cause and response |
|---|---|
| Gray, purple, blue, or chalky weld | Insufficient or disturbed shielding, leaks, drafts, dirty surfaces, or inadequate trailing coverage. Stop, clean the setup, check hoses and fittings, and improve coverage before welding again. |
| Porosity or small pinholes | Moisture, oil, contaminated filler, poor purge, gas turbulence, or a leak. Replace suspect wipes or filler, dry the joint, inspect the gas path, and retest on scrap. |
| Crater crack at the stop | Current was stopped abruptly or the crater was left unfilled. Use a controlled downslope and add enough filler to finish the crater. |
| Wandering arc or tungsten contamination | Tungsten touched the pool, the point was damaged, or the electrode was contaminated. Stop and regrind or replace it; do not bury contamination in the weld. |
| Excessive melt-through or distortion | Too much heat, a large gap, slow travel, or inadequate fixturing. Improve fit-up, reduce heat input, and use controlled tacks and travel. |
Do not solve a shielding problem by simply increasing amperage or travel speed. A faster bead can still be contaminated, and excessive current can make the damage harder to detect.
Beginner questions about titanium TIG welding
Can I TIG weld titanium with a standard TIG machine?
Often, yes, if the machine provides stable DCEN output, high-frequency start, suitable current control, and compatible torch and gas equipment. The machine is only one part of the setup; reliable shielding, clean preparation, and correct filler are essential.
Do I need a back purge for every titanium weld?
You need protection anywhere hot titanium is exposed to air. A back purge is normally needed for an open root, tubing, pipe, or any joint where the reverse side becomes hot. A solid accessible surface may not need a back purge, but it can still require a trailing shield over the front.
Can I use the same stainless-steel brush for titanium?
Use a brush dedicated to titanium, even if it is made from stainless steel. A shared brush can carry iron, abrasive grit, oil, or other contamination to the joint. Mark and store the brush so it is not used for unrelated shop work.
What tungsten polarity should I use?
Use direct current electrode negative, commonly called DCEN or straight polarity, for conventional titanium TIG welding. Alternating current is generally associated with the oxide-cleaning action needed for aluminum, not with normal titanium TIG work.
Is a purple titanium weld always unusable?
A purple, blue, gray, or chalky appearance is a warning that shielding may have been inadequate, but color by itself does not provide a complete acceptance decision. For a noncritical coupon, correct the process and remake it; for an important part, follow its specified inspection and acceptance requirements.
Finish with a controlled, inspectable titanium weld
Learning how to weld titanium with TIG is mainly an exercise in contamination control. Clean metal, compatible filler, DCEN polarity, calm high-purity argon, back purging when needed, and a trailing shield give the weld the protection it needs while hot.
Begin with a simple coupon, verify the material and fit-up, and inspect the color and profile before attempting a valuable component. If the weld turns gray, chalky, heavily blue or purple, or otherwise questionable, stop and correct the process rather than polishing the evidence away. For any joint where failure matters, have the procedure and finished weld evaluated against the applicable requirements by a qualified professional.