How to Set Up a TIG Welder for Mild Steel: A Safer Setup Guide
Setting up a TIG welder for mild steel is less about turning one dial and more about creating a stable, clean arc. The wrong polarity, a contaminated tungsten, poor gas coverage, or an unsuitable amperage can make a simple joint look rough even when your torch technique is sound. Fortunately, the setup is repeatable once you understand what each control does.
For most mild-steel work, the dependable starting point is direct current electrode negative (DCEN), pure argon, a sharpened tungsten electrode, and amperage matched to the thickness of the clean material. A short arc and steady shielding-gas coverage should produce a quiet arc and a controlled puddle rather than smoke, popping, or excessive spatter.
This guide explains how to set up a TIG welder for mild steel from the power source and gas cylinder through the first test bead. You will learn how to select the torch parts, connect the machine safely, choose initial settings, prepare the joint, and verify the result before moving to an actual project.
At a glance
- Use DCEN and pure argon for ordinary mild-steel TIG welding.
- Clean both the steel and tungsten before judging your settings.
- Confirm gas coverage and weld appearance on scrap before welding the project.
How to set up a tig welder for mild steel
The method below assumes a conventional GTAW, or gas tungsten arc welding, machine capable of DC output. It applies to common mild-steel sheet, tubing, and plate, but the exact amperage and torch size still depend on material thickness, joint design, fit-up, and the welder’s duty cycle.
Tools you will need
- DC-capable TIG welder with torch, work lead, and foot pedal or amperage control
- Pure argon cylinder with a compatible regulator or flowmeter
- Appropriate tungsten electrode, usually 2 percent lanthanated for general-purpose work
- Ceramic gas cup, collet, collet body, and back cap sized for the tungsten
- Angle grinder or stainless-steel wire brush reserved for welding preparation
- Mild-steel filler rod, commonly ER70S-2 or ER70S-6 when filler is needed
- Welding helmet, TIG gloves, flame-resistant clothing, safety glasses, and hearing protection
- Optional: tungsten grinder or dedicated abrasive wheel for a clean lengthwise point
Step 1 Inspect the welder, torch, and work area
Place the welder on a stable, dry surface with enough ventilation around its cooling openings. Inspect the torch cable, work lead, gas hose, electrode holder or remote control, and power cord for cuts, crushed sections, loose fittings, or heat damage.
Remove flammable liquids, paper, wood scraps, and other combustible material from the immediate work area. TIG welding produces ultraviolet radiation, hot metal, and sparks even though it generally creates less spatter than other arc processes. Position a suitable fire extinguisher nearby, and make sure anyone in the area has appropriate eye and skin protection.
Do not weld on a sealed container, a tank that may have held fuel or chemicals, or metal with an unknown coating. Stop and get qualified help if the work involves a pressure vessel, structural repair, energized equipment, or a coating that could release hazardous fumes when heated.
Step 2 Secure the argon cylinder and connect the gas supply
Stand the cylinder upright and secure it to a cart or fixed support with a chain or strap. Remove the protective cap only when the cylinder is secured, then briefly crack the valve open while facing the outlet away from yourself to clear loose dust from the connection. Do this only according to the cylinder supplier’s instructions.
Install the regulator or flowmeter designed for argon. Connect the gas hose from the regulator to the welder’s gas inlet, and tighten fittings appropriately without forcing them. Open the cylinder valve slowly and check every connection for leaks using an approved leak-check solution; bubbles indicate a leak that must be corrected before welding.
Set the initial argon flow around 15 to 20 cubic feet per hour for a typical indoor weld with a standard cup. This is a starting range, not a universal rule. Excessive flow can draw room air into the shielding envelope, while too little flow may leave the hot tungsten and puddle exposed.
Important
Keep the cylinder upright and away from heat, impact, and electrical contact. Never use oil or grease on oxygen-service or inert-gas fittings, and never use compressed air or an unknown gas in place of welding-grade argon.
Step 3 Install the correct torch parts and tungsten
Choose a torch size that can handle the planned amperage without overheating. Fit the collet, collet body, ceramic cup, and back cap so they match the tungsten diameter. A 3/32-inch tungsten is a practical general-purpose starting point for many mild-steel jobs; thinner sheet may benefit from a smaller electrode, while heavier work may require a larger one.
For a modern inverter, use a 2 percent lanthanated tungsten or another electrode recommended by the machine manufacturer. Pure tungsten is mainly associated with older AC applications and is not the default choice for DC mild steel. Avoid mixing unidentified electrodes when you are trying to diagnose arc behavior.
Grind the tungsten to a clean, tapered point with the grinding marks running lengthwise along the electrode. A taper roughly two to three times the electrode diameter is a useful starting shape, although the ideal point varies with amperage and joint access. Extend the tungsten only as far as needed for visibility, commonly about one electrode diameter beyond the cup.
Keep the tungsten clean. If it touches the puddle or filler rod, stop, allow it to cool if necessary, remove it, and regrind the contaminated section. A dirty or balled point can make the arc wander and can transfer unwanted material into the weld.
Step 4 Connect DCEN polarity and the work lead
For ordinary TIG welding of mild steel, connect the torch to the negative terminal and the work lead to the positive terminal. This is called DCEN, or direct current electrode negative. It concentrates most of the arc’s heat in the workpiece while keeping the tungsten comparatively cooler and stable.
Connect the work clamp directly to clean metal on the workpiece or to a clean welding table with a reliable electrical path. Do not depend on a painted, rusty, oily, or loosely clamped surface. Keep the lead routed so it will not snag your arm or become hot against sharp edges.
Some welders use a torch connection that includes gas and water-cooling fittings, while others use a separate gas connection at the machine. Follow the labels on the machine and the torch rather than assuming every connector has the same arrangement. If the terminals or controls are unclear, consult the owner’s manual before applying power.
Step 5 Choose the initial TIG controls
Select the TIG process and DC output. Turn off AC, high-frequency settings intended only for specialized applications if the machine requires that choice, and pulse unless you have a reason to use them. High-frequency start is convenient because it starts the arc without touching the tungsten to the steel, but lift-arc TIG can also work when used as designed.
Set the machine to a two-step trigger mode for a simple torch switch, or use four-step mode only when you understand how its latching sequence works. Set pre-flow and post-flow according to the machine’s range and torch arrangement. A short pre-flow helps fill the cup with argon before the arc starts; post-flow protects the cooling tungsten and weld crater after the arc stops.
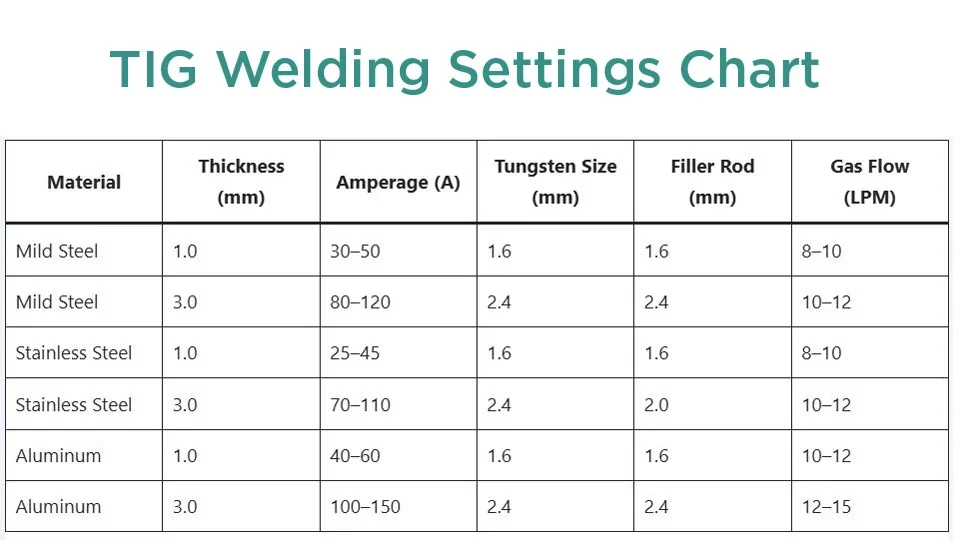
Choose a starting amperage based on the material and joint. A useful rough range for mild steel is about 1 amp per 0.001 inch of thickness, but that rule is only a starting estimate. Joint fit-up, edge condition, travel speed, torch angle, and whether you use filler all change the heat required.
For example, thin sheet may need a low amperage with careful pedal control, while thicker material may need substantially more heat and preheating approved by the project requirements. Begin at the lower end when practicing, then increase gradually if the puddle will not form or penetration is inadequate.
Step 6 Prepare the steel and filler rod
Remove mill scale, rust, paint, oil, and moisture from both sides of the joint area when practical. Use a dedicated stainless-steel brush or abrasive tool that has not been used on greasy or dissimilar materials. Wipe the prepared surface with a suitable solvent and allow it to evaporate fully before striking an arc.
A useful way to approach how to set up a tig welder for mild steel is to check your progress after each stage.
Fit the pieces tightly and consistently. TIG welding exposes gaps and poor alignment because the process deposits relatively little metal compared with wire-fed processes. Tack the joint at several points if needed, using enough tacks to prevent movement without creating large lumps that interfere with torch travel.
Clean the filler rod as well, and keep unused rod covered. ER70S-2 is a common TIG filler for clean mild steel, while ER70S-6 can be useful where the steel has slightly more surface deoxidation demand. Match the filler to the base metal and the job requirements rather than treating one rod as suitable for every application.
Step 7 Set up your position and start a test bead
Sit or stand so your torch hand can travel smoothly and your other hand can feed filler without crossing the arc. Rest part of your torch hand on a stable surface when possible. Keep the torch lead relaxed, and arrange the work so you can see the joint without leaning into the arc.
Put on the helmet with a suitable dark shade, gloves, flame-resistant clothing, and safety glasses. Position the torch over clean scrap mild steel, open the argon, and briefly activate gas flow without striking an arc. Confirm that gas comes from the cup and that the flowmeter remains steady.
Hold the torch about 70 to 80 degrees from the work surface, with the ceramic cup close enough to shield the puddle but not so close that it contacts the metal. Establish a short arc, generally close to the diameter of the tungsten, and move smoothly. Add filler at the leading edge of the puddle if the test calls for a filler weld.
Listen and look. A stable TIG arc has a controlled, concentrated sound; the puddle should wet into the steel without excessive smoke, violent turbulence, or a long gray area around the weld. Keep the torch moving if the puddle grows too wide or the edges begin to melt away.
Step 8 Tune the settings from the test result
Stop the arc using the normal downslope or torch-control sequence, and keep the torch over the end of the weld during post-flow. Let the metal cool enough to handle safely before inspecting it. The end of the bead should not show a bright, unprotected tungsten tip or a crater that suddenly tears open.
If the arc is unstable, check the basics before changing several controls at once: polarity, ground connection, tungsten shape, gas supply, cup condition, and cleanliness. If the puddle is too large, reduce amperage or increase travel speed. If the puddle will not form, increase amperage gradually or slow down while maintaining the short arc.
Once a short test bead looks consistent, repeat it on scrap of the same thickness and in the same joint position as the project. A setup that works on flat heavy plate may not work unchanged on thin tubing or an out-of-position joint.
Why these TIG settings work on mild steel
Mild steel is a relatively forgiving TIG material, but it still depends on heat control and shielding. Unlike aluminum, it normally does not require AC cleaning action; DCEN provides the concentrated heating pattern commonly used for steel. That is why how to set up a tig welder for mild steel usually starts with polarity rather than pulse or frequency adjustments.
Polarity, amperage, and arc length
DCEN places the electrode on the negative side of the circuit and the workpiece on the positive side. This supports a narrow, controllable arc and helps preserve a pointed tungsten. Excessive amperage can undercut edges, enlarge the heat-affected zone, and distort thin material; too little amperage can produce a cold-looking bead with poor fusion.
Arc length matters just as much as the amperage display. A long arc spreads heat, weakens shielding, and can make the bead wide and gray. A short arc improves control, but touching the tungsten to the puddle contaminates it and usually requires stopping to regrind.
Shielding gas and cup coverage
Pure argon is the normal shielding gas for DC TIG welding of mild steel. The gas displaces oxygen and nitrogen around the arc and hot weld metal. You should not substitute an argon-carbon-dioxide or argon-oxygen mixture used for some wire processes; those active gases are not intended for the TIG torch in this application.
A larger cup can provide better coverage when access allows, but it may require a different gas flow and can obstruct your view. Gas lenses, which use a screen to make the flow more uniform, are optional and can help with longer electrode extension or difficult access. They do not compensate for drafts, leaks, or an excessively long arc.
When filler metal is and is not needed
Autogenous TIG welding uses no added filler and can work for closely fitted thin sheet when the edges provide enough material. Adding filler is often preferable for a joint that needs reinforcement, has a small gap, or would otherwise become too thin after melting.
Feed the rod into the front edge of the puddle rather than waving it through the arc. Keep the rod within the argon shield as it heats. Pulling it out repeatedly and allowing the red-hot end to oxidize can introduce contamination even if the base metal was prepared correctly.
How to check the first weld
Before welding the actual part, inspect a cooled test bead under good light. The goal is not simply a shiny surface; look for evidence that the weld fused to both sides of the joint without excessive oxidation or overheating. A small, even bead with smooth transitions is a better starting result than a wide bead made by lingering on the metal.
- Arc behavior: The arc starts cleanly, remains centered, and does not wander unexpectedly.
- Shielding: The bead is generally metallic gray to bright for the material and is not covered with heavy black soot or a chalky, sugared surface.
- Fusion: The bead edges blend into both pieces instead of sitting like a rope on top.
- Heat control: The steel is not excessively warped, melted through, or deeply undercut at the edges.
- Crater: The weld end is filled or tapered smoothly rather than ending in a sharp depression or crack.
- Tungsten: The electrode remains pointed and uncontaminated after the pass.
Check your result
A practical verification is to make a second test bead after correcting one variable. If the bead improves when you adjust only gas coverage, travel speed, or amperage, you have a clearer baseline for the project than you would get by changing several controls at once.
Common problems and practical corrections
Most poor first beads come from a small group of setup or technique errors. Use the symptom to narrow the search, and change one factor at a time so you know which correction helped.
| What you see | Likely causes and corrections |
|---|---|
| Black, gray, or heavily oxidized bead | Insufficient shielding, a gas leak, a draft, dirty steel, contaminated filler, or an arc held too far from the work. Check flow, hoses, cup, cleanliness, and arc length. |
| Tungsten becomes dirty or rounded | The electrode touched the puddle, filler, or workpiece, or the polarity is wrong. Stop, regrind lengthwise, and confirm DCEN. |
| Arc wanders | Uneven tungsten grind, magnetic interference, a loose ground, contaminated material, or an unstable gas stream. Regrind the tungsten and inspect the electrical and gas connections. |
| Burn-through or excessive distortion | Too much amperage, slow travel, a large gap, or insufficient fit-up. Reduce heat, move faster, improve joint fit, or use pulse only after the basic setup is stable. |
| Bead sits on top without blending | Too little heat, too much travel speed, a long arc, or an improperly prepared joint. Increase heat carefully and maintain a short arc over clean edges. |
| Gas continues or stops unexpectedly | Incorrect trigger mode, damaged torch switch, wrong post-flow setting, or a machine-specific control issue. Consult the welder manual before opening the machine. |
Drafts are especially easy to overlook. A fan, open garage door, or compressed-air hose can disturb the argon even when the flowmeter shows the expected reading. Shield the work area without enclosing the welder or cylinder in an unsafe way, and never use a makeshift cover that can catch fire.
Beginner FAQs about TIG welding mild steel
Can I TIG weld mild steel with an AC-only machine?
Not for ordinary TIG work if the machine cannot provide a suitable DCEN output. AC is mainly selected for materials such as aluminum and magnesium, while mild steel normally needs direct current. Check the machine specifications rather than relying on the appearance of its front-panel controls.
What gas should I use for TIG welding mild steel?
Use pure argon from a welding-gas supplier. The regulator or flowmeter must be compatible with the cylinder and the machine’s gas connection. Mixed gases intended for MIG or flux-cored welding are not a general substitute for argon in TIG.
What tungsten size is best for a beginner?
A 3/32-inch, 2 percent lanthanated tungsten is a useful general starting point for many mild-steel applications. Use the manufacturer’s recommendations and select a smaller or larger diameter when the amperage and access require it. The electrode must be sharpened cleanly and matched to the collet.
Do I need filler rod for every mild-steel TIG weld?
No. Closely fitted thin edges can sometimes be fused without filler, but filler rod is useful when the joint needs reinforcement, has a gap, or requires added metal. A compatible ER70S-2 or ER70S-6 rod is common, subject to the project specification.
Why does my TIG weld look dirty even though the steel is clean?
Check gas coverage first, including leaks, drafts, cup position, flow rate, and post-flow. Then check for oil or moisture, a contaminated filler rod, an excessive arc length, or a tungsten that has touched the puddle. Cleanliness alone cannot correct a disrupted shielding envelope.
Confirm the setup before welding the project
Learning how to set up a tig welder for mild steel becomes straightforward when the sequence stays consistent: secure the argon, install a clean tungsten, connect DCEN, prepare the steel, choose a conservative amperage, and prove the settings on matching scrap. The test bead is part of the setup, not an optional extra.
Before moving to the finished part, confirm that the arc is stable, the bead has adequate fusion, the steel is not overheating, and the tungsten remains protected. If the material, coating, joint, or equipment falls outside this basic procedure, stop and use the applicable manufacturer or project requirements rather than guessing.