How to Choose TIG Filler Rod: Practical Steps and Helpful Tips
Choosing the right TIG filler rod can feel harder than striking the arc. A welding rod may look suitable because its color and diameter seem right, yet the alloy can still be incompatible with the base metal or produce a weld that is brittle, discolored, or difficult to control. The good news is that the decision becomes much simpler when you follow a repeatable order instead of guessing from appearance.
In most cases, you choose filler metal by identifying the base metal first, matching the filler classification to that alloy, and then selecting a diameter suited to the joint and heat input. Cleanliness, service conditions, and the way the finished weld will be used can change the best choice, especially with stainless steel, aluminum, and dissimilar metals.
This guide explains how to choose tig filler rod for common steel, stainless steel, and aluminum work. You will learn how to read filler labels, select a practical diameter, account for joint fit and welding position, test the choice on scrap, and recognize when a weld should be stopped and reviewed rather than repaired by trial and error.
At a glance
- Match the filler alloy to the base metal and the job’s service requirements.
- Choose rod diameter from joint size and heat control, not from the tungsten size alone.
- Confirm the choice with a clean practice weld before committing to the finished part.
How to choose tig filler rod for the base metal and joint
The safest beginner method is to work from the material outward: identify the base metal, confirm its specification when possible, select a compatible filler classification, and then adjust rod diameter for the joint. This order prevents a common mistake—choosing a familiar rod first and trying to make it fit an unknown alloy.
Tools you will need
- Base-metal identification or material documentation, so the filler alloy can be matched accurately
- Filler rods with legible classification markings or a labeled package
- Wire brush, solvent, and clean lint-free cloth for removing contamination
- Calipers or a rod-diameter reference, useful for confirming small filler sizes
- Optional: clean scrap of the same alloy for a test weld
Step 1 Identify the base metal and its condition
Start with the part itself, not the rod. Determine whether you are welding mild or carbon steel, stainless steel, aluminum, copper alloy, nickel alloy, or another material. A material certificate, part drawing, manufacturer marking, or purchase record is more reliable than color or a magnet test alone.
Also note whether the base metal is coated, plated, galvanized, anodized, painted, oily, or heavily oxidized. TIG welding requires a clean surface, and coatings can release hazardous fumes or contaminate the tungsten. Remove coatings only with a suitable method, provide ventilation, and follow the coating manufacturer’s or workplace safety guidance.
If you cannot identify the alloy with reasonable confidence, stop before welding a critical component. A qualified welding technician or materials specialist may need to identify it using documentation or testing. A filler rod that works on one type of steel is not automatically correct for every steel that looks similar.
Step 2 Read the filler classification instead of relying on color
TIG filler rods are commonly labeled with an AWS classification. The label communicates the filler’s chemistry and intended use; it is more useful than the rod’s surface color, which can vary among manufacturers and may be confused with color coding used for tungsten electrodes.
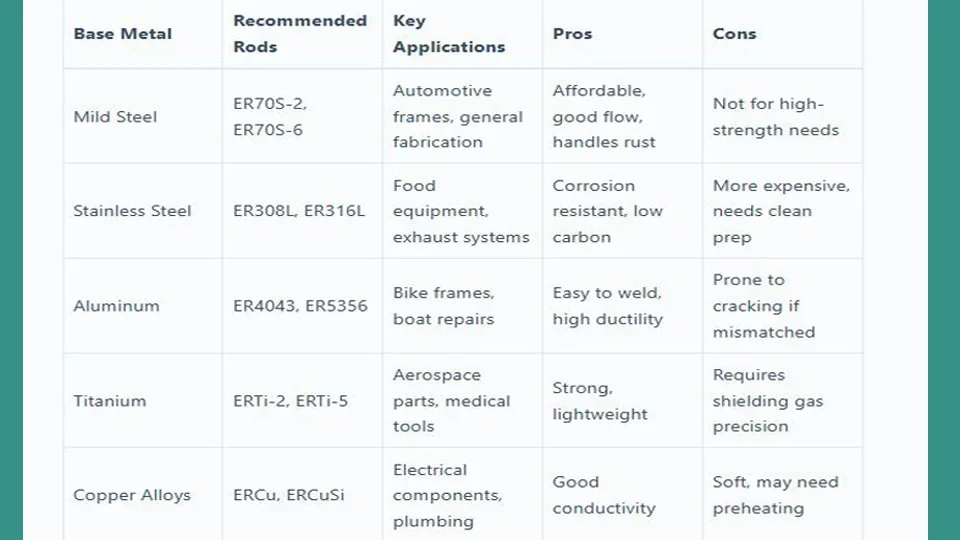
For common carbon steel, ER70S-2 is a widely used TIG filler because its deoxidizers help it tolerate small amounts of residual contamination. ER70S-6 is another carbon-steel option, although the best choice depends on the base-metal specification and the finished weld’s requirements. “ER” indicates that the product can be supplied as electrode or rod, while the remaining classification describes its strength and composition.
For austenitic stainless steel, ER308L is commonly used with 304 stainless, and ER316L is commonly used with 316 stainless. The “L” indicates lower carbon content, which helps reduce the risk of sensitization during welding when the application and welding procedure call for low-carbon filler. Do not assume either stainless filler is suitable for every stainless grade.
For aluminum, ER4043 is a common choice for many aluminum alloys and often produces a fluid puddle with good crack resistance. ER5356 provides higher strength in some applications and is often selected for compatible 5xxx and certain 6xxx-series aluminum alloys. The correct aluminum filler depends strongly on the base alloy, required strength, anodizing plans, corrosion exposure, and service temperature.
Step 3 Match the filler to the base alloy and service conditions
Use the filler manufacturer’s compatibility chart, the base-metal specification, or an approved welding procedure when the work is structural, pressure-containing, safety-related, or subject to a code. The filler must do more than make a visually attractive bead: it must provide suitable strength, ductility, corrosion behavior, and resistance to cracking.
Consider what the joint will experience after welding. Heat, vibration, impact, chemicals, saltwater, repeated loading, and elevated temperature can all affect filler selection. For example, a filler that is acceptable for a noncritical aluminum bracket may not be appropriate for a highly loaded or marine component.
When joining dissimilar metals, do not choose a filler by averaging the two base metals. Dissimilar-metal welding can involve galvanic corrosion, brittle intermetallic compounds, different melting behavior, and unusual dilution. Use a qualified procedure or ask a welding professional before attempting a critical joint.
Important
Do not use an unidentified rod on a load-bearing, pressure-containing, safety-critical, or code-regulated part. If the alloy or service requirement is uncertain, pause and verify the material and procedure first.
Step 4 Choose a rod diameter that suits the joint
Select diameter based on the joint gap, material thickness, welding position, and the amount of heat you can control. A smaller rod melts with less heat and is easier to meter into a small puddle. A larger rod can fill a wider joint more quickly, but it requires enough heat to melt without chilling or disturbing the puddle.
For thin sheet and small fillet welds, a small-diameter rod is usually easier to control. Medium diameters suit many general-purpose joints, while larger rods are useful for thicker material, wider gaps, or higher deposition needs. There is no universal diameter that follows automatically from a particular tungsten size or amperage setting.
A useful visual check is the relationship between rod and puddle. The rod should melt smoothly when its tip enters the leading edge of the molten pool. If it repeatedly forms a cold lump, the rod may be too large, the puddle may be too small, or the arc may be too far from the joint.
If the rod disappears instantly and causes a large blob, it may be too small or being fed too aggressively. A useful way to approach how to choose tig filler rod is to check your progress after each stage.
Step 5 Account for joint fit and welding position
Inspect the joint before setting up the torch. A tight, even fit-up needs less filler than a joint with a wide or inconsistent gap. Excessive gaps may require a larger rod or multiple passes, but adding filler to bridge poor fit-up can leave lack of fusion, trapped contamination, or an oversized weld.
Welding position also matters. In a flat position, gravity helps keep the puddle manageable. Vertical or overhead work generally benefits from a smaller, easier-to-control puddle and careful filler additions.
If the joint requires a large amount of filler to close an uneven gap, correct the fit-up when possible rather than relying on rod to compensate.
Step 6 Prepare and store the rod correctly
Keep filler rods clean, dry, and separated by alloy. Store them in labeled containers or their original packaging, and avoid placing stainless, aluminum, and steel rods together where one can be mistaken for another. Barely visible fingerprints, grinding dust, oil, and shop dirt can introduce contamination into the weld.
Before welding, wipe the rod with a clean lint-free cloth and a suitable solvent if it has been handled or exposed to shop contamination. Allow solvent to evaporate fully before bringing the rod near the arc. Do not use a dirty steel brush on aluminum or stainless steel; use a brush reserved for that alloy.
Aluminum oxide is especially important. It melts at a much higher temperature than the aluminum beneath it, so clean the aluminum with a dedicated stainless-steel brush and remove oils before welding. Cleaning does not replace correct AC settings, shielding, and torch technique, but it gives the filler a cleaner puddle to enter.
Step 7 Set up a test weld on matching scrap
Cut or locate scrap that matches the base alloy and is reasonably close in thickness to the finished work. Set the torch, tungsten, shielding gas, polarity, and current for that material before testing the rod. Filler selection cannot compensate for an unsuitable TIG setup or poor shielding.
Make a short bead or a small sample joint using the selected diameter. Feed the rod at the front edge of the puddle rather than stabbing it into the arc. Keep the rod within the shielding envelope; pulling it completely out and reintroducing it can expose the hot end to air and carry contamination back into the weld.
The test is encouraging when the rod wets into the puddle smoothly, the arc remains stable, and the bead has consistent width and tie-in. A clean surface with no obvious pinholes, soot, floating particles, or excessive discoloration is another positive sign, although appearance alone cannot prove weld quality.
Step 8 Compare the test result with the job requirements
After the sample cools, inspect the bead and the surrounding base metal. Look for cracks, craters, undercut, lack of fusion at the edges, excessive convexity, and visible porosity. If the joint can be sectioned safely, a cut-and-etch examination or other inspection method gives more information than a surface glance.
Check whether the rod deposited enough metal without forcing you to overheat the base material. If the puddle is difficult to control, first confirm cleanliness, fit-up, shielding, amperage, and torch angle. Change filler diameter only after ruling out those basic causes.
When the test meets the visual and procedural requirements, mark the filler package or record the classification and diameter with the job information. That simple note prevents a later mix-up when several rods are present in the shop.
How common TIG filler rods differ
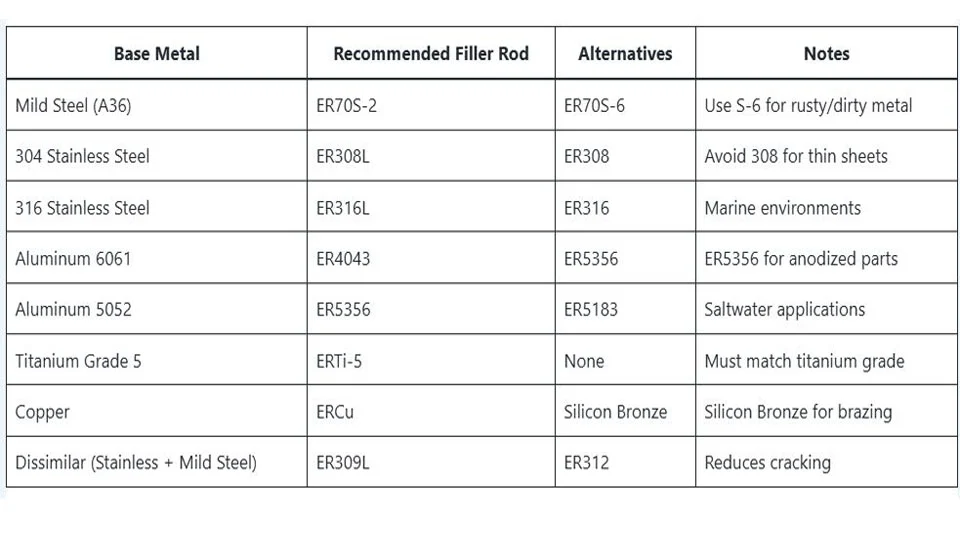
The most useful way to compare filler rods is by alloy family and application, not by brand or appearance. The examples below are common starting points, not substitutes for a welding procedure or the base-metal manufacturer’s recommendations.
| Base metal or situation | Common starting filler |
|---|---|
| Carbon or mild steel | ER70S-2 for clean, general-purpose TIG work; other classifications may be required by the specification |
| 304 stainless steel | ER308L in many routine applications |
| 316 stainless steel | ER316L in many routine applications |
| Many aluminum applications | ER4043 or ER5356, selected according to alloy and service requirements |
Carbon steel filler
ER70S-2 is often chosen for TIG welding mild steel because it contains deoxidizing additions that can help produce sound welds on properly prepared material. It is not a license to weld through rust, oil, mill scale, or coatings. Surface preparation and shielding still control much of the result.
ER70S-6 may be appropriate in some carbon-steel applications and can provide useful wetting characteristics. Match the filler to the base-metal grade and required mechanical properties rather than treating ER70S-2 and ER70S-6 as interchangeable in every job. Understanding how to choose tig filler rod also means recognizing the limits of the method.
Stainless steel filler
Stainless filler selection is affected by corrosion resistance, heat exposure, carbon content, and the specific stainless grade. Keep stainless filler and tools free from carbon-steel contamination, since embedded iron particles can later rust on the surface and create a misleading impression of poor stainless performance.
Control heat input and shielding carefully. A dark, heavily oxidized stainless weld often indicates inadequate gas coverage, excessive heat, poor cleaning, or an overly long arc. Changing rod classification will not correct those setup problems by itself.
Aluminum filler
Aluminum alloys vary considerably, so the alloy number matters. ER4043 is often easier to flow and is commonly selected for compatible 6xxx-series work, while ER5356 may be preferred where higher strength or different color response is important. However, ER5356 is not appropriate for every service condition, including some elevated-temperature applications.
Aluminum filler should be kept especially clean and protected from moisture and shop debris. A contaminated rod can create porosity even when the base metal appears bright. If the weld will be anodized, appearance and color matching may affect the choice between otherwise compatible fillers.
How to verify the filler choice before finishing the part
A filler choice is credible when three things agree: the rod classification matches the base metal, the diameter works with the joint, and a representative test weld behaves properly. Visual appearance supports that conclusion, but it does not replace required inspection or documentation.
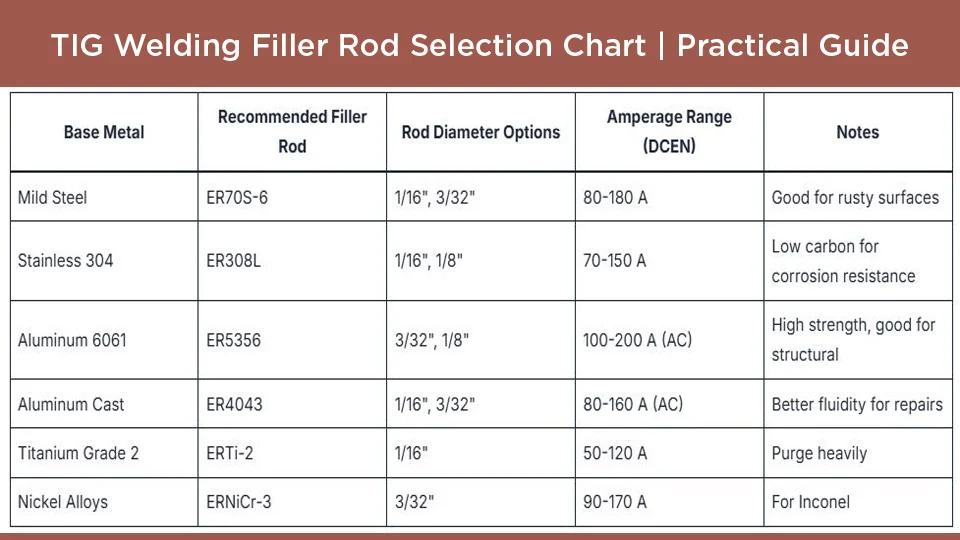
Use the package and procedure as the authority
Read the complete label, including the alloy classification, diameter, lot information when supplied, and storage instructions. If a drawing, welding procedure specification, repair manual, or code requirement names a filler, follow that requirement rather than substituting a familiar rod.
For noncritical personal projects, a matching scrap test may be sufficient for practical confidence. For regulated or safety-sensitive work, use the specified procedure and inspection method. A good-looking bead can still contain internal defects or have unsuitable mechanical properties.
Inspect the finished test bead
Use strong lighting to examine the bead after it cools. The surface should be reasonably uniform, with smooth transitions into both sides of the joint. Watch for pinholes, cracks, a crater at the stop, undercut along the toes, and areas where the filler sits on top without fusing.
Color is only supporting evidence. Stainless steel may show heat tint even when the weld is sound, while a bright-looking weld can still have lack of fusion or porosity. If the result matters, use an appropriate inspection method rather than relying on color alone.
Troubleshoot the result before changing filler
Many TIG problems blamed on the rod actually come from contamination, shielding, fit-up, or heat control. Use the symptoms below to narrow the cause instead of switching alloys repeatedly.
| Symptom | What to check first |
|---|---|
| Porosity or pinholes | Gas flow and leaks, drafts, dirty material, contaminated rod, moisture, and torch distance |
| Rod balls up without wetting | Insufficient puddle heat, rod too large, oxide or oil contamination, or incorrect filler for the base alloy |
| Cracking after cooling | Filler compatibility, excessive restraint, poor joint design, contamination, and the base-metal specification |
| Dark or sooty stainless weld | Inadequate shielding, excessive arc length, dirty material, or trailing-shield problems |
| Weld looks tall and narrow | Insufficient heat, fast travel, poor arc placement, or too much filler for the puddle size |
When the rod does not melt naturally
Do not force a large rod into a small puddle. Reduce the diameter or increase heat only within the limits appropriate for the base metal and joint. The correct adjustment should let the filler melt at the puddle edge without extinguishing the arc or creating a large, uncontrolled blob.
When the weld is contaminated
Stop and clean rather than burying contamination under another pass. Remove the affected section as appropriate, refresh the tungsten if it touched the puddle, clean the base metal and rod, and verify shielding before testing again.
When the result remains uncertain
Stop work on any joint whose failure could injure someone, release pressure, damage equipment, or violate a required code. Obtain the material specification and qualified guidance before proceeding. Guessing with progressively different filler rods is not a reliable qualification method.
Beginner questions about TIG filler rod selection
These questions address common choices that still require a little judgment. The base-metal specification remains the final authority when one is available.
Can I use MIG wire as TIG filler rod?
Sometimes the alloy classification may be compatible, but loose MIG wire is not automatically a suitable substitute. It may have a different diameter, surface condition, or intended classification, and cutting it into convenient lengths can leave sharp or contaminated ends. Use clean filler identified for the alloy and process whenever possible.
Does filler rod diameter need to match tungsten diameter?
No. Tungsten diameter relates mainly to arc control and current capacity, while filler diameter relates to the joint, puddle size, and deposition rate. A small tungsten can be used with a larger rod in some situations, and the reverse can also be true, provided the setup remains controllable.
Which TIG rod is best for stainless steel?
There is no single stainless filler for every grade. ER308L is commonly used with 304 stainless, and ER316L is commonly used with 316 stainless, but ferritic, martensitic, duplex, and heat-resistant grades may require different fillers and procedures.
Should I choose ER4043 or ER5356 for aluminum?
Choose based on the aluminum base alloy and the required strength, corrosion behavior, temperature exposure, and appearance. ER4043 is common for many compatible applications, while ER5356 suits other compatible alloys and requirements. Check the alloy manufacturer’s filler chart before making a critical joint.
Can I weld without filler rod?
Autogenous TIG welding can work on some tight-fit joints, especially thin material, but it reduces the amount of added metal and may change joint strength, cracking behavior, and profile. Do not omit filler simply because the joint looks close; confirm that the design and procedure allow it.
Choose tig filler rod by evidence, then confirm it with a test
The dependable way to choose tig filler rod is to identify the base alloy, read the filler classification, consider service conditions, select a diameter that matches the joint, and test the combination on representative clean scrap. ER70S-2, ER308L, ER316L, ER4043, and ER5356 are useful starting points for common materials, but none is universally correct.
Keep the rod clean, control shielding and heat, and treat porosity, cracking, or uncertain material identity as reasons to stop and investigate. Once the test weld meets the visual and procedural requirements, record the filler classification and diameter so the finished job can be completed consistently. For a reliable result, approach how to choose tig filler rod as a sequence of manageable actions and checks.