How to Choose a MIG Welder: Instructions, Tips, and Useful Advice
Choose a MIG welder by matching its output, duty cycle, wire capacity, power supply, and controls to your metal thickness and available workspace.
How to choose a mig welder depends less on finding the machine with the largest amperage number and more on matching the welder to the work you actually.
A small detail can change the decision the thickness and type of metal you weld most often Two projects may both look like general garage work yet one.
This guide explains output ratings duty cycle voltage requirements wire systems gun and control features safety considerations and realistic capacity limits By the end you will be able.
- ✓Choose output based on your common material thickness, not the maximum rating alone.
- ✓A 120-volt welder favors portability and thin material; a 240-volt model usually offers more sustained capacity.
- ✓Duty cycle, wire size, and control quality often matter more than peak amperage.
- ✓Confirm electrical service, gas compatibility, consumable availability, and safety equipment before buying.
How to Choose a MIG Welder for Your
Start by describing your typical welding jobs in practical terms material thickness joint type weld length location and.
Make the decision around your most common work while allowing some reasonable headroom Buying for a rare maximum job can make a machine unnecessarily expensive and difficult to.
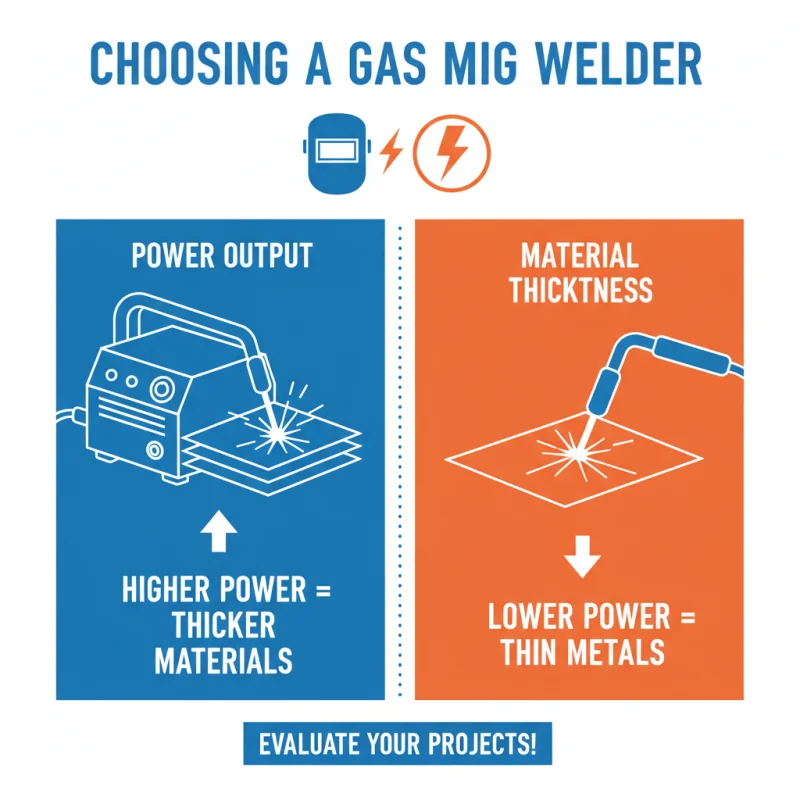
- Primary material: Mild steel is the simplest starting point, while stainless steel and aluminum may require different accessories, settings, or equipment capabilities.
- Usual thickness: Identify the thinnest and thickest material you expect to weld regularly.
- Work pattern: Short repair welds place less demand on a machine than repeated long beads.
- Workspace: Consider outlet access, ventilation, gas-cylinder storage, and whether you must carry the welder to the job.
Thin sheet metal versus heavier fabrication
Thin sheet metal requires stable low-amperage performance and precise adjustment. Excessive heat can cause burn-through, distortion, and enlarged holes, so a machine with usable low-end control may be more valuable than one with an impressive maximum output.
Heavier steel requires enough current and voltage to establish proper fusion You may need multiple passes beveling or a different process when material exceeds the practical single-pass range.
Occasional repairs versus frequent production
For occasional work convenience and ease of setup often outweigh extreme duty cycle A compact welder that starts.
Frequent welding shifts the priority toward duty cycle cooling serviceability and consumable capacity A larger spool replaceable gun.
Choose the Right Power Supply and Output Range
Input voltage is one of the most important buying decisions Welders commonly use 120-volt household power 240-volt power or dual-voltage electronics that can operate on either The available.
A 120-volt welder is convenient for a home garage because it may work from an appropriate household circuit Its practical output is generally more limited especially when welding.
- 120 volts: Portable and convenient for light fabrication, repairs, and thinner steel, but more limited at higher output.
- 240 volts: Better suited to heavier work and sustained welding, provided the workspace has the correct electrical service.
- Dual voltage: Offers flexibility for mobile and shop use, although the machine may not deliver its full rated output on 120 volts.
Understand amperage and voltage together
Amperage primarily influences the amount of welding current available while voltage affects arc length and the overall character of the arc These controls interact changing wire feed speed.
Do not compare amperage numbers without checking the conditions behind them A maximum output may be available only briefly at a particular input voltage or with a reduced.
Check the circuit before buying
Confirm the outlet type, circuit rating, and any extension-cord requirements before selecting a 240-volt unit. A welder should be connected according to its instructions and local electrical requirements; an unsuitable circuit can cause nuisance trips, overheating, or unsafe operation.
Extension cords deserve special attention. A long, undersized cord can create voltage drop and interfere with performance. If mobility is essential, choose a machine designed for the available power and use electrical accessories that are properly rated for the load.
What output range is enough?
For thin automotive panels and light brackets prioritize smooth low-current operation For general fabrication with moderate steel seek a machine with enough output to weld your normal thickness.
Manufacturers’ thickness charts are useful starting points, not guarantees. Actual capacity depends on joint preparation, fit-up, wire type, shielding, travel speed, number of passes, and the quality of the electrical supply.
Compare Duty Cycle, Wire Size, and Welding Process
Duty cycle describes how long a welder can operate within a stated time period at a stated output before it needs to cool For example a rating expressed.
Duty cycle is easy to overlook because a machine may have enough peak amperage on paper but still be unsuitable for repeated long welds If you weld only.
- Read the rating conditions: Duty cycle varies with output, input voltage, ambient temperature, and test standard.
- Separate weld time from project time: A fabrication job includes fitting and repositioning, but repeated beads can still push a small machine hard.
- Allow cooling: Thermal protection prevents damage but does not make an overheated machine productive.
Wire diameter and material thickness
Common solid MIG wire sizes serve different ranges. Smaller wire supports lower current and is useful for thinner material; larger wire can deposit metal faster and support heavier work but generally needs more output and careful setup.
Choose a machine whose drive system and included or optional rollers support the wire sizes you expect to use The gun liner contact tip spool adapter and drive-roll.
Solid wire with gas
Solid wire paired with an external shielding gas usually produces a clean arc with relatively little slag It is often preferred for indoor shop work automotive repairs and. This distinction matters when answering “how to choose a mig welder”.
Shielding gas is vulnerable to wind Even a modest draft can disturb coverage and create porosity so outdoor work may require wind protection or a flux-cored approach Gas.
Flux-cored wire and gasless operation
Self-shielded flux-cored wire can be useful outdoors because it generates its own shielding as it burns It generally produces more smoke and slag than solid wire and the.
A welder advertised as gasless may still be a basic wire-feed machine with limited output Check whether it supports the wire diameter and polarity required for your work.
MIG, flux-cored, and multiprocess machines
A true MIG setup uses a continuously fed wire electrode and shielding gas A multiprocess welder may also.
Choose multiprocess capability when you have a clear use for it such as outdoor stick welding or occasional.
Evaluate Controls, Feeding, and Included Equipment
Good controls make it easier to establish a stable arc and repeat a successful setting. Basic machines may provide separate wire-speed and voltage controls, while more advanced models can offer material selectors, inductance adjustment, synergic programs, or digital displays.
Automatic settings can help beginners reach a usable starting point, but they are not a substitute for understanding arc behavior. Material cleanliness, joint fit-up, wire stick-out, grounding, and travel technique still affect the result.
- Wire-feed adjustment: It should respond predictably without sudden surging or dead spots.
- Voltage control: A sufficiently broad range helps fine-tune arc length and bead shape.
- Gun connection: A standard, serviceable connection can make liners, guns, and consumables easier to replace.
- Work lead: Inspect its length, flexibility, clamp quality, and connection to the machine.
Why wire feeding matters
Many apparent welder problems are actually feeding problems. A worn contact tip, incorrect drive-roll pressure, tangled spool, dirty liner, or poorly sized roller can interrupt the arc and make the machine seem unreliable.
Look for a drive system that matches your intended wire A heavier-duty feeder may use multiple drive rolls and provide more consistent traction especially with larger wire or.
Useful control features
Inductance control can change arc softness wetting and bead appearance on some machines Burnback adjustment can help prevent wire from sticking to the contact tip at the end.
Digital displays improve repeatability when they show meaningful settings, yet displayed values may not exactly match the conditions at the arc. Treat them as useful references and fine-tune by observing bead shape, sound, penetration, and spatter.
Accessories that affect the real price
A low purchase price can be misleading if the package lacks a regulator, gas hose, appropriate contact tips, spare rollers, or a usable gun. Conversely, you may not need every included accessory if you already own compatible equipment.
Budget for a quality auto-darkening helmet, gloves, flame-resistant clothing, ventilation, wire, tips, nozzles, gas, and cleaning tools. Consumables are recurring costs, so a machine that accepts widely available sizes can be more convenient over time.
Match the Welder to Common Materials
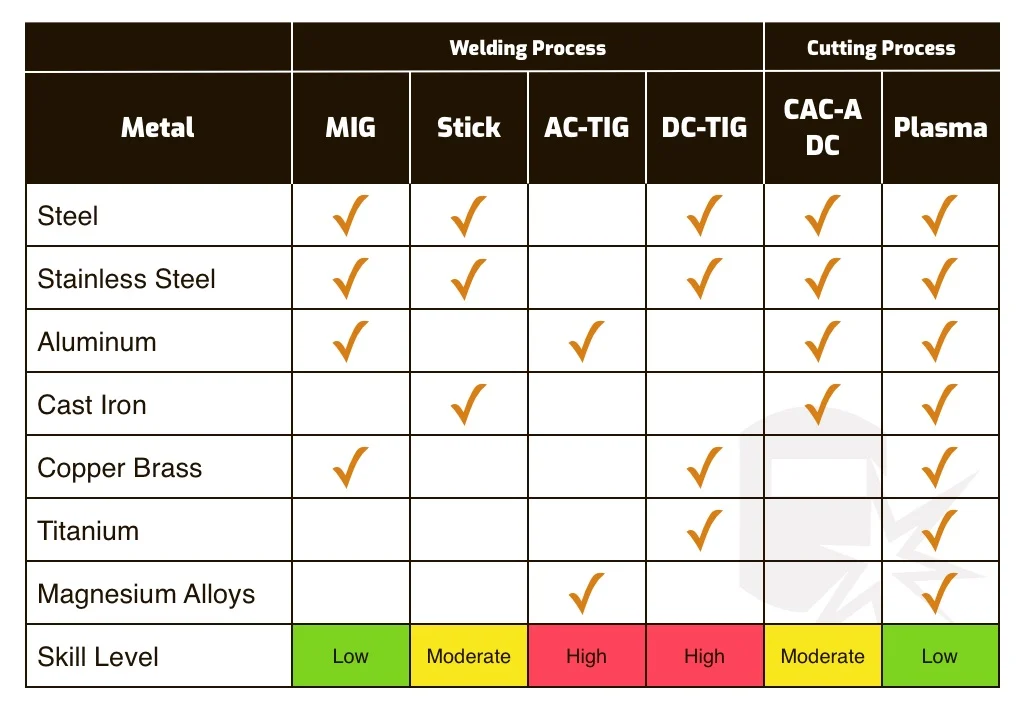
Mild steel is the easiest material for a first MIG setup because common solid wire and shielding-gas combinations are widely available Even so remove rust paint oil and.
Material type also affects torch technique, heat control, wire choice, and joint preparation. A machine suitable for steel may technically weld other metals, but the required accessories and operator skill can change the buying decision.
- Mild steel: A practical starting material with broad wire and gas options.
- Stainless steel: Requires compatible wire and shielding gas, careful cleaning, and attention to heat input.
- Aluminum: Often benefits from a spool gun or specialized feeding arrangement because soft wire can bird-nest in a standard long liner.
- Coated or unknown steel: Coatings may create hazardous fumes; identify and remove coatings safely before welding.
When aluminum changes the purchase
Aluminum wire is softer than typical steel wire and can feed poorly through a conventional gun cable. A spool gun places the spool closer to the gun, reducing the distance the wire must travel and often improving feeding reliability.
If aluminum is a serious part of your plans confirm that the machine supports the needed spool gun drive rolls contact tips and gas arrangement Occasional aluminum work.
Stainless steel considerations
Stainless welding demands cleanliness and suitable shielding Excessive heat can affect appearance and distortion while contamination from tools used on mild steel can compromise the surface A welder. Keep these limitations in mind when considering “how to choose a mig welder”.
Use separate brushes and preparation tools where appropriate, and follow the wire and gas supplier’s instructions. Welding stainless and other alloys also requires attention to fumes and ventilation; the material and any surface coating determine the hazard.
Balance Portability, Cost, and Future Capacity
Portability is valuable when the work moves between a garage, driveway, farm, or jobsite. A lightweight 120-volt unit is easier to carry, but portability can come with a smaller spool, shorter duty cycle, lower output, or less robust cables.
A larger machine may be more economical over its life if it supports the wire sizes duty cycle and accessories you will eventually need Avoid buying far beyond.
- Buy smaller when: You value portability, weld mostly thin material, and work in short sessions.
- Buy larger when: You regularly fabricate heavier steel, need longer welds, or want more room before reaching the machine’s limits.
- Choose dual voltage when: You need mobile flexibility but also have access to suitable higher-voltage power in a shop.
- Reserve budget for setup: Electrical work, gas equipment, consumables, ventilation, and protective gear can materially affect the total cost.
Do not confuse peak power with useful capacity
Marketing language may highlight maximum amperage, maximum metal thickness, or “professional” labels. Compare the stated output at the input voltage you will use, the duty cycle at that output, and the wire sizes supported by the feeder.
A machine that comfortably handles your normal work at a moderate setting is usually a better choice than one that reaches a higher peak only under ideal conditions. Consistency and control produce more value than a specification that rarely applies.
Consider repairability and support
Check whether replacement contact tips, liners, nozzles, drive rolls, guns, and control components are readily available. A common consumable system can keep a machine usable when a small part wears out.
Clear documentation is also important. You should be able to find wiring and polarity instructions, setup charts, maintenance guidance, and overload information. A machine with understandable support reduces trial-and-error and helps prevent incorrect connections.
Common Buying Mistakes and Setup Problems
The most common mistake is choosing by maximum amperage alone. Another is assuming that a welder labeled MIG will automatically include everything needed for gas-shielded welding. Read the package contents and determine which accessories are optional.
New operators may also underestimate the effect of preparation and setup. Incorrect polarity, poor grounding, contaminated metal, unsuitable gas flow, or an improperly seated contact tip can create defects that resemble a machine failure.
- Ignoring low-end control: High maximum output does not guarantee smooth performance on thin sheet.
- Skipping duty-cycle details: A machine may require frequent cooling during the work you intend to do.
- Using the wrong polarity: Solid wire and self-shielded flux core may require different connections.
- Overtightening drive pressure: Excessive pressure can deform wire and worsen feeding rather than improve it.
Symptoms of a poor match
Frequent thermal shutdowns suggest that the machine is being pushed beyond its practical duty cycle or that cooling airflow is restricted. Burn-through on thin material may indicate excessive heat, slow travel, poor fit-up, or inadequate low-end control.
Porosity can result from wind, leaks, insufficient shielding, contaminated material, or incorrect gas flow. Excessive spatter may come from poor voltage and wire-speed balance, incorrect polarity, a dirty nozzle, or an unstable ground connection.
A practical pre-purchase checklist
- Write down the material types and thicknesses you weld most often.
- Estimate whether your welds are short repairs or repeated long beads.
- Check the available outlet voltage and circuit capacity.
- Decide whether you need solid wire, flux core, or both.
- Confirm supported wire diameters, spool sizes, polarity options, and gun compatibility.
- Compare duty cycle at a realistic operating output.
- Add the cost of gas equipment, consumables, electrical changes, and protective gear.
- Verify that replacement parts and operating instructions are available.
Operate and Maintain the Welder Safely
A suitable welder still requires a safe work area. Welding produces intense light, heat, sparks, fumes, and electrical hazards. Keep combustible materials away, provide appropriate ventilation, protect nearby people from arc exposure, and use protective equipment intended for welding.
Do not weld containers tanks or metal that may have held flammable substances unless they have been professionally made safe Coatings galvanized surfaces painted parts and unknown materials.
- Protect your eyes and skin: Use a correctly rated welding helmet, gloves, clothing, and footwear.
- Control fire risk: Inspect both sides of the work and keep sparks away from combustibles.
- Ventilate properly: Local exhaust or suitable respiratory protection may be necessary for fumes.
- Inspect connections: Check cables, gun insulation, gas hoses, and the work clamp before use.
Basic maintenance
Keep the wire compartment clean and dry, remove spatter from the nozzle, and replace worn contact tips. Inspect the liner when feeding becomes rough or inconsistent. Do not allow dust and metal debris to accumulate in cooling openings.
Store wire to prevent moisture and contamination, especially flux-cored wire. Close the gas-cylinder valve when the system is not in use, protect cylinders from tipping, and follow the supplier’s handling instructions for regulators and hoses.
Protect the machine from avoidable strain
Leave adequate clearance around ventilation openings and do not operate the welder in conditions beyond its rated environment. When thermal protection activates, allow the unit to cool rather than repeatedly forcing it to restart.
Use the correct gun liner, drive roll, contact tip, and polarity for the selected wire. Small setup errors can increase heat in the gun, overload the feeder, or create defects that damage confidence in an otherwise capable machine.
FAQ: Choosing a MIG Welder
Is a 120-volt MIG welder enough for home use?
It can be enough for light repairs, thin-to-moderate steel, and short welding sessions. Its suitability depends on material thickness, joint design, duty cycle, and the quality of the available circuit.
Choose a 240-volt or dual-voltage machine if you regularly weld heavier material, need longer beads, or want more output headroom.
Should a beginner choose a MIG-only or multiprocess welder?
A MIG-only welder is often the simplest choice when your work is primarily indoor steel fabrication and repairs A multiprocess model makes sense when you have a real.
What duty cycle should a hobby welder have?
There is no single ideal percentage. Match the rating to your work pattern: short occasional welds place less demand on the machine than long, repeated beads.
Compare the duty cycle at the output you expect to use, not only the most favorable rating listed in the specifications.
Do I need shielding gas for MIG welding?
Solid-wire MIG welding normally uses external shielding gas. Self-shielded flux-cored wire can operate without a gas cylinder, although it has different setup requirements and usually produces more smoke and slag.
Can one MIG welder weld aluminum?
Some can, but aluminum often needs a spool gun or another specialized feeding arrangement, along with compatible wire, tips, drive rolls, and shielding gas. Confirm the complete system rather than assuming a standard steel setup will feed aluminum reliably.
How much extra capacity should I buy?
Moderate headroom is useful for joint fit-up variation, occasional thicker work, and avoiding constant operation at the limit. Excessive capacity adds cost, weight, and electrical demands without improving ordinary thin-metal work.
Are automatic MIG settings worth paying for?
They can shorten setup time and provide a useful starting point, especially for beginners. They do not eliminate the need to clean the material, select the correct wire and gas, set polarity, and adjust technique based on the actual weld.
Conclusion
The best way to choose a MIG welder is to match the machine to your regular material thickness welding duration power availability wire system and need for portability.
Remember that specifications are operating conditions not promises for every joint Safe ventilation correct protective equipment sound electrical connections and proper setup matter as much as the machine.
List your common material thicknesses, available outlet voltage, and typical weld duration, then compare welders against those three facts before considering extra features.
The answer to “how to choose a mig welder” should be applied with these conditions and limitations in mind.