How to Use a MIG Welder: Setup Steps and Troubleshooting Tips
To use a MIG welder, select the correct wire and gas, set voltage and wire speed, prepare clean metal, then weld with a steady gun angle and travel speed.
Learning how to use a mig welder is less about pressing the trigger and more about coordinating several parts of one system the power source wire-feeding mechanism shielding.
A rushed setup often overlooks metal thickness polarity gas flow contact-tip size and the condition of the work surface Even a machine with an excellent specification cannot compensate.
This guide explains how to use a mig welder from preparation through cleanup You will learn how to choose consumables connect the machine tune settings make a controlled.
- ✓Clean metal, correct polarity, a sound work clamp, and suitable shielding are the foundation of a reliable MIG weld.
- ✓Use the machine’s chart as a starting point, then fine-tune voltage and wire speed with short test welds on similar scrap.
- ✓Keep the gun close to the work, maintain a consistent travel angle and speed, and watch the puddle rather than the arc alone.
- ✓Most porosity, bird-nesting, burn-through, and excessive spatter problems have identifiable setup or technique causes.
- ✓Wear full welding protection, control fire hazards, and do not weld containers, painted metal, or structural parts without proper knowledge and precautions.
How to Use a MIG Welder
A MIG welder feeds a continuous electrode wire through a gun while an electric arc melts the wire and base metal In conventional MIG welding a shielding gas.
The machine s voltage influences arc length and the fluidity of the puddle while wire-feed speed largely controls amperage and deposition rate These controls work together so changing.
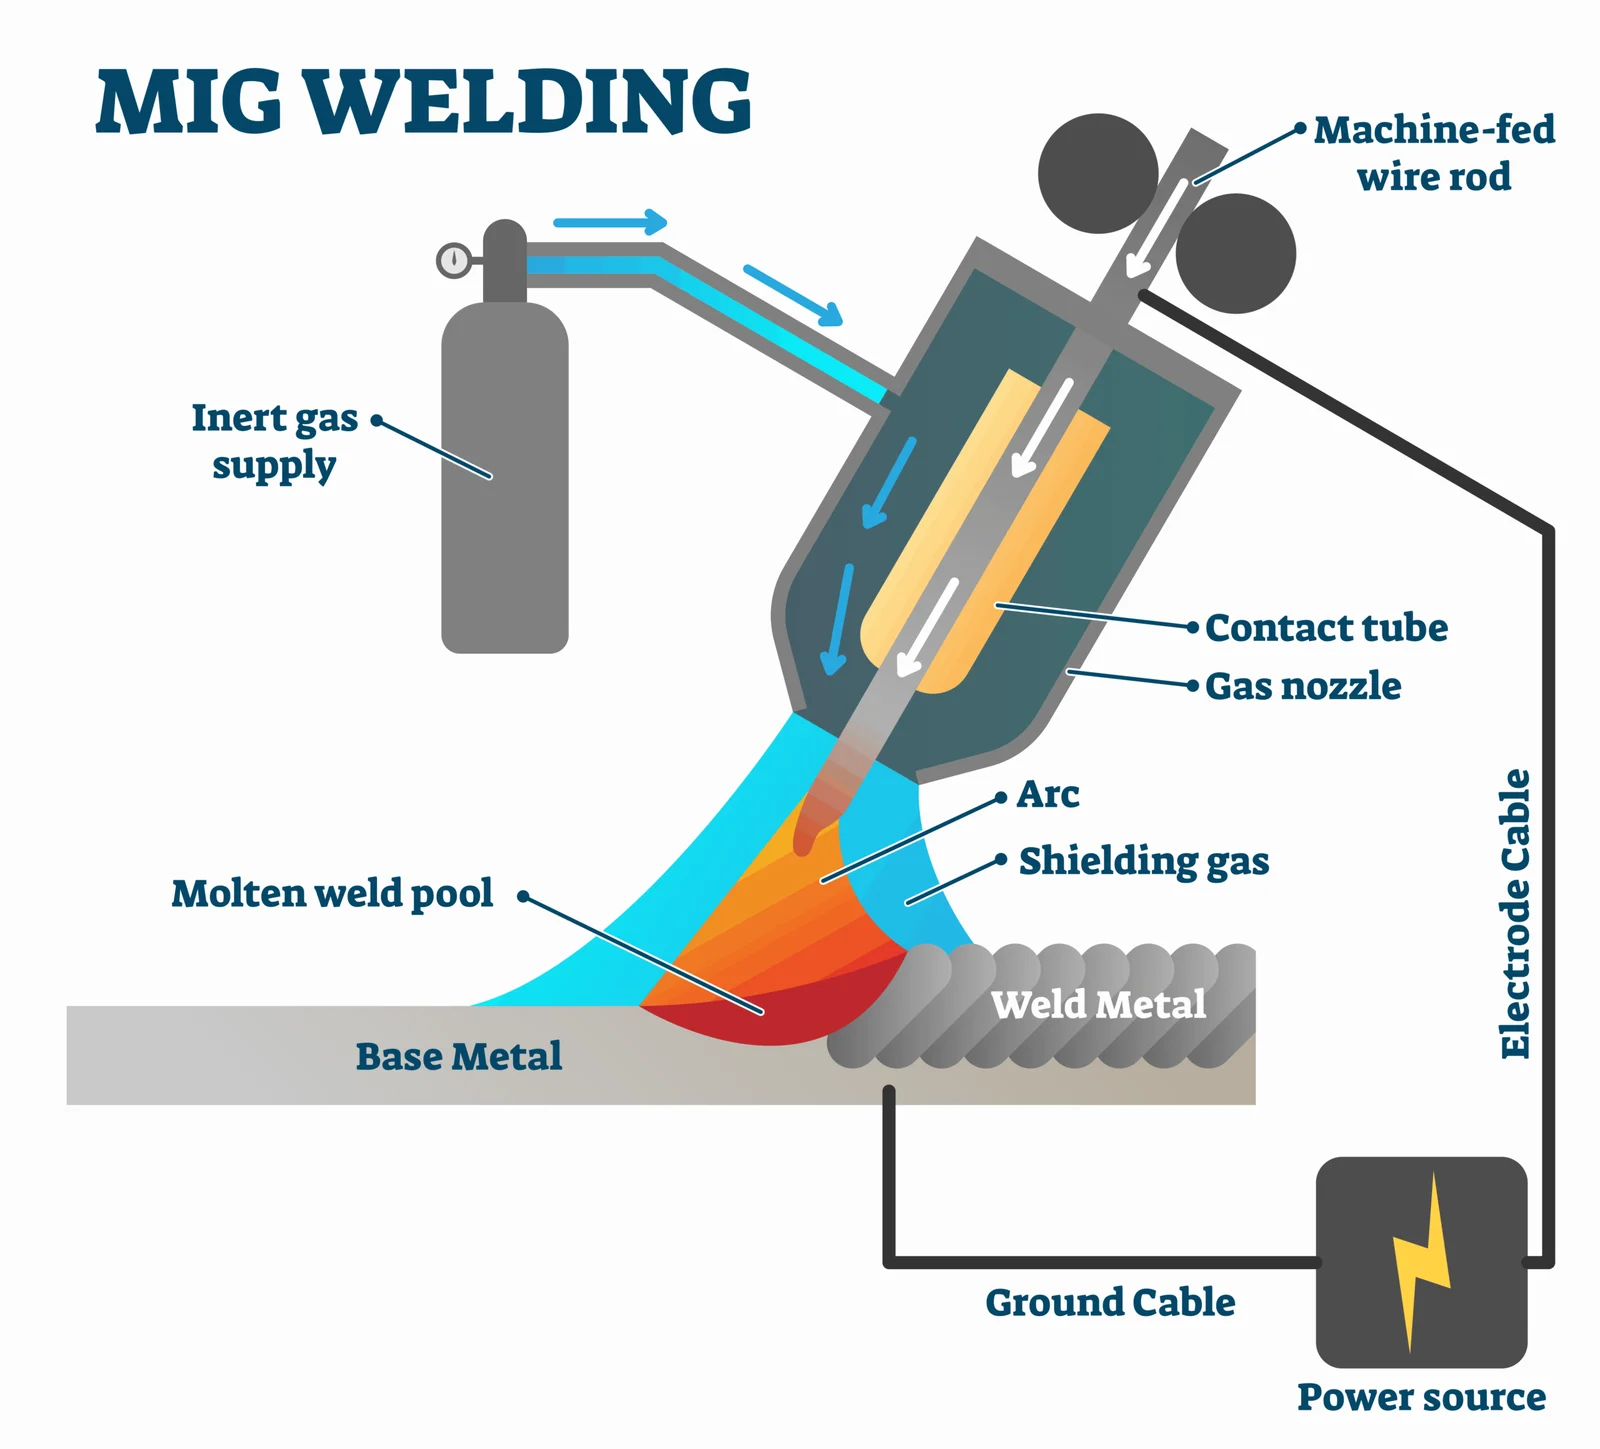
- Arc system: The power source, wire feeder, gun, liner, contact tip, and ground connection must work as one continuous electrical path.
- Shielding method: Solid wire generally needs external gas, while self-shielded flux-cored wire creates its own shielding and is more tolerant of outdoor drafts.
- Heat control: Thin material needs lower heat and faster, controlled travel; thick material may need more heat, multiple passes, or joint preparation.
- Joint quality: Welding cannot reliably bridge oil, rust, paint, scale, moisture, or a poorly fitted joint.
Choose wire, gas, and polarity
For ordinary mild-steel fabrication indoors, solid steel wire with an appropriate shielding-gas mixture is a common starting point. Wire diameter should suit the material thickness and the machine’s output. Smaller wire is easier to control on thin sheet, while larger wire deposits more metal but generally needs more power.
Self-shielded flux-cored wire is useful where wind makes gas shielding unreliable or when greater penetration is helpful It produces slag that must be removed between passes and many.
Identify the material and joint
Confirm whether you are welding mild steel, stainless steel, aluminum, or another alloy. Each requires compatible wire, shielding gas, liner, contact tip, and technique. Aluminum, for example, feeds more softly than steel and commonly needs equipment designed to reduce wire feeding resistance.
Joint type also matters. A butt joint, lap joint, inside corner, and outside corner distribute heat differently. A tight, clean fit usually requires less filler and makes it easier to control penetration than a wide, irregular gap.
Prepare the Work Area and Set Up the Welder
Before connecting anything, create a controlled work area. Welding produces intense light, ultraviolet radiation, sparks, hot metal, and fumes. Remove paper, cardboard, solvents, sawdust, aerosols, and other combustible materials from the spark path.
Provide ventilation that removes fumes without blowing directly across the shielding gas.
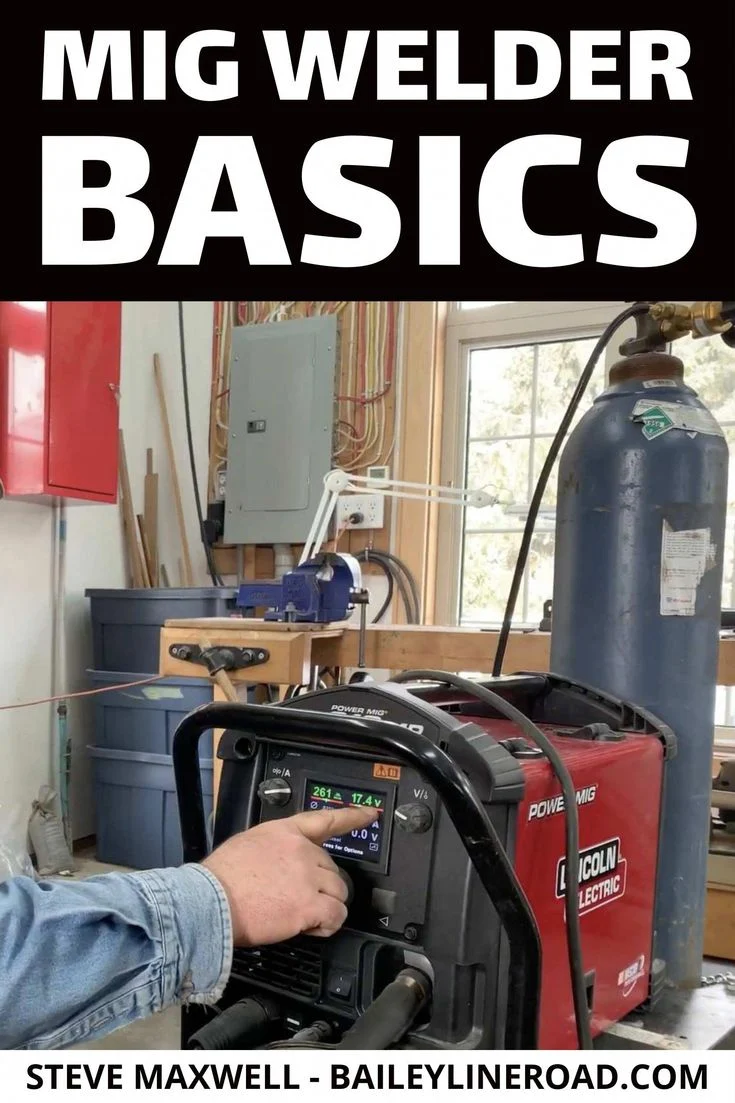
Inspect the machine power cord gun lead gas hose regulator cylinder work lead and electrode holder if your unit has one Do not use damaged insulation leaking hoses.
- Protect your eyes and skin: Use a properly rated welding helmet, safety glasses under the helmet, flame-resistant clothing, welding gloves, and closed leather footwear.
- Control fire risk: Inspect both sides of the work, including hidden cavities and the floor below, for combustible material before striking an arc.
- Manage fumes: Use local extraction or suitable ventilation, and never weld coatings or unknown residues without removing them safely.
- Secure the cylinder: Keep it upright, cap it when transported, and open the valve gradually while standing to the side of the regulator.
Load the wire spool
Choose the wire diameter shown on the spool and confirm that the drive rolls liner and contact tip match it Place the spool so the wire unwinds in.
Release the drive-roll pressure guide the wire through the inlet across the correct groove and into the liner Keep the gun lead as straight as practical while feeding.
Connect polarity and shielding gas
For gas-shielded solid wire, connect the gun and work lead according to the polarity specified for that wire. For self-shielded flux-cored wire, check whether the leads must be reversed. A polarity error can cause excessive spatter, poor penetration, and an unstable arc even when other settings appear reasonable.
Attach the regulator to the correct cylinder confirm the connection is compatible and open the cylinder valve slowly Set gas flow within the range recommended for the wire and nozzle then check for leaks Excessive flow is not automatically better it can create turbulence.
Set the work clamp
Attach the work clamp to bright, clean metal as close to the weld as practical. A clamp attached over paint, rust, scale, or a loose fixture creates resistance and may make the arc inconsistent. If the weld behaves differently when the clamp is moved, the original connection may be poor.
Choose MIG Settings and Make the First Test Weld
Machine charts are the best starting point because they account for the welder’s output, wire type, diameter, gas, and material thickness. Set the wire type, diameter, and polarity first. Then use the recommended voltage and wire-feed speed as an initial baseline rather than treating them as permanent values.
Prepare a piece of clean scrap that matches the actual material in thickness and orientation Make a short bead let the piece cool enough to handle safely and.
- Stable arc: The arc should sound reasonably consistent rather than repeatedly stuttering, snapping, or going dead.
- Correct bead shape: A sound bead generally has smooth tie-in at both edges without tall ridges, deep undercut, or excessive convexity.
- Controlled puddle: You should see the leading edge of the molten pool and maintain enough control to keep it centered on the joint.
- Sound penetration: The weld should fuse to the intended base metal without burning through or merely sitting on top.
Voltage and wire-feed speed
If wire-feed speed is too high for the selected voltage the wire may push into the puddle and produce a harsh irregular arc If it is too low.
Use the machine’s terms carefully. Some compact welders combine voltage and wire speed in a single control, while others provide separate adjustments. A setting that works for a flat bead may not be ideal for vertical or overhead welding, where a smaller, more controllable puddle is often preferable.
Gas flow and stick-out
Stick-out is the length of wire extending beyond the contact tip Excessive stick-out preheats more wire before it reaches the arc and can reduce effective penetration Very short.
Shielding gas must reach the puddle without being disrupted. Wind, a partially blocked nozzle, spatter inside the nozzle, leaks, and an incorrect flow rate can all lead to porosity. A clean nozzle and a steady hand position matter as much as the regulator setting.
Recognize a useful arc sound
For many short-circuit MIG applications on steel, a steady frying or sizzling sound indicates a reasonably balanced setup, although sound alone cannot prove weld quality. A loud, irregular popping sound may point to incorrect settings, poor grounding, contamination, unstable feeding, or insufficient gas coverage.
Do not chase sound by making several changes at once. First verify the wire path, polarity, clamp, gas, and clean surface; then tune voltage, wire speed, and travel technique.
Use the Gun Correctly: Angle, Travel, and Puddle Control
Once the test weld is acceptable position the parts securely and make the joint accessible Hold the gun so the contact tip and nozzle remain at a consistent.
For many steel joints a slight travel angle in the direction of movement is a practical starting technique Pushing the gun can provide a wider flatter bead and. This distinction matters when answering “how to use a mig welder”.
- Move steadily: A fast travel speed can leave a narrow bead with insufficient fusion, while a slow speed can create excessive heat, a wide bead, or burn-through.
- Keep the nozzle clear: Remove accumulated spatter before it restricts gas flow or changes the effective stick-out.
- Watch the leading edge: Direct the arc so the puddle reaches both sides of the joint instead of simply depositing metal on one edge.
- Use short beads when appropriate: On thin or distortion-prone material, alternating short welds can limit heat buildup.
Flat-position welding
The flat position is the easiest place to learn because gravity helps keep the puddle in the joint. Keep the gun angle and travel speed consistent, and pause only enough at the edges to establish fusion. Excessive side-to-side weaving usually adds heat without improving a narrow joint.
For a fillet weld, aim the arc into the corner while maintaining equal attention to both legs. A bead that favors one plate may indicate incorrect gun angle, poor fit-up, or travel that is too fast on the neglected side.
Vertical and overhead welding
Vertical and overhead positions require more control because gravity pulls the liquid puddle away from the joint. Lowering heat, shortening the arc, using a smaller wire where practical, and making controlled movements can help. A slight pause at each side of a small weave may prevent the puddle from sagging.
Overhead welding increases the chance of falling hot spatter. Use appropriate coverage, keep your body out of the direct path, and do not attempt it until you can consistently control the puddle in easier positions.
Thin sheet metal
Thin sheet can burn through before a beginner recognizes that too much heat has accumulated. Use the lowest practical setting, keep moving, and consider short stitch welds rather than one continuous bead. Allow cooling between sections and maintain tight fit-up without forcing panels out of alignment.
When repairing automotive or similarly thin panels, remove coatings safely and confirm that wiring, fuel, insulation, and enclosed cavities are protected. Heat can travel far beyond the visible arc.
How to Use a MIG Welder Without Common Setup Mistakes
The fastest way to improve results is to separate machine problems from technique problems. If the wire feeds inconsistently, changing travel speed will not solve the root cause. If the arc is stable but the bead lacks fusion, inspect settings, joint preparation, angle, and speed in that order.
Many people learning how to use a mig welder adjust voltage and wire speed repeatedly while overlooking the work clamp or a blocked liner. Establish a repeatable inspection sequence so every correction is based on evidence rather than guesswork.
- Welding dirty metal: Remove rust, mill scale, oil, paint, and moisture from the weld zone and the clamp location.
- Changing several controls: Adjust one setting at a time and test on comparable scrap.
- Dragging too far away: Excessive stick-out reduces control and can weaken shielding and penetration.
- Ignoring position: A setting suitable for a flat joint may put too much liquid metal in a vertical or overhead weld.
Porosity and pinholes
Porosity appears as holes or gas pockets in the weld Common causes include an empty or closed gas cylinder a leaking hose incorrect flow wind a dirty nozzle.
Check gas supply and connections first, then inspect the nozzle and clean the joint. Do not simply increase gas flow without checking for turbulence or leaks. If porosity appears only in one area, look for drafts, surface contamination, or a clamp and gun position that changes at that point.
Excessive spatter
Spatter can result from an unstable arc caused by mismatched voltage and wire speed, incorrect polarity, poor grounding, contaminated metal, or an inconsistent travel distance. It can also increase when the gun angle directs the arc away from the joint.
Confirm polarity and wire type, clean the contact area, inspect the drive rolls and liner, and return to the chart’s baseline settings. Use anti-spatter products only as a supplement; they cannot correct poor settings or bad fit-up.
Burn-through and lack of fusion
Burn-through occurs when heat creates a hole or collapses the joint. Reduce heat input, increase travel speed modestly, use intermittent welds, or improve fit-up. On a gap, bridge the joint with short controlled deposits instead of holding a large puddle in one place.
Lack of fusion occurs when the weld does not properly join one or both sides of the joint The causes may include insufficient heat excessive travel speed an.
Bird-nesting and wire-feed problems
Bird-nesting is a tangled mass of wire near the drive rolls or gun inlet It commonly results from incorrect drive pressure a blocked or worn liner a damaged.
Do not keep pulling the trigger against a jam. That can drive more wire into the obstruction and damage the liner or drive system. Replace worn consumables and use the correct groove and pressure for the wire diameter.
Finish, Inspect, and Maintain the Equipment
After releasing the trigger keep the gun in position briefly if the process and machine instructions call for it then move away from the cooling weld without touching.
Visual inspection cannot reveal every internal defect, and a neat appearance does not guarantee structural strength. For load-bearing, safety-critical, pressure-containing, or code-regulated work, use the applicable qualified procedure and inspection requirements rather than relying on a casual bead check.
- Gun consumables: Clean the nozzle, check the contact tip for wear, and replace parts that are loose, burned, or the wrong size.
- Wire path: Keep the liner, drive rolls, and inlet guide free of debris and replace parts that cause inconsistent feeding.
- Gas system: Inspect hoses and fittings for damage or leaks, and close the cylinder valve when the system is not in use.
- Machine storage: Protect the welder from moisture, dust, impact, and unauthorized operation; follow its service instructions.
Control heat and distortion
Welding adds heat unevenly, so parts can pull out of alignment. Use clamps and temporary tacks to hold the joint, but do not place tacks where they prevent the final weld from fusing. Alternate sides or sections when practical, and allow cooling rather than continually adding heat.
Do not quench a hot weld with water unless a qualified procedure specifically permits it. Rapid cooling can affect the material and may create other problems. Plan the sequence before welding so the part remains accessible and the heat is distributed deliberately.
When to stop and reassess
Stop if you smell burning insulation see fire outside the intended area notice gas leakage or lose control of the arc Shut down safely disconnect power when appropriate.
Do not weld sealed containers, tanks, drums, or pipes that may contain flammable residue unless they have been properly cleaned, isolated, and handled under a qualified safety procedure. Do not weld galvanized or unknown coatings without understanding the fume hazards and using suitable controls.
FAQ: How to Use a MIG Welder
Can a beginner learn how to use a mig welder safely?
Yes, a beginner can learn the fundamentals by practicing on clean, known material in a ventilated area with proper protective equipment and supervision when needed. Start with flat-position test welds and do not begin with structural, pressure-containing, overhead, or unknown-material work.
Should I push or pull the MIG gun?
Either technique can be appropriate, depending on the wire, gas, joint, position, and desired bead profile. Pushing often improves visibility and can produce a wider bead, while pulling may provide a narrower bead and deeper penetration; confirm the preferred technique for your consumable and procedure.
Why does my MIG welder keep sticking the wire to the contact tip?
The wire may be burning back because wire-feed speed is too low, voltage is too high for the feed rate, the contact tip is worn or incorrect, or the wire feed is slipping. Check the tip size, drive-roll pressure, liner, spool tension, polarity, and chart settings before changing technique.
How far should the MIG wire stick out?
Use the range recommended for the wire and application, and keep it consistent throughout the bead. Excessive stick-out can reduce effective heat at the joint and make shielding less reliable, while extremely short stick-out can damage the contact tip and restrict visibility.
What gas flow should I use for MIG welding?
Use the flow range specified for your wire, nozzle, and indoor conditions rather than assuming maximum flow is best. Check for leaks and drafts first, because high flow can create turbulence and pull air into the shielding envelope.
Can I use solid MIG wire without shielding gas?
Usually not. Solid wire relies on external shielding gas, so using it without gas normally produces a porous, contaminated weld. If you need to weld without a gas cylinder, use a compatible self-shielded flux-cored wire and the polarity specified for that wire.
How do I know whether my MIG weld is strong enough?
Appearance alone cannot establish strength. Check for proper fusion, adequate joint size, absence of cracks and severe undercut, and appropriate penetration, but use a qualified welding procedure and inspection method for structural or safety-critical work.
Conclusion
Learning how to use a mig welder means controlling the complete welding system not just setting a dial Select compatible wire and gas verify polarity prepare clean material.
MIG welding is accessible, but it still involves arc radiation, fumes, fire, hot metal, pressurized gas, and the possibility of hidden defects. Use it conservatively until your results are repeatable, and leave structural or hazardous work to a qualified professional or approved procedure.
Set up your welder with the correct wire and polarity, make three short test beads on matching scrap, and change only one setting at a time while inspecting each result.