Parts of a Weld Fully Explained: Toe, Root, Face, Throat, and Leg
A weld’s parts are the visible surfaces, edges, and internal dimensions that describe where the weld sits and how it joins the metal. On a fillet weld, the key terms are face, toe, root, leg, and throat; groove welds also have a face, toes, and root, but their shape and measurements differ.
Have you ever looked at a weld drawing or inspection note and wondered which edge someone meant by “toe”? Or tried to tell whether a weld is too small when all you can see is a bead sitting on top of a joint?
I once spent too long judging a fillet weld by the bead’s rounded face, then realized the leg length was the measurement that mattered for the job. The weld looked substantial, but appearances alone didn’t answer the question. That’s a common mix-up, not a dumb one.
I wrote this to give you a clear map of weld geometry, with plain explanations you can use at the bench, on a print, or during an inspection. You’ll also get the distinctions that help prevent a neat-looking bead from being mistaken for a correctly sized weld.
Get the terms straight, and you can communicate more clearly, measure the right features, and catch a mismatch between a drawing and a finished joint. Skip those distinctions, and you may judge the wrong dimension or overlook a problem at the weld’s edge.
Set aside about nine minutes. By the end, you’ll be able to:
- Identify the face, toe, root, leg, and throat.
- Tell fillet weld measurements apart from groove weld dimensions.
- Read basic weld size information and spot common visual concerns.
- Choose a sensible next check when a weld doesn’t match the drawing.
Parts of a Weld: the Main Features and What They Mean
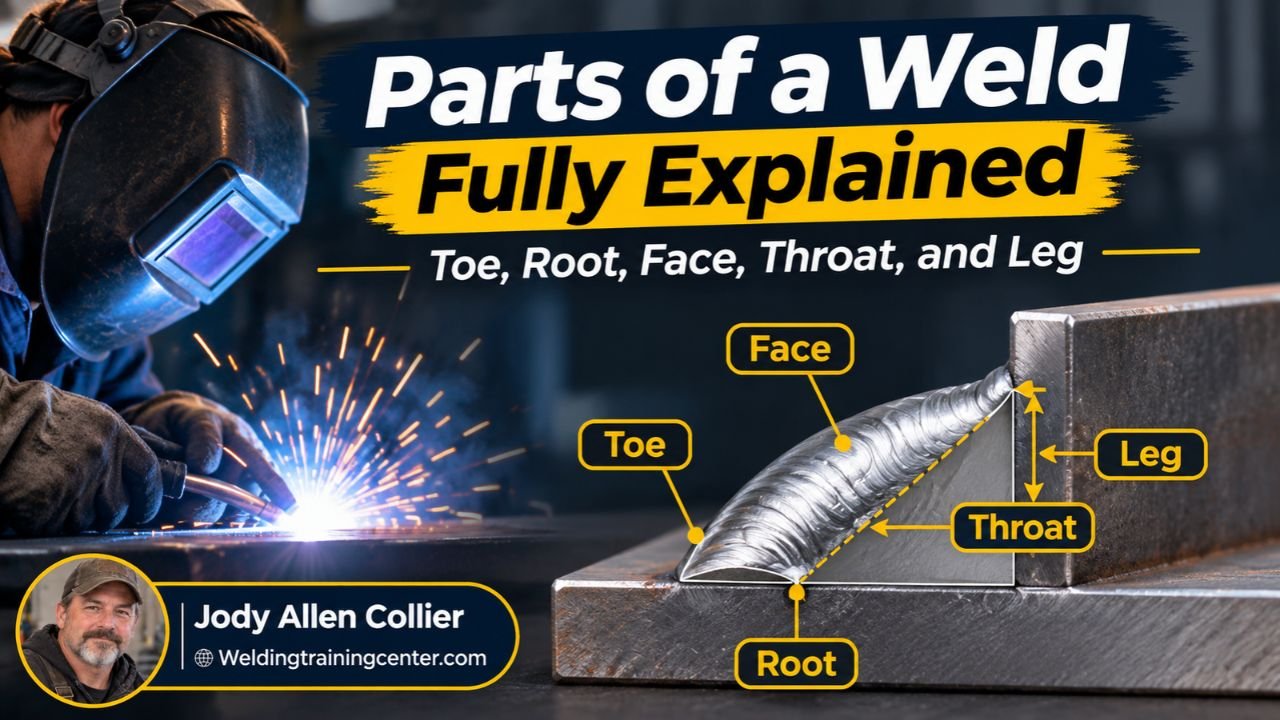
The main parts of a weld are the face, toe, root, leg, and throat, though not every joint uses every measurement in the same way. On a fillet weld joining two plates at a right angle, the face is the exposed surface, each toe is where that surface meets the base metal, and the root is the deepest area of the joint.
A useful starting point is to look at the joint before you look at the bead. The joint tells you how the pieces meet; the weld’s profile tells you which features you can name and measure.
The face and toes are on the outside
The weld face is the exposed surface of the weld on the side where it was deposited. A face may be flat, slightly rounded, or shaped by the welding process and technique.
A weld toe is the line where the weld face meets the base metal. Most visible fillet welds have two toes, one along each side of the bead; a groove weld usually has a toe on each edge of its face.
Toes matter because abrupt transitions or visible grooves beside them can be signs worth checking. A smooth-looking edge is not proof of a sound weld, though, since appearance can’t reveal every internal condition.
The root is where the joint goes deepest
The weld root is the deepest part of the joint where the weld metal reaches, or is intended to reach. Its exact location depends on the joint design, preparation, and weld type.
On a fillet weld, the root sits in the inside corner where the joined surfaces meet. On a groove weld, the root is at the bottom of the prepared groove, opposite the face.
Don’t confuse the weld root with the root opening, which is the gap between joint members before welding. A drawing or welding procedure may specify that gap, while the finished weld root describes the deepest part of the completed weld.
Legs and throat describe a fillet weld’s size
A fillet weld’s leg is the distance from the root to the toe along one joined surface. A typical equal-leg fillet has two legs of the same length, though welds can be designed with unequal legs.
The throat is the shortest distance from the root to the face of the weld. For a standard equal-leg fillet with a flat face, the theoretical throat is about 0.707 times the leg size. A 1/4-inch equal-leg fillet has a theoretical throat of about 3/16 inch, before considering the actual face profile.
The throat is important because it describes the effective depth of weld metal across the joint, not the bead’s height above the surfaces. A convex bead can look tall without adding the same amount of useful throat that a properly sized weld provides.
The actual throat follows the real weld face, while the theoretical throat is based on the specified shape. The effective throat used for design or inspection can depend on the applicable code, joint details, and weld procedure, so don’t treat the simple geometry formula as a substitute for the drawing or governing requirements.
Reinforcement adds material above the base surface
Weld reinforcement is weld metal that extends beyond the surface of the base metal at a groove weld. A small amount may be allowed by the governing requirements, but extra height doesn’t automatically mean extra strength.
A high, narrow bead can look impressive while leaving other parts of the joint poorly fused or incorrectly sized. If you’re comparing extra metal on top with proper weld dimensions, weld reinforcement details help explain why height and quality aren’t the same thing.
What’s the fastest way to avoid mixing up toe and root? Trace the weld from the outside inward: the toe is the outer edge, and the root is the deepest meeting point of the joined pieces.
- Face and toes are visible surface features.
- The root is at the deepest part of the joint.
- Fillet weld legs are measured along the joined surfaces; throat runs from root toward face.
- Bead height alone doesn’t tell you whether a weld is correctly sized.
How Weld Parts Change with Joint Type and Size
Weld terms stay more useful when you connect them to the joint type, since a fillet weld and a groove weld don’t use every dimension in the same way. A fillet weld typically uses leg size and throat, while a groove weld may use depth of preparation, root opening, and reinforcement.
A fillet weld joins two surfaces that meet at an angle, often at a T-joint, lap joint, or corner joint. Its exposed face bridges the corner, with a toe on each side and a root in the corner; that geometry is why leg and throat measurements are common. For the broader joint family and common size terms, fillet weld basics are a natural next step.
Groove welds use different reference points
A groove weld fills a prepared opening between the parts being joined. The groove may have square, V-shaped, bevel, U-shaped, or other joint preparation, and its geometry affects how the weld is made and described.
With a groove weld, the face and toes remain visible on the finished side, while the root sits at the bottom of the groove. The depth of bevel or groove preparation describes the joint shape before welding; it isn’t automatically the same as the completed weld’s effective size.
A weld can also be made from one side or both sides, depending on the joint design and access. A weld symbol or drawing notes may call out backing, root treatment, or other details, so a glance at the finished face can’t tell the whole story.
| Feature | Fillet weld | Groove weld |
|---|---|---|
| Face | Exposed surface joining the two sides | Exposed surface covering the groove |
| Toe | Edge where face meets base metal | Edge where face meets base metal |
| Root | Inside corner of the joint | Deepest area of the prepared groove |
| Common size reference | Leg and throat | Groove depth, weld size, or other drawing requirement |
| Extra metal at face | Bead profile may project from the surfaces | Reinforcement may extend beyond the base surface |
The weld size isn’t always the bead’s widest point
A weld’s size is a defined measurement tied to its weld type and design, not simply how wide or tall the bead looks. For a fillet weld, drawings often specify a leg dimension; for groove welds, the required dimension may be stated differently.
On a print, a weld symbol gives information about where and how a weld is to be made. The symbol can include the weld type, size, length, location, and other instructions; the exact information depends on the drawing and applicable standard.
If a dimension is unclear, don’t guess based on the drawing’s scale or compare the bead with a nearby bolt. Read the stated size and its placement on the symbol, then check the drawing notes or ask the person responsible for the design. Weld size notation can help decode those dimensions and their locations.
I once assumed a weld callout meant the same thing as the visible width of the bead, and that led me to check the wrong feature first. The practical fix was simple: identify the weld type, then read the dimension attached to it before measuring anything.
How do you keep a rounded bead from fooling your eye? Measure the specified feature, such as the fillet leg, instead of using the highest point of the face as a stand-in for size.
Welding changes the metal beside the bead, too
The base metal is the original material being joined, while weld metal is the metal that melts and becomes part of the weld. Some processes add filler metal; others may join material with little or no added filler.
Next to the fusion boundary, heat can change the base metal without melting it. That affected area is the heat-affected zone, often shortened to HAZ; it isn’t weld metal, even though welding heat changed its properties or structure.
This distinction helps when you’re discussing a weld that looks sound but has a concern in the surrounding material. The bead, the fusion boundary, and the HAZ are related, but they’re not interchangeable names for one feature.
How to Inspect Weld Features Without Guessing
A useful weld check starts with the drawing or procedure, then compares the required dimensions and visible condition with the finished joint. A visual check can catch many surface issues, but it can’t confirm every internal feature or replace inspection required by the job.
A basic visual inspection means checking the weld and nearby base metal for visible conditions, then measuring the required dimensions with an appropriate tool. Depending on access and the specified acceptance criteria, a fillet weld gauge or ruler may help check leg size, face profile, or reinforcement.
Follow a repeatable inspection sequence
- Identify the joint and weld type. Decide whether you’re looking at a fillet, groove, or another weld before choosing which feature to measure.
- Read the drawing or applicable instructions. Confirm the required weld size, length, location, and any stated limits or inspection needs.
- Clean enough to inspect. Remove loose debris or spatter that blocks the view, without grinding or altering the weld unless the job allows it.
- Check the face and toes. Look for visible interruptions, undercut-like grooves, cracks, or an uneven transition that should be assessed against the applicable requirements.
- Measure the specified dimension. Use a suitable gauge for the stated feature, rather than judging by the bead’s overall bulk.
- Record and escalate uncertainty. If the drawing, access, or acceptance criteria aren’t clear, ask the responsible inspector, supervisor, or engineer instead of making up a limit.
Pro Tip: A fillet weld gauge is useful for checking leg size, but the gauge must sit correctly against clean surfaces. A thick coating, rough edge, or awkward corner can throw off a quick reading.
Know what a visual check can and can’t tell you
A visual check can reveal surface shape, visible toes, obvious cracks, and some dimensional concerns. It can’t reliably confirm internal fusion, hidden porosity, or the full condition of a root that you can’t access.
Different inspection methods answer different questions. The job may require a qualified inspector or additional testing, and the correct method depends on the weld, material, service conditions, and governing requirements.
Never grind, cut, or probe a questionable weld just to get a better look unless the procedure and responsible authority allow it. If a weld is part of a structural or pressure-containing item, pause and get the required review before modifying it or putting it into service.
Common concerns and sensible next checks
| What you notice | Why it deserves attention | Sensible next step |
|---|---|---|
| A groove along a toe | It may indicate undercut or another surface condition | Compare with acceptance criteria and have it assessed |
| A bead that looks unusually tall | Extra face metal doesn’t prove correct size or fusion | Check the specified measurement and reinforcement limits |
| A visible crack | Cracks can be serious and shouldn’t be dismissed by appearance | Stop and refer the weld for the required evaluation |
| Inconsistent leg lengths | The weld may not match the specified geometry | Measure each leg and compare with the drawing |
| A root you can’t inspect | The deepest area may be hidden from view | Follow the required inspection plan or ask for qualified review |
Important Tip: Don’t use a generic visual rule as an acceptance standard. Weld requirements vary by design, code, procedure, and service, so the applicable drawing and inspection criteria control the decision.
How can you tell whether a small surface mark is harmless or a rejectable condition? You can’t decide from the name alone; use the project’s acceptance criteria and the right inspection method.
FAQs About Parts of a Weld
What are the five main parts of a weld?
The five commonly discussed parts are the face, toes, root, legs, and throat, though the full set depends on the weld type. A fillet weld has legs and a throat, while a groove weld is described with other joint and weld dimensions. The drawing determines which measurements matter.
Is the weld toe the same as the weld root?
No, the weld toe is where the exposed weld face meets the base metal, while the weld root is the deepest part of the joint. A fillet weld’s toes sit along the outer edges of the bead, and its root sits in the inside corner.
What is the difference between weld leg and weld throat?
A leg is measured from the root to a toe along one surface of a fillet joint. The throat is measured from the root toward the weld face. For a standard equal-leg fillet with a flat face, theoretical throat is about 0.707 times the leg size.
Does a bigger weld bead mean a stronger weld?
No, a larger-looking bead doesn’t automatically mean a stronger or acceptable weld. Excess face metal can change the profile without proving proper size, fusion, or internal condition. Strength and acceptance depend on the design, weld type, material, workmanship, and applicable requirements.
Can you inspect every part of a weld by looking at it?
No, visual inspection only covers features that can be seen from accessible surfaces. It can help assess the face, toes, and some dimensions, but it can’t confirm hidden root conditions or internal discontinuities. The job’s inspection plan determines whether additional methods or a qualified inspector are needed.
Use the Drawing to Make the Final Call
Knowing the parts of a weld gives you a better way to describe what you’re seeing, but the names alone don’t decide whether a weld passes. Match the feature to the joint type, then compare the specified measurement and visible condition with the drawing and applicable inspection criteria.
In my view, the most reliable habit is to name the feature before you judge it: face, toe, root, leg, or throat. That small pause keeps a rounded bead from distracting you from the actual requirement.
Your next step is straightforward: find the weld callout, identify the weld type, and measure the dimension the drawing specifies. If anything is unclear or the weld is safety-critical, ask the responsible inspector or engineer before accepting or changing it.