What Is Slag in Welding and How to Remove It
Slag is the hardened, nonmetallic coating that forms over a weld when melted flux rises to the surface and cools. You see it most often after stick or flux-cored welding. It shields the hot weld metal while it cools, but it should be removed before you inspect the bead or lay another pass.
If you’re asking, “What is slag in welding?” after your first practice bead, picture a dark crust covering the metal underneath. Slag isn’t part of the finished metal joint, and leaving it between welding passes can trap unwanted material inside the weld.
This matters even when you’re welding a simple 1/8-inch steel bracket. You need to know when to chip, when to brush, and when a stubborn patch might signal another problem. Hitting the coating harder isn’t always the right answer.
This guide is for garage welders and hobbyists learning stick or flux-cored welding. You’ll learn why slag forms, which tools remove it, how to clean a weld step by step, and how to avoid trapping slag inside your next weld.
Quick Answer
- Slag: A hardened, nonmetallic coating formed from melted welding flux.
- Purpose: Protects hot weld metal from air and helps control cooling.
- Removal: Use a chipping hammer and wire brush after the weld has solidified.
- Important: Remove slag before adding another weld pass to help prevent trapped slag defects.
What Is Slag in Welding and Why Does It Form?
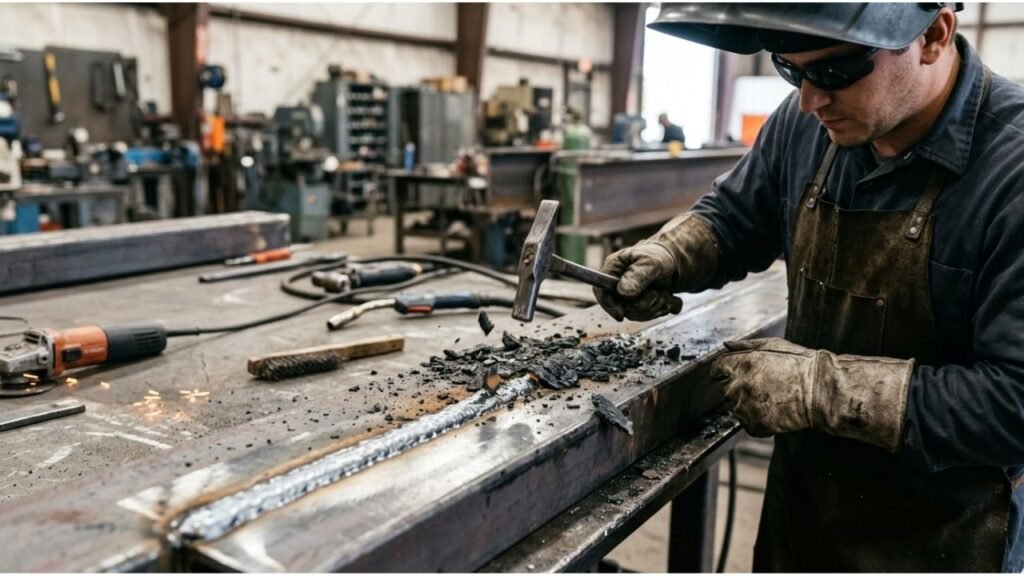
Welding slag is a layer of nonmetallic material formed when flux melts during welding and collects above the molten weld metal. As the weld cools, this material hardens into a coating that protects the hot metal from air and helps control how the weld pool cools and solidifies.
How welding slag forms
In stick welding, the metal rod has an outer coating called flux. Flux contains materials that help protect and clean the molten metal during welding.
When you strike an arc, the rod and its coating heat up. The flux melts, releases shielding gases, and forms liquid slag that separates from the molten weld metal.
As you move the rod forward, the metal and slag begin cooling. The metal becomes the weld bead, while the slag hardens over its surface.
Think of slag as a temporary protective cover. It serves a purpose while the metal is hot, but you normally remove it once the weld has solidified and you’re ready to inspect or continue welding.
What does slag actually do?
Slag helps the welding process in several ways:
- Protects against air: Helps keep oxygen and nitrogen away from hot weld metal.
- Helps remove impurities: Flux reactions can carry unwanted materials out of the molten weld.
- Controls cooling: The coating slows heat loss from the weld surface.
- Supports the weld pool: Some slag systems help hold molten metal in place during vertical and overhead welding.
Slag doesn’t become useful weld metal after cooling. It remains a separate material that must be cleaned away when required.
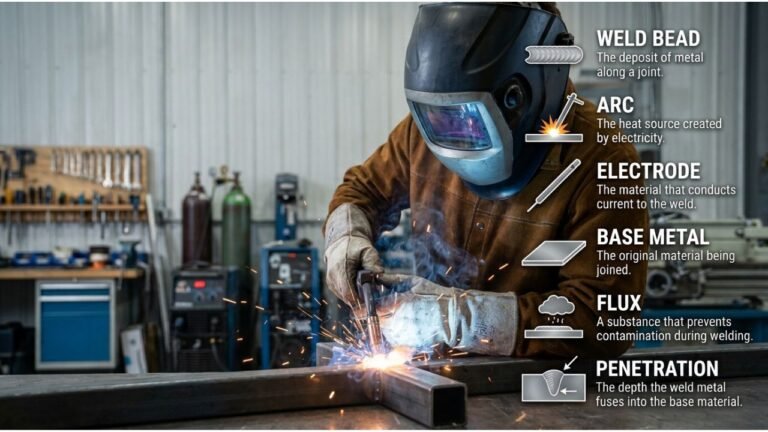
If you’re unfamiliar with terms such as flux, electrode, weld pool, and fusion, the guide to basic welding terms explains them with simple examples.
Which Types of Welding Produce Slag?
Stick welding and flux-cored arc welding commonly produce slag because they use flux to protect the molten metal. Submerged arc welding also forms slag. Standard solid-wire MIG and TIG welding don’t create the same protective slag coating because they normally use shielding gas instead of flux.
| Welding process | Produces slag? | What you should expect |
|---|---|---|
| Stick welding (SMAW) | Yes | Hardened coating over the bead |
| Flux-cored welding (FCAW) | Yes | Slag that varies with wire type |
| Submerged arc welding (SAW) | Yes | Slag formed from melted granular flux |
| Solid-wire MIG welding (GMAW) | No typical flux slag | May leave spatter or small silicate deposits |
| TIG welding (GTAW) | No | No normal flux slag coating |
Slag in stick welding
Stick welding uses a flux-coated electrode. As the rod burns, its coating produces the protective materials that eventually form slag.
The coating may be thin, thick, brittle, or firmly attached, depending on the electrode type and how the weld was made.
For example, an E7018 electrode may leave slag that lifts away in long pieces when the technique and conditions are suitable. Other electrodes can leave material that needs more brushing and chipping.
Slag in flux-cored welding
Flux-cored welding uses a hollow wire containing flux materials.
Both self-shielded and gas-shielded flux-cored wires can produce slag, although the amount and removal behavior vary by wire.
This is one reason flux-cored welding needs more cleaning between passes than standard solid-wire MIG welding.
Miller Electric explains these practical differences in its comparison of MIG and flux-cored welding.
What Does Welding Slag Look Like?
Welding slag usually looks like a dark gray, black, brown, or glassy crust covering the finished bead. Its thickness and texture depend on the welding process, electrode, and cooling conditions. Some slag forms a smooth shell, while other slag breaks into small, rough flakes during removal.
Fresh slag may look shiny while it’s hot. As it cools, it often becomes duller and may develop small cracks.
You may notice several different appearances:
- Smooth, dark coating: Common with some stick electrodes.
- Thin, flaky layer: Often breaks away with light tapping.
- Thick, rough crust: May need a chipping hammer followed by brushing.
- Long, curled pieces: Slag that separates as the bead cools.
- Small stubborn patches: Often found along weld edges or inside grooves.
Does slag that peels off easily mean a good weld?
Not necessarily.
Easy slag removal can indicate favorable bead shape and suitable welding conditions. However, it doesn’t prove that the weld has proper fusion.
Fusion means the weld metal and base metal have melted together properly.
A bead may look clean after the slag falls away and still contain hidden flaws. Always inspect the exposed metal instead of judging weld quality by how easily the slag comes off.
How to Remove Slag From Welding: Step-by-Step
The usual way to remove welding slag is to let the weld solidify, loosen the coating with a chipping hammer, and clean the remaining material with a wire brush. Work carefully around the weld edges, and inspect the exposed bead before making another pass or finishing the project.
Step 01: Stop Welding and Secure the Workpiece
Finish the welding pass and move the electrode holder or welding gun to a safe position.
Make sure the workpiece is supported and can’t slide while you’re cleaning it. A clamp or welding vise can help hold a small piece of steel.
Keep your welding gloves, protective clothing, and safety glasses on. Use an appropriate face shield over your safety glasses when chipping.
Safety Note: Slag can break loose suddenly, sending sharp pieces toward your face or anyone nearby. Keep other people clear of the work area and never aim flying chips toward yourself.
The OSHA welding and cutting safety requirements cover protective equipment, fire hazards, and ventilation.
Step 02: Let the Slag Solidify and Cool
Wait until the weld and slag have solidified before trying to remove the coating.
Hot slag may crack or pop away from the surface as the metal cools. Don’t place your face close to the workpiece to watch this happen.
The required cooling time depends on the metal thickness, weld size, and surrounding conditions. A thick steel plate holds heat longer than a small piece of thin steel.
Allow enough cooling for safe handling with the proper tools and protective equipment. Never assume the metal is safe to touch because it has stopped glowing.
Avoid pouring water over a fresh weld just to speed up slag removal unless the welding procedure specifically allows it.
Step 03: Find the Slag Layer Before Chipping
Look at the weld surface and identify the coating you want to remove.
Slag often appears darker and rougher than the exposed weld metal. On some beads, you can already see a small gap where the coating has started lifting.
Check both sides of the bead, especially the edges where the weld meets the base metal.
These edges are called weld toes.
Slag can collect in narrow spaces beside the toes, so don’t focus only on the middle of the weld.
Step 04: Loosen the Slag With a Chipping Hammer
Hold a welding chipping hammer firmly and place its tip near an exposed end or loose edge of the slag.
Use controlled, light taps to crack the coating and lift it away. Work along the bead rather than striking hard into the weld metal.
A chipping hammer usually has a pointed end and a chisel-shaped end. The chisel end works well on broader sections, while the point can help reach narrow areas.
Keep your face and hands out of the path of flying chips.
Pro Tip: If the slag has already lifted at one end, start there. Following a loose edge is often easier than striking directly into the middle of a firmly attached coating.
Step 05: Brush Away the Remaining Slag
Once the larger pieces are removed, use a wire brush to clean the bead.
Brush along the weld, paying attention to the toes, corners, and any small grooves.
A stiff hand brush is usually enough for light leftover slag on a simple practice weld.
For stainless steel, use a suitable brush dedicated to stainless steel. A brush previously used on ordinary carbon steel can transfer iron particles that may cause surface rust.
Keep brushing until you can inspect the weld metal clearly.
If a patch won’t move, don’t assume it’s harmless. Check whether it’s attached slag, a surface flaw, or material trapped in a groove.
Step 06: Remove Stubborn Slag Carefully
Some slag stays stuck in narrow corners or against uneven weld edges.
Try light chipping from another direction, followed by brushing.
For larger jobs, a suitable needle scaler or powered wire brush may help. A needle scaler is a tool with small metal pins that rapidly tap the surface to loosen deposits.
An angle grinder may be needed for slag trapped in a surface groove, but grinding can remove good weld metal.
Use the correct guarded tool and abrasive for the job. Wear appropriate eye, face, hearing, and respiratory protection for the work.
If cleaning would require cutting deeply into a structural weld, stop and have the repair assessed by a qualified welder or inspector.
Step 07: Inspect the Weld Before Continuing
After cleaning, check the entire bead under good lighting.
Look for cracks, holes, grooves, or spots that appear to contain trapped material.
Before another pass, remove all accessible slag from the previous bead and nearby joint surfaces.
Pay close attention to narrow corners. A new pass can cover leftover slag and trap it inside the finished weld.
When you’re finished, collect the chips and dispose of them according to the materials used and your shop’s waste rules.
The goal is a clean, visible weld surface ready for proper inspection or the next welding operation.
What Tools Are Best for Removing Welding Slag?
A chipping hammer and wire brush are the standard tools for cleaning slag from small stick and flux-cored welds. Larger or harder-to-reach deposits may require powered tools, but the best choice depends on the slag thickness, joint shape, and how much cleaning you can do without removing good weld metal.
| Tool | Best use | What to watch for |
|---|---|---|
| Chipping hammer | Breaking thick, brittle slag | Hard strikes can mark the bead |
| Hand wire brush | Removing loose flakes and dust | May not remove firmly attached slag |
| Powered wire brush | Cleaning larger accessible surfaces | Wire fragments can fly off |
| Needle scaler | Loosening heavy slag on suitable workpieces | Can mark thin or finished surfaces |
| Angle grinder | Cleaning stubborn deposits or preparing a repair | Can remove needed weld metal |
Should you use a grinder for every weld?
No. Grinding is often unnecessary if the slag breaks away cleanly.
A grinder can change the weld’s size or shape. It also creates sparks and airborne particles.
For most beginner practice beads, start with a chipping hammer and hand wire brush.
Save grinding for work that actually needs it, and follow the required weld procedure when working on a joint that carries a load.
Why Is My Welding Slag So Hard to Remove?
Slag may stick because of the electrode’s flux type, an uneven bead, poor welding settings, or narrow grooves that hold the coating in place. Hard-to-remove slag doesn’t always mean the weld is defective, but it gives you a reason to inspect your technique and the exposed metal carefully.
| Possible cause | What you may notice | What to check |
|---|---|---|
| Electrode or wire type | Slag consistently sticks with one consumable | Manufacturer guidance for that filler |
| Uneven travel speed | Thick and thin sections of slag | Steadier movement along the joint |
| Incorrect heat settings | Irregular bead shape or poor tie-in | Recommended current and voltage |
| Poor electrode angle | Slag gathers along one side | Electrode position and travel direction |
| Deep grooves beside the bead | Small pieces remain trapped | Weld shape and possible undercut |
| Uneven previous passes | Slag lodges between neighboring beads | Pass placement and cleaning |
Common mistakes when removing slag
A frequent mistake is striking the bead too aggressively.
Hard hammer blows can damage small welds without solving the reason the slag is stuck.
Another mistake is brushing only the top of the bead while leaving material inside a corner.
The third problem is starting another weld pass before the first one has been properly cleaned.
If the slag repeatedly sticks in the same place, inspect the weld profile and review your technique instead of simply increasing hammer force.
What Is Slag Inclusion in Welding?
Slag inclusion is a weld defect caused by nonmetallic slag becoming trapped inside or between layers of weld metal. It can happen when a new pass covers leftover slag, or when poor welding technique prevents slag from separating from the molten pool. Hidden inclusions cannot be removed by surface brushing.
How slag gets trapped inside a weld
Imagine welding two thick steel plates with several passes.
After the first pass, some slag remains in a narrow corner. You start the next pass without cleaning that area.
The new molten metal covers the trapped material. When the weld cools, the slag remains inside the joint.
This is called a slag inclusion.
It can interrupt the sound metal in the joint and reduce the weld’s ability to carry loads.
Common causes of slag inclusions
- Slag left behind between welding passes.
- Narrow grooves that make cleaning difficult.
- Incorrect electrode angle or travel technique.
- Poor bead overlap that creates pockets between passes.
- Welding conditions that keep slag from separating properly.
Some inclusions are visible at the weld surface. Others are hidden and may require methods such as X-ray inspection to detect.
Important: Chipping removes surface slag, not slag sealed inside solid metal. A suspected internal defect needs proper evaluation and an approved repair method. Don’t cover it with another bead.
How Can You Prevent Slag Inclusions Between Weld Passes?
The best way to prevent slag inclusions is to remove slag completely between passes and produce weld beads without deep pockets that trap it. Proper joint preparation, electrode angle, travel speed, and heat settings also help the slag rise out of the molten pool instead of becoming buried.
Follow these practices:
- Clean the joint before welding. Remove paint, oil, dirt, heavy rust, and other unwanted surface materials.
- Choose the correct electrode. Use a rod or wire suited to the metal, joint, position, and welding procedure.
- Follow the recommended settings. Incorrect current or voltage can affect bead shape and slag behavior.
- Maintain a steady travel speed. Avoid uneven ridges and excessive buildup that create hidden pockets.
- Place each pass carefully. Good overlap and smooth bead edges help prevent slag from becoming trapped.
- Clean before every new pass. Inspect the previous bead, especially its toes and narrow corners.
- Don’t weld over a known defect. Stop and correct the problem using an approved method.
Miller Electric’s stick welding technique guide explains how current, arc length, electrode angle, movement, and travel speed affect welding results.
For a beginner, the simplest habit is to treat cleaning and inspection as part of each welding pass, rather than something you do only after the job is finished.
What Is the Difference Between Slag, Flux, and Spatter?
Flux, slag, and spatter are different materials or products of the welding process. Flux is used to help protect and clean the molten weld, slag is the nonmetallic coating formed from flux reactions, and spatter is made of small metal droplets thrown away from the weld pool.
| Term | What it means | How to recognize it |
|---|---|---|
| Flux | Material used to protect and clean molten metal | Found in a stick rod coating or flux-cored wire |
| Slag | Nonmetallic layer left after flux melts and reacts | Crust covering the weld bead |
| Spatter | Small drops of molten metal that land nearby | Tiny metal balls stuck around the weld |
| Mill scale | Oxide coating formed on steel during hot manufacturing | Dark coating on steel before welding |
| Silicate deposits | Small glassy deposits sometimes left by solid-wire MIG welding | Small brown or glassy islands on the bead |
Slag is usually removed by chipping and brushing. Spatter may need scraping or another suitable cleaning method.
Mill scale is different because it may be present before you even strike an arc.
Knowing the difference helps you select the right cleaning method instead of grinding away material unnecessarily.
Frequently Asked Questions About Welding Slag
Beginners often wonder whether slag is harmful, why it falls off some welds, and what happens if they leave it in place. These questions become easier to answer once you know that slag is a temporary protective material, while slag trapped inside a weld is a defect.
Is slag good or bad in welding?
Slag is useful during welding because it helps shield hot metal from air, supports the weld pool, and affects cooling. However, slag isn’t useful as part of the finished metal joint. Remove it before inspecting the weld or making another pass, and avoid trapping it inside the weld.
Do you always have to remove welding slag?
Remove slag before making another pass over the same area and before any inspection or surface preparation that requires clean weld metal. It may also need removal before painting. The final cleaning requirements depend on the job, but leaving slag between passes is generally unacceptable.
Can welding slag fall off by itself?
Yes. Some electrodes and flux-cored wires produce slag that cracks or peels away as the weld cools. This happens because the coating and weld metal behave differently during cooling. Even when most slag falls off naturally, inspect and brush the bead to remove any remaining pieces.
What happens if you weld over slag?
Welding over slag can trap nonmetallic material inside the new weld layer, causing a slag inclusion. This defect may reduce weld quality and strength. Cleaning the previous pass before welding again helps prevent it. A hidden inclusion requires proper inspection and repair, not surface brushing.
Does MIG welding create slag?
Standard solid-wire MIG welding doesn’t create the thick protective slag coating associated with stick or flux-cored welding. It can produce spatter and small silicate deposits on the bead. Flux-cored welding may use similar-looking equipment, but its flux-containing wire can create slag that needs removal.
Is welding slag dangerous to touch?
Yes, particularly while it’s hot. Fresh slag can cause burns, and small pieces can fly off suddenly during cooling or chipping. Cooled pieces may have sharp edges. Wear suitable gloves, safety glasses, and face protection, and avoid breathing dust produced during powered cleaning.
Final Thoughts on Welding Slag and Safe Removal
Slag is a normal part of stick, flux-cored, and other flux-based welding processes. It protects the hot weld as it cools, but it isn’t part of the finished weld metal. Once the bead has solidified, proper cleaning lets you inspect the surface and prepare for another pass without leaving unwanted material behind.
For most small welding jobs, a chipping hammer and wire brush will handle the cleanup. Work carefully around the weld toes, avoid striking too hard, and check for leftover material in narrow corners. If slag appears trapped inside the metal, treat it as a weld defect rather than something you can brush away.
Your next practice task is simple: run a short bead on clean scrap steel, remove the slag safely, and inspect the exposed surface. To understand what you’re looking at underneath, read What Is a Weld Bead? Parts, Types and Examples. That knowledge will help you judge your practice welds more confidently.