What Is Fusion in Welding? How Metals Join and Why It Matters
Fusion in welding is the melting and joining of the base metals at the joint, with or without added filler metal. As the molten area cools, it forms a solid connection between the parts.
Have you ever looked at a weld that seemed neat on the outside but wondered if the metal actually joined underneath? Or had a bead sit too high on the surface when you needed a strong connection?
I once rushed a short repair and focused so much on making the bead look smooth that I didn’t pay enough attention to how the heat was reaching the joint. The finished weld looked tidy, but I had to go back and correct it. That’s a common mistake, not a dumb one.
I wrote this to make fusion clear without burying you in welding-school language. If you’re learning to weld, checking a repair, or trying to understand a weld defect, the goal is to help you connect what you see at the surface with what’s happening inside the joint.
Get fusion right, and the parts can form a sound connection with less rework and fewer surprises. Miss it, and a weld may look acceptable while leaving a weak, unbonded area where the metals should have joined.
This takes about 9 minutes to read. By the end, you’ll know how to:
- Tell fusion apart from filler metal and weld penetration.
- Recognize what affects fusion in common welding processes.
- Spot signs of weak fusion and understand what to check next.
- Avoid common mistakes without guessing at machine settings.
What Is Fusion in Welding?
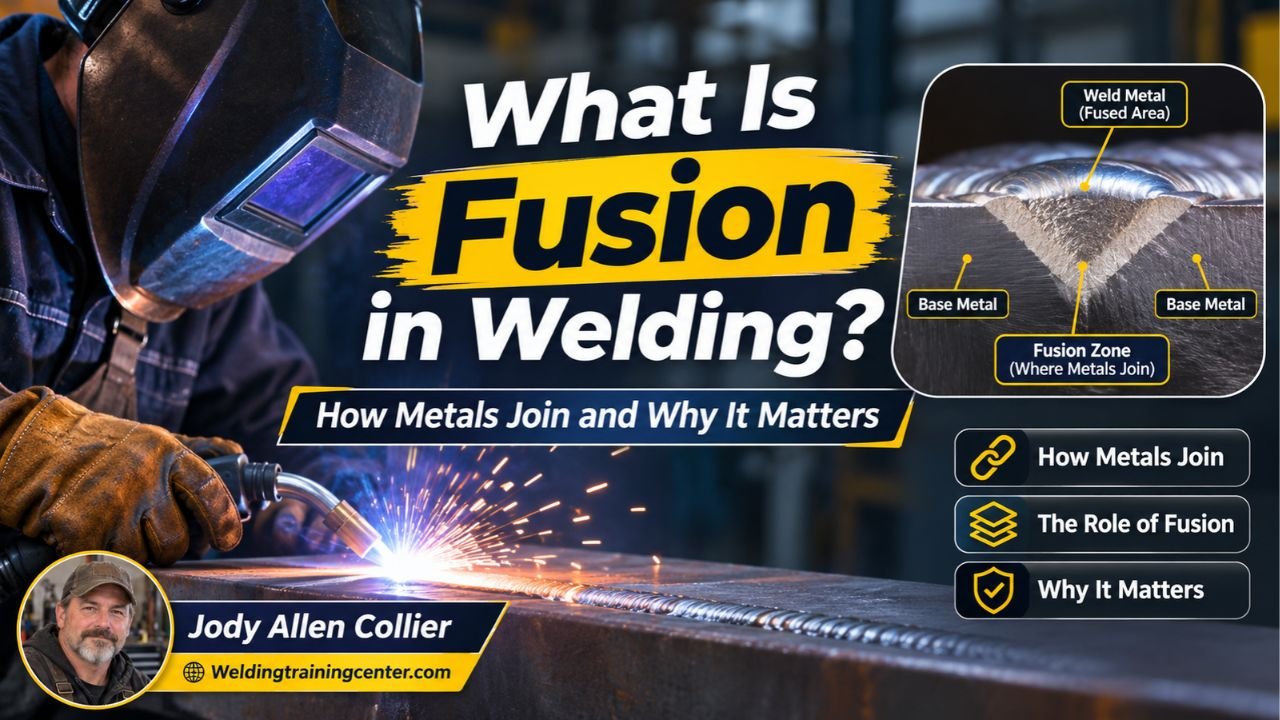
Fusion in welding happens when heat melts the edges of the base metal, the parts being joined, and the molten metal cools into a continuous joint. Filler metal may be added, but the base metals still need to fuse where the weld is meant to join them.
The molten metal is called the weld pool. In a typical arc weld, an electric arc creates heat at the joint, and the welder guides the pool along the seam. The basics of how welding works help explain why the arc, workpiece, and travel motion all affect the final joint.
Fusion doesn’t mean the entire part melts. The goal is to melt a controlled area at the joint, then let it solidify while keeping the surrounding material in usable shape. A narrow bead joining two steel plates is doing exactly that when the edges melt together beneath the bead.
Here’s the key distinction: filler metal can make up much of the visible bead, but filler alone doesn’t prove the base metal fused. A bead can sit on top like a strip of frosting if the joint edges didn’t get hot enough or the molten metal didn’t reach them.
The term fusion zone means the area that melted and then solidified as part of the weld. Along its outer edge is the fusion boundary, where melted weld metal meets the unmelted base metal. A sound joint has a proper bond at that boundary instead of a gap or cold interface.
Some fusion welds use no filler at all. In autogenous welding, the parts melt and join without added filler, while other welds use a wire, rod, or electrode to supply filler metal.
Fusion welding differs from solid-state welding, where the materials join without melting the base metal. Friction welding is one solid-state process; it creates a bond through heat and pressure while the material remains below its melting point.
How Fusion, Penetration, and the HAZ Differ
Fusion describes whether the metals melted and joined; penetration describes how far the weld extends into the joint. The heat-affected zone, or HAZ, is nearby base metal that didn’t melt but changed because of welding heat.
These terms often get mixed up because they all describe different parts of the same weld. A weld can have a visible bead, some penetration, and a HAZ, yet still have a spot where the weld metal didn’t fuse to the joint face.
| Term | What it describes | What to look for |
|---|---|---|
| Fusion | Melting and bonding at the intended joint surfaces | A sound connection at the weld boundary |
| Penetration | How far the weld extends into the joint | Weld depth suited to the joint and procedure |
| HAZ | Base metal changed by heat but not melted | A region beside the fusion zone |
| Filler metal | Added metal that becomes part of the weld | Material supplied by a rod, wire, or electrode |
Weld penetration matters because a weld may not reach far enough into a joint even when the surface looks smooth. The right depth depends on the joint design, material thickness, welding process, and specified procedure. Weld penetration depth is a separate question from whether the weld fused along its boundaries.
The HAZ sits beside the fusion zone. Because the metal there experienced heat without melting, its properties can change; the size and effect depend on the material and the heat cycle. A wide, discolored area may catch your eye, but appearance alone doesn’t tell you whether the weld is sound. the heat-affected zone is worth checking as its own part of weld quality.
One practical way to keep the terms straight is to ask two separate questions: did the weld bond to the surfaces it was meant to join, and did the weld reach the required depth? Those are related checks, not interchangeable ones.
What Controls Fusion During Welding?
Fusion depends on getting enough usable heat to the joint, directing the weld pool where it needs to go, and matching the process to the material and joint. Machine settings matter, but no single setting guarantees a sound weld on every job.
A few conditions commonly shape the result:
- Heat input: Too little heat can leave the joint edges unmelted; excessive heat can cause distortion or other problems.
- Travel speed: Moving too quickly can leave too little time for the joint faces to melt. Moving too slowly can add excessive heat.
- Arc length and angle: Poor control can make it harder to direct heat and shielding where they’re needed.
- Joint preparation: Dirt, rust, paint, oil, or poor fit-up can interfere with the process or hide the joint edges.
- Material and thickness: Different metals and thicknesses respond differently to heat and need suitable procedures.
- Shielding and consumables: Gas, flux, wire, rod, and electrode condition can affect the weld pool and the finished weld.
A short, steep-sided groove can be tougher to reach than an open joint, even when the machine display hasn’t changed. That’s why a setup that works on a flat lap joint may not transfer neatly to a tight root pass or a thick plate.
What should you change if a bead looks cold or piles up? First check the joint, process, and procedure rather than turning a dial at random. If you’re following a qualified procedure or a manufacturer’s instructions, stick to its limits; the correct current, voltage, wire speed, and travel speed depend on the exact setup.
I’ve had a weld pool behave differently after I cleaned a joint and improved the fit-up, even though I hadn’t changed the basic machine setting. That taught me not to blame the machine before checking the metal in front of me.
Pro Tip: Clean the joint far enough beyond the weld path that your torch, electrode, or filler won’t pull contamination into the pool. A clean-looking strip right under the bead isn’t much help if the weld starts in rust or paint.
How to Recognize Lack of Fusion
Lack of fusion is a weld defect where the weld metal fails to bond properly to the base metal or to a previous weld pass. It can occur at the joint face, the root, or between layers of a multi-pass weld.
Some signs are visible: an unfused groove beside the bead, a sharp line at a weld boundary, or a pass that appears to sit on top of another without blending in. But surface appearance can’t reveal every internal defect, and a good-looking bead doesn’t guarantee full fusion.
Common causes include:
- Heat that’s too low for the joint and process.
- Travel that’s too fast for the joint faces to melt.
- An electrode or torch angle that directs heat away from the sidewall.
- Slag or other material left between weld passes.
- Poor access to a narrow joint or an awkward welding position.
- Contamination or joint fit-up that keeps the pool from reaching the intended surfaces.
A weld that looks like a smooth rope laid across the seam may be a warning sign if the edges don’t blend in. Still, don’t diagnose a hidden defect from appearance alone; the inspection method depends on the weld, the job requirements, and what can be accessed.
Can you check every fusion problem just by looking? No. Visual inspection can catch surface conditions, but internal inspection may call for a method such as radiographic or ultrasonic testing, when required by the job and performed by qualified people.
A repaired weld needs more than another bead laid over the top. The proper repair depends on the defect, joint design, material, and governing procedure; a qualified welding inspector or engineer can help decide what removal, preparation, and re-welding are needed. lack of fusion defects deserve particular care because extra surface metal won’t automatically fix an unbonded boundary.
Important Tip: If a weld is part of a pressure, structural, lifting, or other safety-critical assembly, don’t rely on a visual guess or an informal patch. Follow the applicable inspection and repair requirements, and bring in a qualified professional when needed.
A Safe, Practical Way to Aim for Fusion
Good fusion starts before you strike an arc. Prepare the joint, follow the procedure for the material and position, and control the pool so it wets the intended edges rather than simply piling up on the surface.
- Check the job requirements. Identify the material, thickness, joint type, welding position, and any required procedure or inspection.
- Prepare the joint. Remove contamination from the weld area and confirm the parts fit as intended. Use the specified bevel, root opening, or backing when the procedure calls for it.
- Set up the correct process and consumables. Use the specified wire, rod, electrode, shielding gas, and machine range rather than relying on a setting copied from another job.
- Protect yourself before welding. Use a suitable welding helmet, gloves, protective clothing, and ventilation for the process and material. Keep flammable items clear, and follow fire-prevention rules for the work area.
- Make the weld with the joint in view. Keep a steady travel speed and direct the heat to the intended surfaces. Pause or adjust only as the procedure and the weld pool call for.
- Inspect the result. Let the weld cool as required, then check its visible profile and any specified acceptance criteria. Use the required inspection method if surface checks aren’t enough.
Safety comes before setup and welding, not after something goes wrong. Arc light can injure eyes and skin, hot metal can burn, and welding fumes need appropriate control; don’t weld unknown coatings or materials without checking the hazards and controls.
If the pool seems to run ahead while the side edges stay dark, stop and reassess rather than trying to hide the problem under more filler. A steady, controlled bead usually gives you a clearer view of what the metal is doing.
- Fusion means the intended base-metal surfaces melt and bond.
- Penetration and the HAZ describe different features of the weld.
- A smooth bead can still have an unfused boundary.
- Follow the job procedure and inspection requirements instead of guessing.
FAQs About What Is Fusion in Welding
Does fusion welding always use filler metal?
No, fusion welding can join base metals without filler. Autogenous welding melts the parts themselves, while other processes add filler from a rod, wire, or electrode. The choice depends on the process, joint, and requirements, so a bead containing filler isn’t the only kind of fusion weld.
Is fusion the same as penetration in welding?
No, fusion means the intended metal surfaces melted and bonded, while penetration describes how far the weld extends into the joint. A weld may have some penetration but still have an unfused area along a sidewall. Both conditions can matter when checking a joint.
Can a weld look good but still lack fusion?
Yes, a smooth surface can hide a weak or unbonded boundary below the bead. Visual inspection can identify some surface clues, but it can’t confirm every internal condition. Use the inspection method required for the job, especially for assemblies where weld failure could put people at risk.
What causes lack of fusion in a weld?
Lack of fusion can result from insufficient heat at the joint, fast travel, poor torch or electrode angle, contamination, or slag trapped between passes. Joint shape and access can also make it hard to reach a sidewall. The right correction depends on the specific cause and welding procedure.
Does the heat-affected zone melt during welding?
No, the HAZ is base metal that changed from the welding heat but didn’t melt. The fusion zone did melt and solidify. The HAZ’s size and properties depend on the material and heat cycle, so its appearance alone can’t confirm the quality of the fusion boundary.
Make the Joint, Not Just the Bead
Fusion is the bond made when the intended base-metal surfaces melt and join. That’s the part worth focusing on when you’re learning to weld or trying to judge whether a joint needs closer inspection.
I’d put joint preparation and a clear view of the weld pool ahead of chasing a perfect-looking bead. Those habits help you notice when heat isn’t reaching the joint, and they make troubleshooting less like guesswork.
Your next step is simple: check the material, joint, and job requirements before choosing settings or making a repair. If the weld carries a safety-critical load, use the required inspection process and get qualified help rather than trusting appearance alone. A clean bead is nice; a sound bond is the point.