How to Scratch Start TIG Weld: Safe Arc Control for Beginners
Scratch-start TIG welding is a useful way to make a TIG arc when your machine does not have high-frequency or lift-arc starting. Instead of pressing a start button or using a high-voltage signal, you briefly touch the tungsten electrode to the workpiece and lift it away. That simple motion can produce a clean arc, but only if the contact is controlled.
The main challenge is avoiding tungsten contamination. If the tungsten stays in contact too long, drags across the metal, or touches the molten puddle, it can leave particles in the weld and make the arc unstable. You also need the correct polarity, shielding gas, and a safe work setup before striking the arc.
This guide explains how to scratch start tig weld on suitable steel and other direct-current-compatible materials. You will learn how to prepare the joint, set the torch, start the arc without gouging the work, control the puddle, stop the weld, and check the finished bead. The method is practical for beginners, but it requires more care than a modern high-frequency start.
At a glance
- Use direct current electrode negative and argon unless your machine and material instructions specify otherwise.
- Touch the tungsten lightly, then lift it immediately to establish a short arc.
- Inspect the bead and tungsten for contamination before continuing with more welding.
How to scratch start tig weld safely and consistently
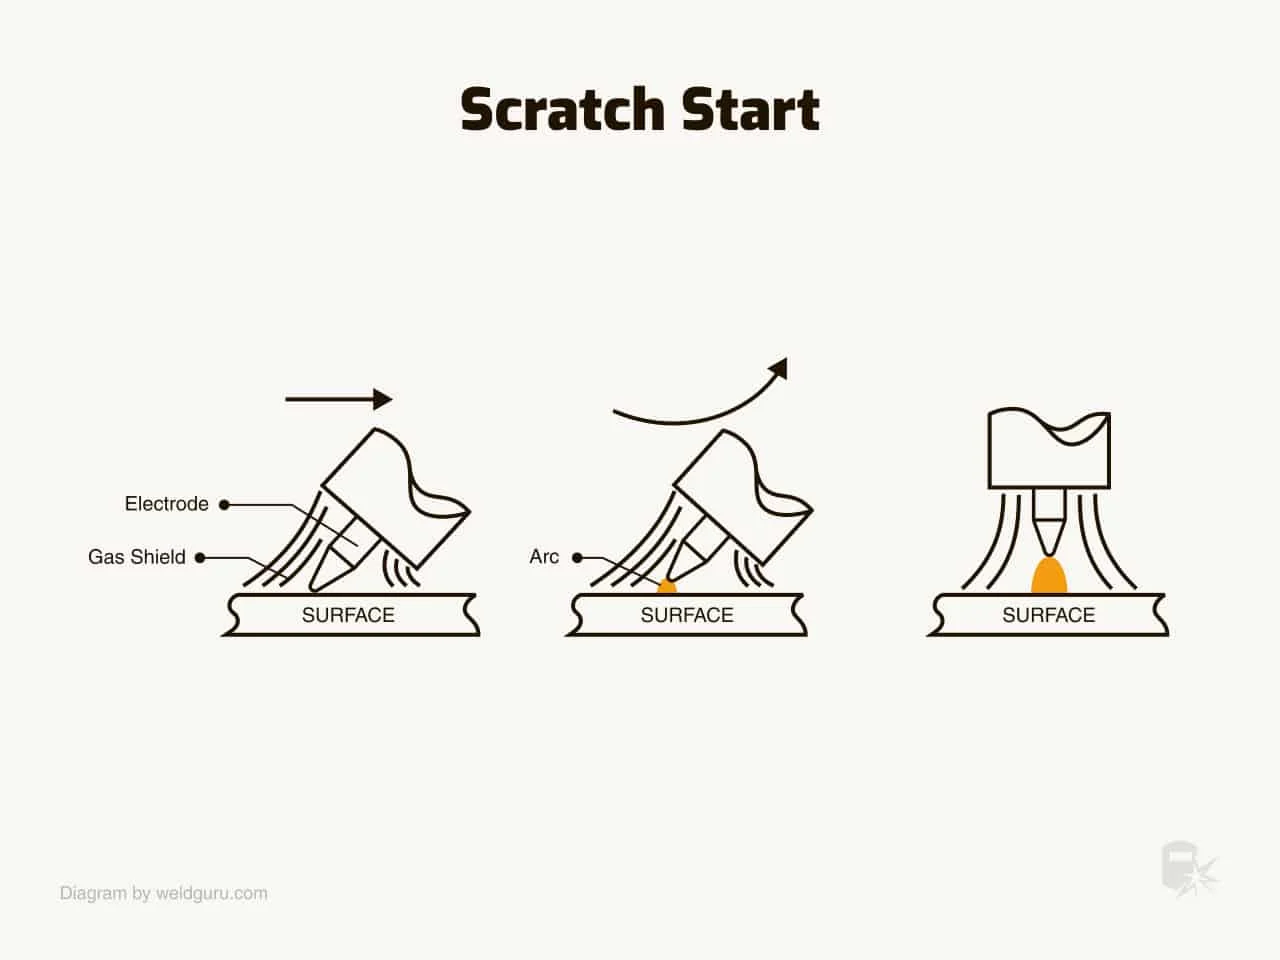
Scratch starting is best understood as a controlled touch-and-lift motion, not as dragging the tungsten across the joint like a match. The tungsten makes brief electrical contact with the workpiece, then the operator lifts the torch just enough for the arc to continue across the small gap.
This technique is most suitable for clean steel, stainless steel, and other materials that can be TIG welded using direct current. It is generally not the right starting method for aluminum, which usually requires alternating current and often benefits from high-frequency starting. Always compare the machine manual, torch connections, and material requirements before welding.
Tools you will need
- DC-capable TIG machine with a torch, work clamp, and suitable electrode holder or torch connection
- Pure argon cylinder, regulator, and flow-control equipment for shielding the weld
- 2% lanthanated or similar TIG tungsten, sharpened for a stable arc
- Clean filler rod matched to the base metal, if the joint requires filler
- Welding helmet, TIG gloves, flame-resistant clothing, safety glasses, and hearing protection when appropriate
- Stainless-steel wire brush, degreaser, and clean lint-free cloth for joint preparation
- Optional: scrap metal of the same or similar material for practicing the start
Step 1 Confirm the machine and material are compatible
Read the welder’s instructions and identify whether it can provide a stable scratch-start TIG arc. The machine needs a TIG-capable output, a gas supply, and a torch arrangement that allows the tungsten to carry the welding current. A stick-welding power source may not provide the gas control or current behavior needed for TIG.
For most steel and stainless-steel work, set the machine for direct current electrode negative, often abbreviated DCEN. In this arrangement, the torch is connected to the negative terminal and the work clamp to the positive terminal, although the exact connection depends on the machine design. The wrong polarity can cause excessive tungsten heating, a broad unstable arc, or poor penetration.
Do not assume that a scratch start makes every TIG machine suitable for every material. If the machine does not support the required polarity, amperage range, shielding gas, or torch connection, stop before trying to weld.
Step 2 Make the work area safe and attach the connections
Place the workpiece on a stable, fire-resistant surface and remove flammable materials from the area. Welding produces ultraviolet radiation, hot metal, fumes, and sparks even when the weld is small. Provide ventilation that removes fumes without blowing the shielding gas away from the joint.
Connect the torch, work lead, gas hose, and regulator according to the welder’s instructions. Open the cylinder valve slowly, check the connections for leaks using an approved leak-checking method, and set the argon flow within the range recommended by the torch and cup manufacturer. Excessive gas flow can create turbulence and draw air into the shielding area, so more is not automatically better.
Attach the work clamp directly to clean metal on the workpiece or to a clean welding table that is electrically connected to it. A clamp resting on paint, rust, scale, or a loose fixture can produce intermittent current and an unreliable arc.
Important
Never weld on a sealed container, unknown coating, or metal that may have held flammable materials. Stop if you smell burning coatings, see unexpected fumes, or cannot establish a safe ventilation and fire-control setup.
Step 3 Prepare the joint and sharpen the tungsten
Remove oil, paint, rust, mill scale, and moisture from the joint. Use a suitable degreaser first, allow the surface to dry, and then use a dedicated stainless-steel brush or clean abrasive reserved for the material. Contamination on the joint can cause porosity, inclusions, and an erratic puddle.
Grind the tungsten lengthwise so the grinding marks run in the same direction as the electrode. A pointed or lightly truncated point is commonly used for DC TIG welding. The exact diameter and tip shape depend on amperage, joint access, and the electrode manufacturer’s recommendations.
Keep the tungsten clean after sharpening. Do not allow it to contact oily gloves, the floor, dirty filler rod, or the inside of a contaminated cup. A clean tungsten is especially important with scratch starting because the electrode intentionally contacts the work at the beginning of the arc.
Step 4 Set the torch and make a practice start
Hold the torch so the tungsten points toward the joint and the ceramic cup is close enough to provide gas coverage. Keep the tungsten extension modest; a long extension is harder to control and more vulnerable to side contamination. Position the filler rod nearby if you will add filler, but keep it out of the way during the initial start.
Before touching the work, place the torch at roughly a right angle to the surface, then lean it slightly in the direction of travel. The tungsten should be close to the metal without touching it. If your machine has a foot pedal or hand control, set the current low enough for a practice piece and increase it only as needed for the material thickness.
Practice on scrap first. This lets you learn how quickly the arc responds without damaging the actual joint. Keep the torch steady, lightly touch the tungsten to the metal, and immediately lift it a small distance.
The correct motion feels more like a brief tap followed by a lift than a long scratch. A useful way to approach how to scratch start tig weld is to check your progress after each stage.
Step 5 Scratch and lift to establish the arc
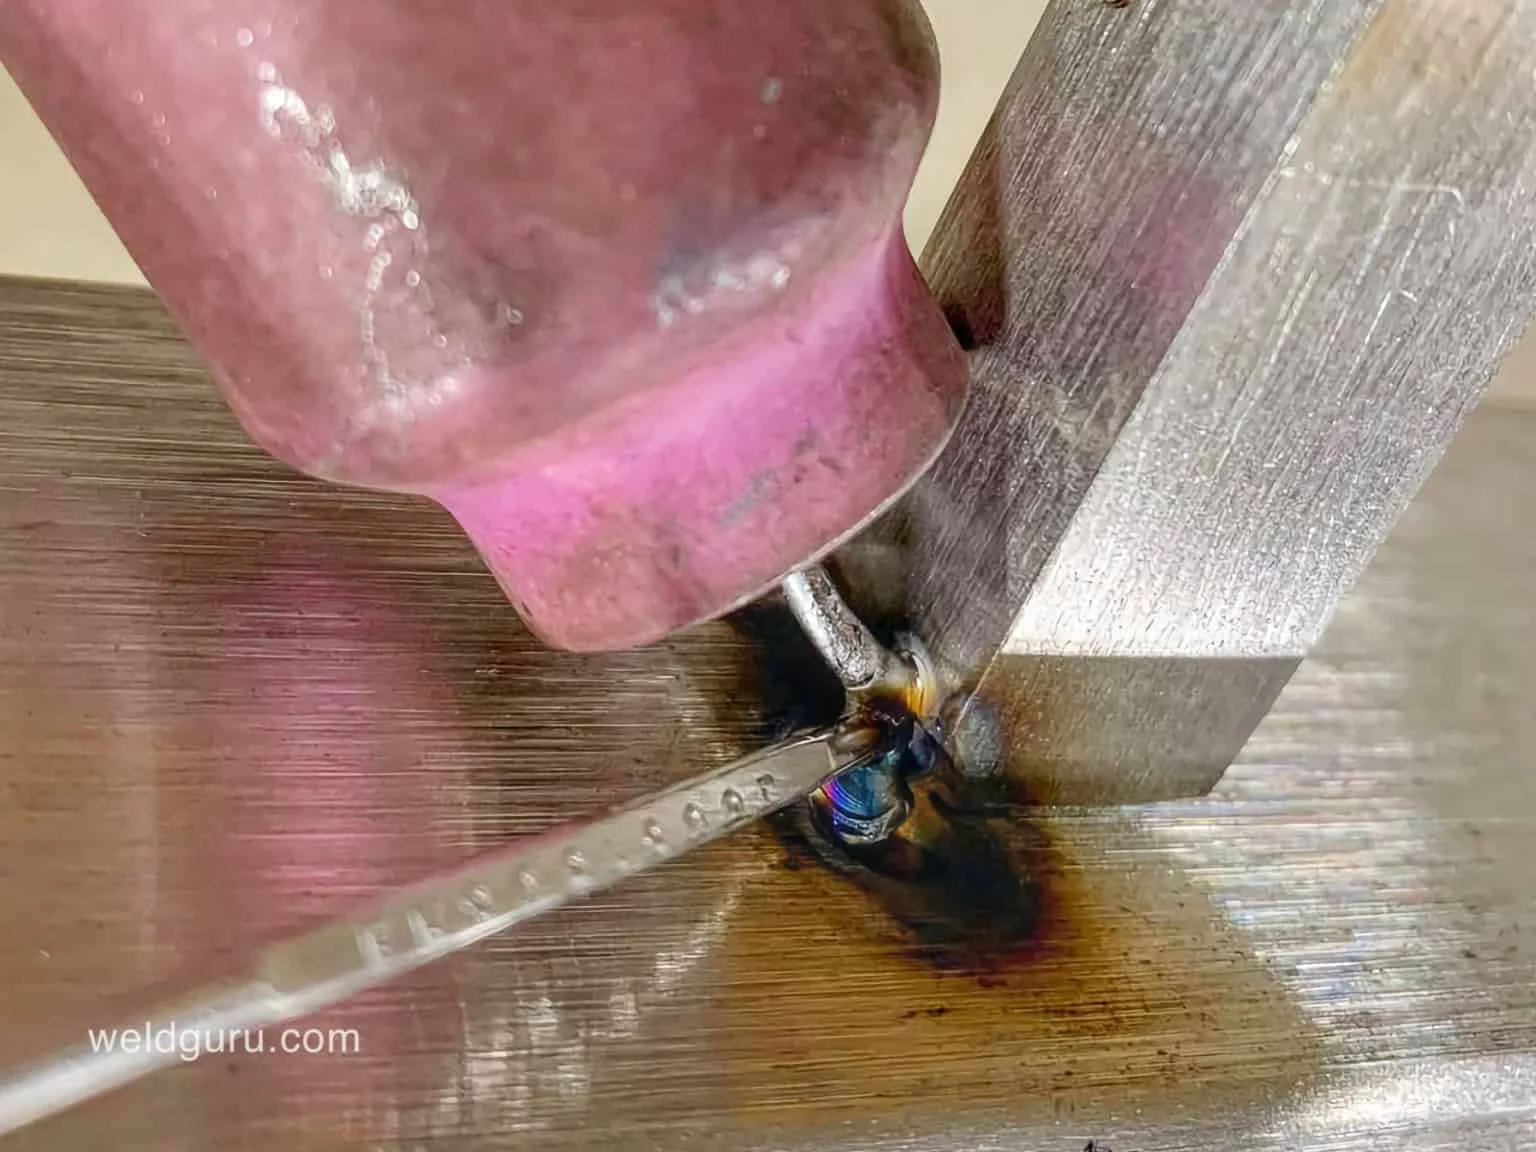
With shielding gas flowing, touch the tungsten lightly to the starting point or just beside it. Move the torch a very short distance while maintaining contact, then lift the tungsten enough to create a small arc gap. The motion should be controlled and shallow; pressing down or dragging several millimeters increases the chance of gouging the work and bending the electrode.
As the arc starts, hold the tungsten a short, consistent distance above the work. A stable arc has a focused sound and appearance, while a long arc looks spread out and may fail to protect the puddle. The exact arc length depends on tungsten diameter and current, but keeping it close is a useful beginner rule.
If the arc does not start, do not keep scraping forcefully. Lift the torch, check the clamp and polarity, confirm that gas is flowing, and try again on a clean spot. Repeated hard contact can flatten or contaminate the tungsten.
Helpful tip
A practical scratch-start sequence is: position, touch lightly, move a fraction, lift, and hold. If the tungsten visibly sticks, stop welding, break the connection safely, and inspect the electrode before trying again.
Step 6 Form the puddle before adding filler
Once the arc is established, pause briefly over the starting point until a small molten puddle forms. The puddle is the shiny, fluid area of melted base metal. Do not add filler immediately if the base metal has not melted; the rod may ball up or sit on top instead of joining the work.
Keep the torch moving smoothly once the puddle reaches the size appropriate for the joint. Maintain a consistent torch angle and arc length. For a basic butt or lap joint, aim the arc at the leading edge of the puddle rather than directly at the filler rod.
Feed filler by dipping the end into the front of the puddle and withdrawing it without allowing the rod to touch the tungsten. Keep the filler within the shielding gas while it is hot. If the rod leaves the gas coverage and becomes oxidized, trim the affected end before feeding it again.
Step 7 Travel steadily along the joint
Move at a speed that keeps the puddle controlled and the bead evenly fused into both sides of the joint. Traveling too slowly can overheat thin material and produce a wide, sunken bead. Traveling too quickly can leave a narrow bead with incomplete fusion.
Watch the edges of the puddle rather than only the bright arc. You should see the base metal melt smoothly at the intended joint line. A clean, steady gas shield usually leaves a bright or evenly colored bead, depending on the material, while gray, chalky, or heavily discolored metal can indicate shielding trouble or overheating.
Scratch-start TIG requires particular attention during the first inch of the weld. The starting point may contain a small inclusion if the tungsten touched too firmly. If the appearance matters, use a practice start outside the finished joint when the joint design allows it, or clean and inspect the start before continuing.
Step 8 Finish the weld and remove the torch correctly
At the end of the joint, reduce travel speed slightly if needed and fill the crater rather than pulling away abruptly. A crater is the depression left when the molten puddle shrinks. Depending on the machine, you may reduce current with a foot control or simply add a final filler dab while moving the torch off the joint.
After stopping the arc, keep the torch over the finished area for a short period while shielding gas continues. This protects the hot tungsten and weld surface from immediate oxidation. Follow the machine’s gas-control instructions rather than manually interrupting the gas supply at the cylinder.
Place the torch on a safe nonflammable surface and allow the workpiece to cool naturally. Do not touch the joint or tungsten with bare hands, even if the metal no longer appears red.
Step 9 Inspect the tungsten and the completed bead
Turn off the welding output and inspect the tungsten once it is safe to handle. A normal start leaves the tip reasonably sharp and clean. A flattened, balled, cracked, or visibly contaminated tip should be reground before the next weld.
Examine the bead under good lighting. Look for continuity, even width, fusion at both edges, and a filled end crater. Check for visible pores, dark inclusions, undercut along the edges, excessive spatter, and areas where the bead appears to sit on top without joining the base metal.
Understanding how to scratch start tig weld also means recognizing the limits of the method.
For a practice weld, bend or section the sample only if you have the appropriate equipment and know how to perform that evaluation safely. Visual appearance alone cannot prove structural strength. If the weld will carry a safety-critical load, follow the applicable welding procedure and have the work evaluated by a qualified person.
Check your result
A good beginner result has a stable arc, a clean and controlled puddle, smooth tie-in at both sides of the joint, and a tungsten tip that did not become visibly contaminated.
What makes scratch-start TIG different?
High-frequency TIG starts the arc without touching the tungsten to the workpiece. Lift-arc systems use a controlled low-current contact and sense the lift. Scratch starting is more basic: the operator creates the initial contact and separation manually.
That difference affects both technique and cleanliness. Scratch starting can leave tungsten particles in the weld if the electrode sticks or drags. It is also less convenient for highly visible starts, thin sheet, or applications where contamination is unacceptable.
Why DCEN is commonly used
Direct current electrode negative directs most of the welding heat toward the workpiece while keeping the tungsten relatively cool. This arrangement is widely used for TIG welding steel and stainless steel with argon shielding.
Polarity is not a universal substitute for a procedure specification. Some materials and machines require different settings, so verify the recommended current type before welding an unfamiliar alloy.
When scratch starting is a poor choice
Choose another starting method when the job demands a completely uncontaminated weld start, when the material is extremely thin, or when the machine provides a suitable high-frequency or lift-arc function. Aluminum commonly requires AC TIG and a starting system designed for that process.
If you need to weld a pressure vessel, vehicle safety component, structural connection, or any part whose failure could injure someone, do not rely on a casual practice setup. Use a qualified welding procedure and appropriate inspection.
Troubleshoot the arc, bead, and tungsten
Most beginner problems come from one of four causes: poor electrical contact, incorrect settings, contaminated surfaces, or an arc that is too long. Change one variable at a time so you can identify what corrected the problem.
| What you see | Likely cause and correction |
|---|---|
| The arc will not start | Check work-clamp contact, torch connections, polarity, gas flow, and machine mode. Try a clean practice spot instead of pressing harder. |
| The tungsten sticks or becomes dirty | The contact lasted too long or the electrode entered the puddle. Stop, allow it to cool, and regrind the contaminated section. |
| The bead is gray or porous | Inspect gas flow, leaks, cup condition, drafts, surface cleanliness, and torch distance. Shielding must cover the puddle and hot filler. |
| The metal burns through | Current may be too high, travel may be too slow, or the material may be too thin for the technique. Reduce heat and move more steadily. |
| The bead sits on top | The joint may be dirty, current too low, or travel too fast. Clean the joint and watch for actual melting at both edges. |
Correcting tungsten contamination
If the tungsten touches the molten puddle, stop and inspect it. A contaminated electrode can make the arc wander, introduce dark particles, and prevent a consistent puddle. Do not simply continue hoping the contamination will burn away.
Regrind the electrode lengthwise beyond the affected area, wipe away grinding dust, and restore a suitable point. If the tungsten is badly deformed or cracked, replacing it is safer than trying to salvage a damaged tip.
Improving an unstable arc
First shorten the arc and steady your torch hand. Then check that the gas cup is not damaged, the collet holds the tungsten firmly, and the work clamp is attached to clean metal.
Air movement can also disturb shielding. Close doors or redirect fans, but do not sacrifice ventilation. The goal is to remove fumes while keeping the gas envelope around the arc intact.
Beginner questions about scratch-start TIG welding
These questions cover the points that most often cause confusion when someone first attempts a manual TIG start.
Can I scratch start TIG weld without high-frequency?
Yes, if the machine supports TIG welding with the required current and polarity. Scratch starting does not need high-frequency circuitry, but it does require a suitable torch, shielding gas, work connection, and a controlled touch-and-lift technique.
Should the tungsten actually touch the metal?
It makes brief contact during the starting motion, but it should not remain pressed against the work. Touch lightly, lift immediately after the arc begins, and regrind the tungsten if it sticks or contacts the puddle.
Can I use scratch start on aluminum?
Usually not with a basic DC scratch-start setup. Aluminum TIG welding generally uses alternating current to clean and penetrate the oxide layer, along with equipment and starting controls suited to AC operation.
What gas should I use for scratch-start TIG?
Pure argon is the usual shielding gas for beginner TIG work on steel and stainless steel. Use the flow rate recommended for your torch and cup, and protect the arc from drafts. Do not substitute oxygen or ordinary compressed air.
Why does my tungsten become contaminated immediately?
The torch may be starting with too much pressure, the arc may be too long, or the tungsten may be dipping into the puddle. Use a lighter touch, lift promptly, keep the electrode short and steady, and stop to regrind it after contamination.
Finish with a clean, verified scratch-start weld
Learning how to scratch start tig weld is mainly an exercise in controlled contact, clean preparation, and steady arc control. Use compatible equipment, DCEN for suitable direct-current materials, pure argon shielding, and a sharply prepared tungsten. A brief touch followed by an immediate lift is enough; forceful dragging usually creates more problems than it solves.
Practice on clean scrap before committing to a finished joint. After each attempt, inspect the bead and the tungsten, correct one problem at a time, and stop if the equipment, material, fumes, or intended application is beyond your confidence and training. A clean start is useful, but safe setup and verified weld quality matter more than simply getting an arc to light.