How to Hold a MIG Gun: Clear Instructions and Common Mistakes
Hold the MIG gun firmly but lightly with both hands, keep the contact tip a consistent distance from the work, and move at a controlled angle.
A faint change in arc sound a wandering bead or spatter collecting on one side of the weld often means your gun position changed before the problem became.
Learning how to hold a mig gun is less about squeezing the handle and more about creating a stable path for the wire shielding gas and arc Your.
This guide explains the standard two-handed grip the distances and angles that matter how to approach flat horizontal vertical and overhead joints and how to recognize mistakes from.
- ✓Use a relaxed two-handed grip and let your arms, not just your wrists, guide the gun.
- ✓Keep a consistent contact-tip-to-work distance and maintain the correct travel direction for the wire size and process.
- ✓Use a slight push angle for many short-circuit MIG applications, while adapting work angle to the joint.
- ✓Support the gun and your hands against a stable reference when practical, but never brace on hot or electrically unsafe surfaces.
- ✓Read bead shape, spatter, arc sound, and wire behavior together before changing machine settings.
How to Hold a MIG Gun
The basic position is a relaxed two-handed grip Hold the gun handle in your dominant hand with your index finger near the trigger but not pressing it accidentally.
Keep your wrists fairly straight and your elbows slightly bent Instead of making the entire travel motion with your fingers guide the gun with your forearms and shoulders.
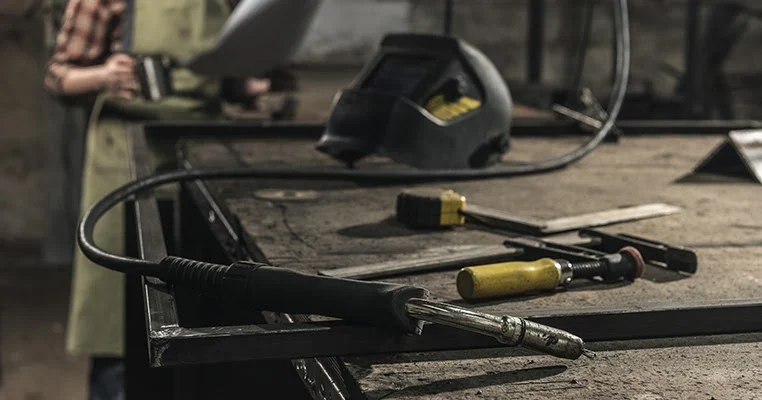
- Pressure: Hold the gun securely enough to prevent rotation, but do not clamp down until your hand tires.
- Support: Rest a forearm or elbow on a clean, stable, nonconductive support when it is safe and does not restrict movement.
- Visibility: Position your head and body so you can see the leading edge of the puddle without leaning over the arc.
- Movement: Move your whole hand and forearm smoothly rather than steering only with your fingertips.
Where each hand belongs
Your rear hand controls the trigger and general direction Your forward hand refines the angle and helps prevent the gun from twisting Depending on the gun design you.
Do not place your forward hand directly on a hot nozzle bare copper or recently welded workpiece A nozzle can remain hot after the arc stops and spatter.
Use your stance as part of the grip
Stand with your feet far enough apart to resist a small pull from the cable Put one foot slightly forward in the direction of travel but avoid a.
A stable stance also helps you maintain a consistent travel speed When your balance shifts the gun commonly speeds up slows down or changes angle Those changes may.
How Angle, Distance, and Travel Direction Change the Weld
Gun position has three related parts: the distance from the contact tip to the work, the travel angle, and the work angle. A good grip cannot compensate for an inconsistent distance or an angle that does not suit the joint.
For many common solid-wire short-circuit MIG applications a slight push angle is a useful starting point The gun points in the direction of travel often around 10 to.
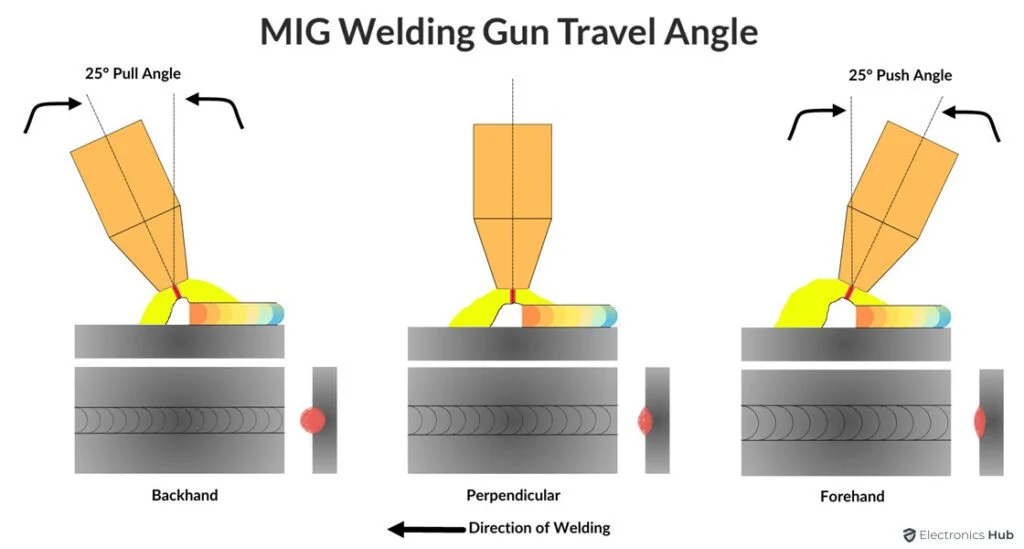
- Contact-tip distance: Keep the wire extension consistent; excessive extension can soften the arc and reduce control.
- Travel angle: A modest push angle often gives useful puddle visibility and a flatter bead on typical steel work.
- Work angle: Center the gun over the joint unless the joint geometry requires a deliberate adjustment.
- Direction: Keep the nozzle and wire aimed at the leading portion of the puddle, not far behind it.
Contact-tip-to-work distance
The important distance is measured from the end of the contact tip to the workpiece not merely from the nozzle The wire extending beyond the tip is called.
A longer-than-intended extension can produce a less forceful arc more inconsistent penetration and a wire that seems to burn back unpredictably A very short extension can bring the.
Use the procedure or machine guidance for the exact wire and transfer mode As a practical habit choose a comfortable distance observe the arc and keep that distance.
Travel angle versus work angle
Travel angle describes the tilt in the direction you move Work angle describes the gun s position across the joint On a butt joint the work angle is.
If the work angle is too far toward one side of a fillet the arc can favor one plate The result may be uneven fusion an off-center bead.
Push and pull techniques
With a push technique the gun points in the direction of travel and the nozzle tends to lead the puddle This often improves visibility and can produce a.
With a pull technique the gun trails behind the puddle This can create a more pronounced bead and may be useful in some situations but it can also.
Do not switch from push to pull simply to repair a defect without considering wire type gas thickness and joint design A change in direction also changes puddle.
Holding the Gun on Different Joint Positions
The best grip changes slightly with the position of the weld In a flat joint you can usually support the gun and watch the puddle easily In vertical.
Before starting dry-run the motion with the arc off Move the gun from the beginning to the end of the weld and check whether the cable snags your.
- Flat: Keep the wire centered in the joint and use a stable forearm position to maintain a consistent puddle.
- Horizontal: Keep the gun from sagging toward the lower plate and watch for gravity-driven overlap.
- Vertical: Use a controlled pace and a compact motion suited to the procedure; avoid letting the puddle run ahead of you.
- Overhead: Minimize unnecessary weaving, keep the nozzle distance steady, and protect yourself from falling spatter.
Flat-position welds
Flat welding usually gives you the greatest freedom to support your arms Keep the gun approximately perpendicular across the joint and use a small travel angle If your. This distinction matters when answering “how to hold a mig gun”.
Watch the leading edge of the puddle rather than staring only at the bright arc The puddle shows whether you are moving too fast lingering too long or.
Horizontal fillets
In a horizontal fillet gravity pulls the molten metal toward the lower plate Keep the work angle centered in the corner and avoid pointing the gun too steeply.
Traveling too slowly can produce a wide, sagging bead with overlap at the lower toe. Traveling too quickly may leave insufficient fill or poor fusion at the upper toe. A compact, controlled motion is generally easier to manage than a broad weave.
Vertical welding
Vertical welding demands a position that lets you control the puddle as it moves against gravity. Many operators weld vertical-up when penetration and control are needed, using a slower progression and a small side-to-side movement only when the procedure calls for it.
Keep both hands involved but do not let the forward hand force the nozzle into the joint If the gun is too close the puddle can become difficult.
Overhead welding
Overhead work increases exposure to spatter heat and falling debris Wear the required protective clothing gloves eye and face protection and other equipment appropriate to the work environment.
Use the smallest controlled motion that produces the required bead A wide weave makes the puddle harder to support overhead and can increase the amount of molten metal.
Common MIG Gun-Holding Mistakes and Their Effects
Many weld defects begin as small changes in hand position The operator may compensate for a poor view cable drag fatigue or an awkward joint by twisting the.
When troubleshooting, inspect the gun position before changing multiple machine controls. Adjust one variable at a time so you can tell whether the improvement came from a better grip, a corrected angle, or a new setting.
- Death grip: Excessive squeezing causes fatigue and makes fine, smooth movement harder.
- Wrist-only travel: A short repetitive motion encourages a changing angle and uneven speed.
- Chasing the puddle: Moving the gun erratically to follow molten metal can create an inconsistent bead.
- Leaning on the work: Contact with hot or electrically unsafe surfaces can injure you or damage equipment.
Holding the gun too tightly
A firm grip prevents the gun from rotating but excessive pressure creates tension in the fingers wrist and forearm That tension becomes more noticeable as the weld continues.
Loosen your fingers slightly while keeping the handle aligned. If the gun feels difficult to control without a tight grip, check for cable drag, an awkward approach angle, or a position that requires too much reach.
Letting the cable control the gun
A heavy cable can pull the gun sideways or twist the neck Route the cable over your shoulder or arm only if that method is safe and does.
If the cable must bend sharply to reach the joint, reposition the machine or workpiece. Fighting cable tension with your wrist is a temporary fix that often produces a wandering bead.
Changing distance during the weld
Operators sometimes move the nozzle closer when the arc becomes noisy or farther away when spatter appears That response can make the problem worse Excessive stickout changes the.
First stabilize your hand and restore a consistent distance. Then check the wire, liner, contact tip, shielding gas, polarity, and machine settings if the arc remains abnormal.
Reading the Weld to Correct Your Hand Position
The finished bead can reveal how you held the gun but no single visual clue proves one cause Inspect the bead together with the arc sound wire behavior.
A useful diagnostic habit is to make a short test weld on clean, similar material. Keep the machine settings fixed and change only your hand position or travel technique. This isolates technique from equipment and material variables.
- Uneven bead width: Often suggests inconsistent travel speed, changing angle, or an unsteady hand path.
- Bead favoring one side: Check work angle and whether the wire is aimed into the joint root.
- Heavy spatter: Check stickout, arc length, polarity, wire condition, gas coverage, and settings before blaming grip alone.
- Thin or cold-looking bead: Consider excessive travel speed, poor joint access, or an angle that directs heat away from the joint.
Bead shape and fusion
A consistent bead generally has a predictable width and smooth transitions at the toes If one side has a sharp edge or the bead repeatedly climbs one plate.
Surface appearance cannot confirm internal fusion. For work where strength, code compliance, or critical service matters, follow the applicable qualified procedure and inspection requirements rather than judging quality by appearance alone. Keep these limitations in mind when considering “how to hold a mig gun”.
Arc sound and wire behavior
A stable MIG arc often has a repeatable sound for the selected process and settings. Popping, stubbing, or irregular wire feeding can indicate incorrect settings or a mechanical problem, but a changing contact-tip distance can produce similar symptoms.
Watch whether the wire seems to push the gun backward or whether the gun is being pulled toward the work A steady hand should not be forced to.
Safety and Ergonomics Before You Pull the Trigger
Correct gun handling starts before the arc Remove combustible materials from the work area provide suitable ventilation secure the workpiece and use the protective equipment required for the.
Inspect the gun, cable, trigger, connections, nozzle, and contact tip before use. Do not operate equipment with damaged insulation, exposed conductors, loose connections, or a trigger that sticks. Follow the welder and gun manufacturer’s instructions for setup, duty cycle, and maintenance.
- Protective clothing: Wear a properly rated helmet, gloves, nonflammable clothing, and footwear that cover exposed skin.
- Ventilation: Keep your breathing zone away from the plume and use suitable local exhaust or respiratory controls when required.
- Electrical awareness: Keep gloves and equipment dry, avoid touching energized parts, and disconnect power before servicing.
- Hot work: Treat the nozzle, workpiece, and nearby metal as hot until they have cooled and been identified as safe.
Preventing fatigue
Fatigue changes technique gradually. Your elbow may drop, the wrist may bend, and the gun may drift closer to the work. Break long welds into manageable sections when the procedure allows, and reposition your body instead of holding an uncomfortable reach.
Keep the gun close to your centerline without crowding the joint A neutral shoulder and wrist position provides better control than reaching far to one side If the.
Supporting the gun safely
A clean support can improve consistency especially for a straight seam You may support a forearm against a stable fixture or rest a gloved hand in a way.
Never use the workpiece as a hand rest merely because it looks cool Metal can retain heat carry welding current or have sharp edges Keep your body and cables positioned so an accidental movement cannot place you.
How to Practice MIG Gun Control
Practice should isolate movement before you add a difficult joint or unusual position Begin with clean scrap of similar thickness and use the machine procedure appropriate to the.
First rehearse the motion with the gun switched off and the wire safely managed Identify where you will begin where you will stop how you will support your.
- Set up a stable workpiece at a comfortable height and orientation.
- Place your feet so you can reach the full test length without twisting.
- Hold the gun with both hands and establish the intended work and travel angles.
- Start the arc and focus on the leading edge of the puddle.
- Maintain the same contact-tip distance and travel speed for a short section.
- Stop safely, allow the work to cool as appropriate, and inspect the bead.
- Change one technique variable at a time, such as support, angle, or travel speed.
Use straight lines before weaving
A straight travel bead is a useful first exercise because it exposes inconsistent speed and angle Keep the wire aimed along the joint and avoid adding a weave.
Marking a reference line on clean scrap can help you see whether the gun wanders. You can also practice moving the gun along the line without welding, keeping the same wrist position and distance. The goal is repeatability, not speed.
Practice changing position
Once flat practice is consistent, repeat the same controlled motion in a horizontal or vertical orientation. Expect to adjust your stance and perhaps the travel strategy, but keep the basic principles: stable support, clear visibility, consistent distance, and deliberate angle.
Do not practice overhead welding casually. It requires suitable protective measures, a controlled work area, and an understanding of how the procedure behaves in that position. If a weld is safety-critical, training and qualified supervision are more appropriate than self-directed experimentation.
Troubleshooting When Technique Is Not the Only Problem
Gun position matters but it is only one part of a MIG system If the weld remains poor after you stabilize your grip examine the consumables and setup.
Look for contamination such as oil paint rust mill scale moisture or dirty gloves Poor fit-up and an unstable ground connection can also create defects that resemble poor.
- Gun: Inspect the nozzle, contact tip, liner, trigger, cable, and connections.
- Wire: Check spool condition, drive-roll pressure, feed path, and wire size.
- Gas: Confirm the correct gas, flow, connection, and protection from drafts.
- Work: Clean the joint, verify fit-up, and confirm a sound work connection.
When to stop adjusting your grip
If the arc is erratic even when the gun is stable continuing to change your hand position may waste time Stop and inspect the equipment or ask a.
Likewise, do not use grip adjustments to compensate for an unsuitable welding procedure. Material thickness, joint design, wire type, transfer mode, and position all place limits on what a particular technique can achieve.
FAQ: How to Hold a MIG Gun
Should I hold a MIG gun with one hand or two?
Use two hands when practical The rear hand controls the trigger and general direction while the forward hand helps stabilize the neck and maintain angle One-handed welding may.
How tight should my grip be?
Hold the gun firmly enough that it does not rotate or slip, but keep your fingers and wrist relaxed. If your hand becomes tense quickly, check cable drag, body position, and reach before simply gripping harder.
Should I push or pull the MIG gun?
A slight push angle is a common starting point for many conventional MIG applications because it can improve puddle visibility and produce a flatter bead Pulling may be.
How far should the MIG gun be from the metal?
Maintain the specified contact-tip-to-work distance for your wire and process and keep it consistent Measure from the contact tip rather than the nozzle If you do not have.
Where should I look while welding?
Watch the leading edge of the molten puddle and the joint line, not only the bright arc. This helps you see whether the wire is centered, whether both sides are receiving heat, and whether your travel speed is changing.
Why does my MIG gun keep moving closer to the work?
Fatigue cable tension an unstable stance and poor visibility commonly cause the gun to drift Support your forearm safely reposition your feet improve your view and route the.
Can I rest my hand on the workpiece while welding?
Only if the support is confirmed safe, stable, cool enough to touch, and electrically appropriate for the situation. As a general practice, avoid resting directly on the workpiece because it may be hot, sharp, contaminated, or part of the current path.
Conclusion
Good MIG gun control comes from a relaxed two-handed grip, a stable stance, consistent contact-tip distance, and an angle suited to the joint and procedure. The best technique also preserves visibility, limits fatigue, and keeps the cable from pulling the gun off course.
Use the weld, arc sound, and wire behavior as clues, but remember that not every defect is a grip problem. Safe equipment, clean material, suitable settings, shielding gas, and qualified procedures remain essential.
The answer to “how to hold a mig gun” should be applied with these conditions and limitations in mind.