T-Joint Welding Explained: Joint Setup, Techniques, and Tips
T joint welding joins two pieces at roughly 90 degrees, with one piece meeting the face of the other. A fillet weld is the usual choice, and a clean fit, sound tacks, and steady heat help the joint hold up.
Are you trying to weld a crosspiece onto a plate without pulling the whole assembly out of square? Or are you unsure whether the weld needs to go on one side or both?
I once rushed through tacking a small T-shaped assembly and started welding before checking the angle again. The finished joint looked tidy, but the upright had leaned just enough to make the next part awkward to fit. That’s a common mistake, not a dumb one.
I wrote this to give you a clear way to set up, weld, and check a T-joint without guessing your way through the job. It’s for beginners who want practical steps, plus anyone who needs a quick refresher before striking an arc.
Get the fit and sequence right, and you’re more likely to end up with a square assembly, a consistent weld, and less cleanup. Skip those checks, and you can wind up grinding out defects or discovering too late that the parts don’t fit.
Set aside about 9 minutes, and you’ll come away knowing how to:
- Set and tack a T-joint so it stays square.
- Pick a fillet weld size based on the drawing or job requirements.
- Spot common defects and adjust your technique.
- Choose a welding position and process that fit the work.
T Joint Welding: How to Set Up and Weld the Joint
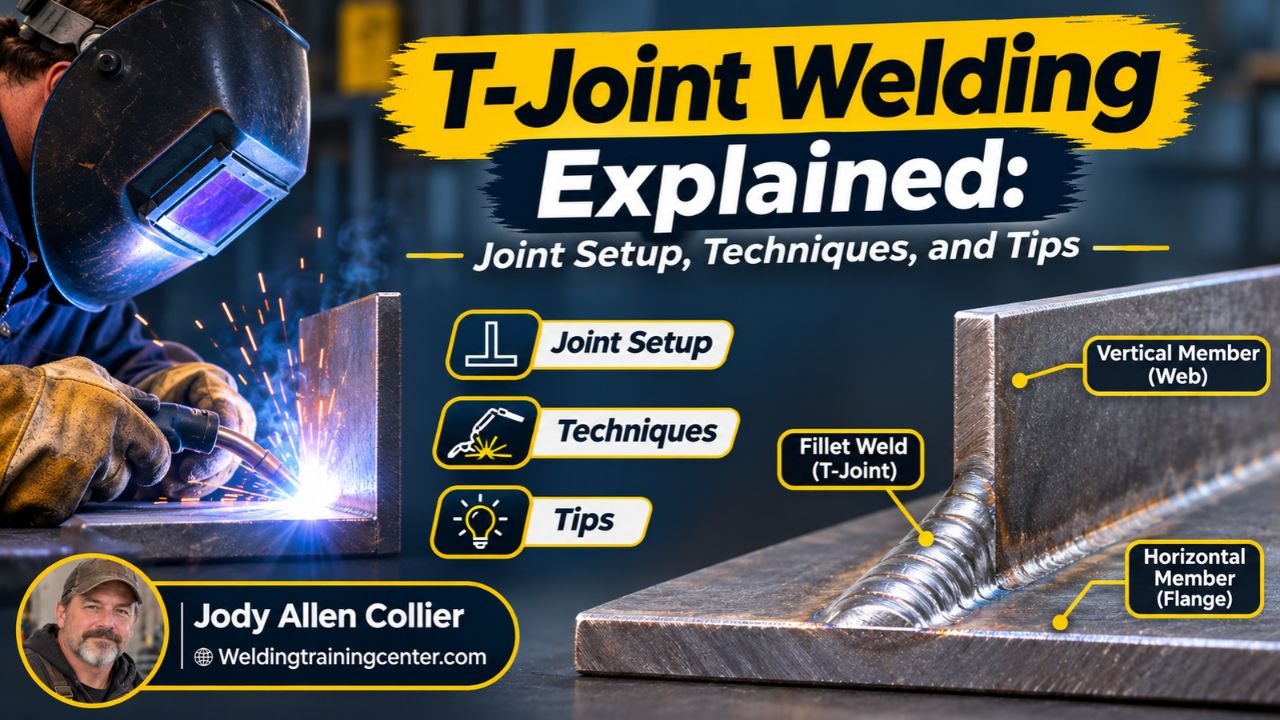
T joint welding works best when the parts meet cleanly at about 90 degrees, stay in position with well-placed tacks, and receive a continuous, properly sized weld. For a basic steel T-joint, fit the upright against the base plate, tack it, check the angle, then make the specified weld with a steady travel angle and consistent movement.
A T-joint is a connection where the edge or end of one piece meets the face of another. The most common weld is a fillet weld, a roughly triangular weld that fills the inside corner between the pieces.
Start with the drawing or job instructions. They should tell you where to weld, how long the weld should run, and what size or weld symbol to follow. If those details aren’t available, don’t assume that a bigger weld automatically makes the joint better.
- Clean the joint area. Remove oil, paint, rust, and loose scale where the weld will go. Contamination can make it harder to get a sound weld.
- Set the parts at 90 degrees. Use a square or fixture, and support the base so it won’t rock.
- Clamp and tack both ends. Keep the tacks small but sound enough to hold the parts through welding.
- Check fit-up again. Measure the angle and look for a gap or uneven contact at the root, the inside corner where the pieces meet.
- Weld to the specified size and length. Follow the applicable procedure and weld the required side or sides.
- Let the joint cool as directed, then inspect it. Look for visible gaps, cracks, missed sections, and obvious changes in shape.
A T-joint can use welds on one side or both, depending on the design and load. The weld symbol or written instructions matter more than a general rule of thumb, since the right detail depends on the material, thickness, loads, and applicable requirements.
T-joints are one of several common welding joint types. A fillet weld size and placement need to match the job, rather than a guess based on how beefy the weld looks.
Fit-Up, Weld Size, and Defects to Watch For
Good fit-up gives the weld a consistent place to join the parts, while correct weld size keeps the joint from being under- or over-welded. Check the root, the angle, the tack welds, and the specified dimensions before you settle into a long pass.
What should you do if the upright doesn’t sit flush against the plate? Stop and check whether the parts are warped, cut unevenly, or held at the wrong angle; don’t use extra weld metal to fill a gap unless the job instructions allow that approach.
The root opening is the gap between the parts at the joint. A small gap may be acceptable for a particular design, while a wide or inconsistent gap can make welding harder and may lead to burn-through, poor fusion, or an uneven profile. Use the specified fit-up tolerance when one is provided.
Weld size comes from the drawing, weld symbol, welding procedure, or applicable code requirements for the job. A fillet that’s too small may not provide the required strength; one that’s too large adds heat and filler metal, which can increase distortion without solving the actual problem.
| What you notice | What may be going on | What to check |
|---|---|---|
| The upright leans after welding | Heat pulled the assembly, or the tacks didn’t hold | Tack placement, clamping, and welding sequence |
| A gap opens at the root | Parts don’t fit evenly, or the assembly shifted | Cut edges, clamps, and root opening |
| Weld metal sits on the surface without blending | Poor fusion or unsuitable technique | Joint cleanliness, settings, angle, and travel |
| Holes or deep notches appear at the weld edge | Excessive heat or poor control may be involved | Material thickness, travel speed, and settings |
| The weld has visible pits | Contamination or shielding trouble may be involved | Surface prep, shielding gas flow, and equipment |
Those symptoms don’t all have one cause. Check the material, process, equipment settings, and the procedure before changing your technique; a machine adjustment that helps one setup can create a new problem on another.
I once found that an assembly I’d tacked on one end alone shifted as I welded the open side. I stopped, brought the parts back into alignment, and added holding tacks before continuing. That pause saved me from making a crooked joint harder to fix.
Pro Tip: Alternate short weld sections from one side to the other when the procedure and joint design allow it. Spreading heat can help limit distortion, but don’t change a required weld sequence without approval.
A welding joint design decision starts before the arc: the parts, loads, access, and required weld all affect the setup. A lap joint connection overlaps the pieces instead of meeting edge-to-face, while a corner joint setup joins parts at an outside corner. Those alternatives may suit a different assembly, but they aren’t interchangeable with a T-joint just because they look easier to tack.
Welding Position, Process, and Safe Work Habits
The best welding position and process depend on access, material, equipment, and the job requirements. A flat-position T-joint is often easier to control than a vertical or overhead joint, but shop layout and assembly size don’t always give you that luxury.
Welding positions describe how the weld is placed and how the work is oriented. 1F means a fillet weld in the flat position, 2F a horizontal fillet weld, 3F a vertical fillet weld, and 4F an overhead fillet weld. Positions affect puddle control, so use the qualified procedure or training for the position you need.
Common processes include SMAW (stick welding), GMAW (MIG welding), and GTAW (TIG welding). Each has different equipment, filler, and setup needs; follow the welding procedure and the equipment maker’s instructions for the material and thickness in front of you.
- SMAW uses a coated electrode and can suit work where portability matters.
- GMAW uses a continuously fed wire and shielding gas, so drafts can disrupt shielding.
- GTAW uses a nonconsumable tungsten electrode and gives the welder close control, though it generally calls for more time and skill.
Which process should you pick for a thin T-joint? Choose the process and settings approved for the material and thickness, then make sure your technique won’t put too much heat into the thin part. Thin metal can distort or burn through if the heat and travel speed don’t suit the setup.
Before welding, protect yourself and people nearby from arc light, hot metal, fumes, and fire. Wear a welding helmet with the correct filter shade, safety glasses, gloves, flame-resistant clothing, and suitable footwear. Keep flammable items away, use screens to block arc exposure, and arrange ventilation that fits the material and process.
Important Tip: Coated, galvanized, or unknown metals can produce hazardous fumes when heated. Identify the material and coating before welding, remove coatings only with an appropriate safe method, and use suitable ventilation or respiratory protection based on the hazard; ask a qualified safety professional if you can’t confirm what controls are needed.
Don’t weld a closed container or a part that may hold flammable liquid or vapor unless it has been made safe under a qualified procedure. Keep a suitable fire extinguisher nearby, and check the work area after welding for smoldering material. A few minutes of prevention beats a shop fire.
FAQs About T Joint Welding
Is a fillet weld always used for a T-joint?
No. A fillet weld is common, but the required weld depends on the design, material, loading, and job requirements. Some joints call for a groove weld or another detail to achieve specified penetration or strength.
Follow the drawing, weld symbol, and approved procedure rather than choosing a weld type by appearance.
Should a T-joint be welded on one side or both?
Either arrangement can be correct, depending on the design and access. A drawing or weld symbol should show the required side, length, and size. Don’t assume that welding both sides is allowed or needed; extra weld metal can add heat, distortion, and cost without meeting a stated requirement.
How do you keep a T-joint square while welding?
Clamp the parts firmly, check the angle before tacking, and place tacks where they can resist movement. Recheck the angle after tacking, since tack welds and uneven contact can pull parts out of position. If the assembly still shifts, stop and correct the support or fit-up before laying down the main weld.
What causes porosity in a T-joint weld?
Porosity is a set of gas pockets in the weld metal. Contamination, poor shielding, drafts, or equipment and consumable problems can contribute, depending on the welding process. Clean the joint and check gas coverage or consumables before changing machine settings, and follow the approved procedure for the material.
Can a beginner weld a T-joint?
Yes, a beginner can practice T-joints with suitable training, safe equipment, and an appropriate practice setup. Start with scrap of matching material and thickness, then inspect the weld and ask a qualified instructor to review it. A practice weld doesn’t prove a joint is suitable for structural or safety-critical service.
Make the T-Joint Fit the Job
A sound T-joint starts with a square fit and a weld that matches the drawing, not with piling on more metal. My preference is to spend an extra minute checking the angle and tacks before welding; correcting fit-up is usually easier before the assembly heats up.
If you’re practicing, use clean scrap that matches the job as closely as you can, and get qualified feedback before relying on the result. If you’re working from a drawing, follow its weld details and ask the responsible welding professional when anything is unclear.
Your clearest next step is simple: check the joint design, clean the contact area, and verify the fit before striking an arc. That small pause can save you a crooked part, a rough repair, and a lot of unnecessary grinding.