Stack of Dimes Weld: What It Means and How to Achieve It Yourself
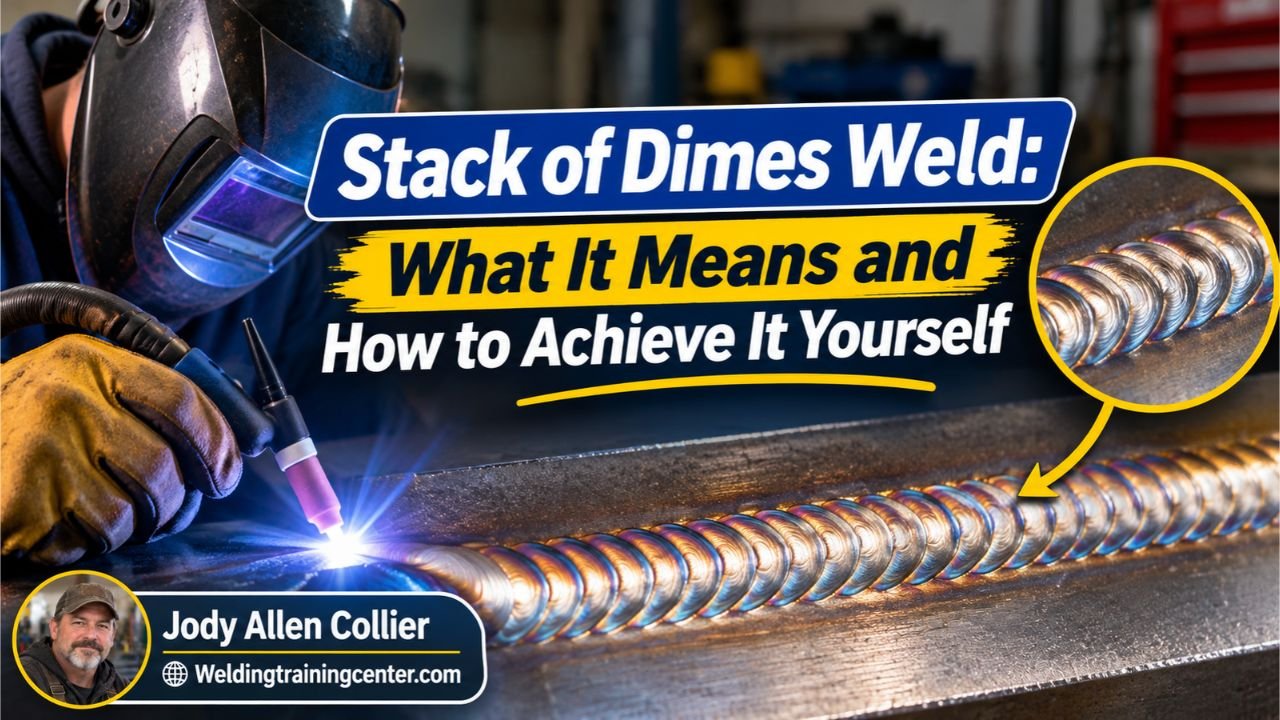
A stack of dimes weld is a bead with evenly spaced, overlapping ripples, usually made by controlling heat, filler, and travel motion. The pattern looks neat, but appearance alone can’t prove a weld is strong.
Have you tried to make those tidy ripples and ended up with a lumpy bead, a flat line, or a plate that got way too hot? Are you wondering if the pattern is a sign of good work, or just a nice-looking surface?
I once rushed a small practice weld and focused so hard on making the ripples look even that I let my torch angle wander. The bead looked decent from above, but the edges didn’t tie in evenly, and I had to grind it back and start again. That’s a common mistake, not a dumb one.
I wrote this to help you understand what creates the pattern and how to practice it without treating appearance as the whole job. You’ll get practical guidance on setup, motion, and checking the bead, whether you’re working with TIG or MIG.
When you get the basics right, you’ll waste less filler, avoid unnecessary grinding, and have a better shot at a weld that both looks clean and fuses properly. Skip the fundamentals, and you can get pretty ripples sitting on top of a weak joint.
Set aside about 10 minutes. By the end, you’ll know how to:
- Tell a real stack-of-dimes pattern from a decorative-looking bead.
- Set up a useful practice session without chasing someone else’s machine settings.
- Adjust your hand motion when ripples bunch up, flatten out, or turn irregular.
- Check the weld’s edges and surface before deciding it’s ready.
Stack of Dimes Weld: What It Means and How to Make One
A stack of dimes weld is a bead with regular, overlapping marks that resemble coins laid in a row. To make one, hold a steady arc, keep your torch or gun angle consistent, control your travel speed, and add filler in a repeatable rhythm when your welding process uses filler.
The term describes a bead profile, meaning the visible shape of deposited weld metal. It doesn’t name a welding process or a certified level of quality. A bead can look polished and still have poor fusion, a hidden defect, or an unsuitable size for the joint.
The basic pattern comes from repeated deposits or a controlled motion that leaves small ripples behind. With TIG welding, the welder commonly feeds filler rod into the weld pool at a steady pace. With MIG welding, the wire feeds continuously, so the appearance comes more from torch movement, settings, and travel rhythm than from separate hand-fed drops.
The main habits are simple, but they take practice:
- Clean the joint and clamp the pieces so they won’t move.
- Choose a material, thickness, joint, and process, then use the machine maker’s starting guidance.
- Hold a consistent arc length and torch or gun angle.
- Move at a controlled pace, adding filler at a repeatable rhythm if the process calls for it.
- Let the weld cool enough to inspect, then check the bead’s edges and shape.
The basics behind melting metal together, including the role of heat and joint preparation, are part of how welding works. If the joint is dirty or the parts shift during welding, hand technique can’t rescue the result.
A useful first practice target is consistency, not a perfect ripple pattern. Try short beads on clean scrap of the same material and similar thickness as your project. Keep the workpiece position comfortable so your arm can move smoothly instead of reaching or twisting.
Pro Tip: Make several short practice beads before welding the actual part. Short runs make it easier to spot a speed or rhythm problem before it stretches across the whole joint.
I’d rather see a slightly plain bead with sound edges than a dramatic rippled one with poor fusion. If a joint carries weight, pressure, or safety risk, follow the design requirements and have a qualified welder assess work you can’t verify.
- The pattern describes how a bead looks, not whether it’s strong.
- Consistent travel, torch position, and filler rhythm matter more than exaggerated ripples.
- Practice on matching scrap before touching the finished part.
Set Up Your Welder and Hand Motion
A good-looking bead starts before the arc strikes: use clean metal, a stable workpiece, and settings suited to the material and thickness. There isn’t one amperage or wire speed that makes every stack-of-dimes pattern, so use your machine manual and process guidance as a starting point.
Remove paint, rust, oil, and other contamination from the weld area, using a method suited to the metal. Secure the pieces so they don’t shift, and arrange your body and cables before welding. A stable stance helps your hand travel smoothly; an awkward reach often shows up as a wobbly bead.
For TIG, the rhythm comes from coordinating the torch, arc, and filler rod. Keep the tungsten from touching the weld pool, maintain a steady arc length, and feed filler consistently. If filler dabs are too large or too far apart, the ripples can look chunky; if the torch pauses too long, the work can overheat.
For MIG, the wire supplies filler continuously. A straight, steady pass may leave a more even bead than a forced rocking motion, especially on a narrow joint. Don’t add side-to-side movement just to make the surface look busy.
How does travel speed change the bead? Moving too quickly can leave a narrow bead with poor tie-in, while moving too slowly can create an overly wide, hot bead. Consistent welding travel speed helps you keep the puddle size and bead shape under control, but the right pace still depends on the material, joint, process, and settings.
Torch or gun angle matters, too. A steep or inconsistent angle can change how heat enters the joint and where weld metal lands. Pick a comfortable angle that suits your process and joint, then keep it steady rather than correcting it every few seconds.
| What you notice | Common cause | What to try next |
|---|---|---|
| Ripples bunch up | Travel slows or filler arrives too quickly | Move at a steadier pace and even out filler timing |
| Bead looks flat or stretched | Travel is too fast, or the pattern is being overworked | Slow slightly and check fusion at both edges |
| Bead is wide and hot | Travel is too slow, excessive heat, or too much weaving | Review settings and make a more direct pass |
| Ripples vary in size | Hand rhythm, arc length, or torch angle changes | Practice short runs with a relaxed, repeatable motion |
| Edges look raised or poorly joined | Poor torch position, contamination, or inadequate fusion | Stop and correct the cause; don’t hide it with another pass |
A stringer bead is a relatively straight pass with little side-to-side movement. A weave bead moves across a wider path, and the choice depends on joint shape, material, process, and procedure. If you’re deciding between a weave bead and stringer bead, don’t pick based on which makes the prettiest ripples; use the technique that fits the joint and applicable welding requirements.
Want an easy way to notice your own speed changes? Make a few short beads and compare their width and ripple spacing, not just the single section that looks best. If the spacing tightens at the end, your hand likely slowed down or your position got cramped.
Important Tip: Don’t copy settings from a video as if they’re universal. A machine’s output, wire or electrode, shielding gas, joint, and metal thickness all affect the result.
Inspect the Bead and Fix Common Problems
A stack-of-dimes pattern is useful as a visual clue, but inspection should focus on whether the weld suits the joint and has sound fusion. Look at the bead’s width, edges, surface, and consistency, then follow the inspection requirements for the job rather than judging by ripples alone.
Fusion means the base metal and weld metal have melted together at the joint. A bead that sits on top of the pieces without joining them properly can look tidy but fail under load. Visible signs such as undercut, pores, cracks, or incomplete coverage deserve attention, though some internal defects can’t be confirmed by looking at the surface.
Before welding, use protective gear suited to the process, including a welding helmet with the right shade, gloves, and flame-resistant clothing. Keep bystanders protected from arc flash, clear flammables from the work area, and provide ventilation appropriate for the materials and coatings involved. Welding fumes can be hazardous, and coated or unknown metal needs proper identification and handling before you strike an arc.
If you’re unsure what a metal is coated with, don’t weld it until you’ve identified the coating and chosen safe controls. For work involving structural loads, pressure, vehicles, or other high-consequence uses, follow the required procedure and get qualified help rather than relying on a cosmetic check.
I once found that my bead got uneven whenever I tried to watch the puddle from a strained angle. Repositioning the work and my stance made the next practice run steadier; the useful lesson was that hand control starts with a view and posture you can hold.
A basic troubleshooting routine helps keep small problems from turning into a long grind-and-repair session:
- Stop if the bead is behaving unpredictably, and let the metal cool before touching or inspecting it.
- Check whether the joint is clean, secure, and suited to the settings and consumables.
- Change one factor at a time, such as travel pace or torch angle, then make another short practice pass.
- Inspect the bead edges and surface; don’t cover a defect with another pass without finding its cause.
If ripples look irregular, fix the rhythm before adding more hand motion. If the bead is too wide, check whether you’re moving slowly or weaving farther than the joint needs. If the bead is narrow or poorly joined at the edges, review the angle, heat, and travel pace instead of trying to decorate the surface.
- Check the bead’s edges and fusion, not just its ripple pattern.
- Fix the cause of a defect before adding another pass.
- Stop and seek qualified guidance when the work has safety or structural consequences.
FAQs About Stack of Dimes Weld
Does a stack of dimes weld mean the weld is strong?
No. A stack of dimes weld describes a visible ripple pattern, not a strength rating. Strength depends on factors such as joint design, material, weld size, fusion, and the required procedure.
A neat surface can still hide a defect, so use the inspection method and acceptance rules required for the job.
Which welding process makes the stack-of-dimes look?
TIG welding is often associated with visible, evenly spaced ripples because the welder feeds filler by hand. MIG can produce a similar appearance through steady movement and suitable settings. The process alone doesn’t guarantee the pattern, and neither process makes a bead sound just because its surface looks attractive.
Should I pause between each ripple?
Not necessarily. A controlled rhythm can help produce regular ripples, but long pauses can overheat the work or leave uneven deposits. With TIG, coordinate filler timing and torch movement; with MIG, keep the gun moving steadily.
Use a short practice bead to adjust your rhythm for the joint and material.
Why do my weld ripples look uneven?
Uneven ripples often come from changing travel speed, arc length, torch angle, or filler timing. They can also reflect an uncomfortable stance or inconsistent workpiece position. Make short practice runs, change one factor at a time, and compare bead width and edge tie-in as well as ripple spacing.
Can I use a stack-of-dimes pattern on every joint?
No. A rippled appearance isn’t the right goal for every weld or joint. Some work calls for a straight pass, a particular weld size, or a specified welding procedure.
Follow the job requirements and use a technique that fits the joint, rather than adding movement just to create a certain look.
Build a Bead You Can Trust
A stack of dimes weld can be a satisfying sign that your hand motion and filler rhythm are getting steadier. Still, the cleanest-looking bead isn’t automatically the best one for the job. I’d focus on a consistent pass, good edge fusion, and a joint that meets its requirements before spending time making every ripple look identical.
Your clearest next step is to practice short beads on clean scrap that matches the real material as closely as you can. Change one part of your technique at a time, and inspect the edges before you chase a prettier pattern. That approach saves material, makes problems easier to spot, and builds control you can carry into the work that matters.