CJP vs PJP Welds: Complete vs Partial Weld Penetration Explained
CJP welds penetrate through the full thickness of the joint, while PJP welds penetrate only partway. The right choice depends on the joint’s design loads, the required strength, and the weld details shown on the plans.
Are you trying to tell whether a weld callout means a full-strength joint or a smaller, partial-depth weld? That distinction can affect the groove you prepare, the welding access you need, and whether the finished work matches the design.
I once read a groove weld callout too quickly and focused on the weld size without checking the penetration requirement. Catching the mismatch before the joint was finished saved a messy repair and a lot of grinding. It’s a common mistake, not a dumb one.
I wrote this to help you sort out the terms, read the drawings, and spot the details that can change the work. If you’re a welder, inspector, student, or someone checking a shop drawing, you’ll get a plain answer without having to decode every symbol from scratch.
Get the callout right, and you’re less likely to prepare the wrong joint, miss a required weld size, or spend time redoing work. This guide takes about 9 minutes to read, and you’ll come away knowing how to:
- Tell CJP and PJP welds apart.
- Read the penetration details on a welding symbol.
- Understand how joint prep, access, and inspection affect the choice.
- Spot common reasons a weld doesn’t meet its required penetration.
CJP vs PJP: What’S the Difference?
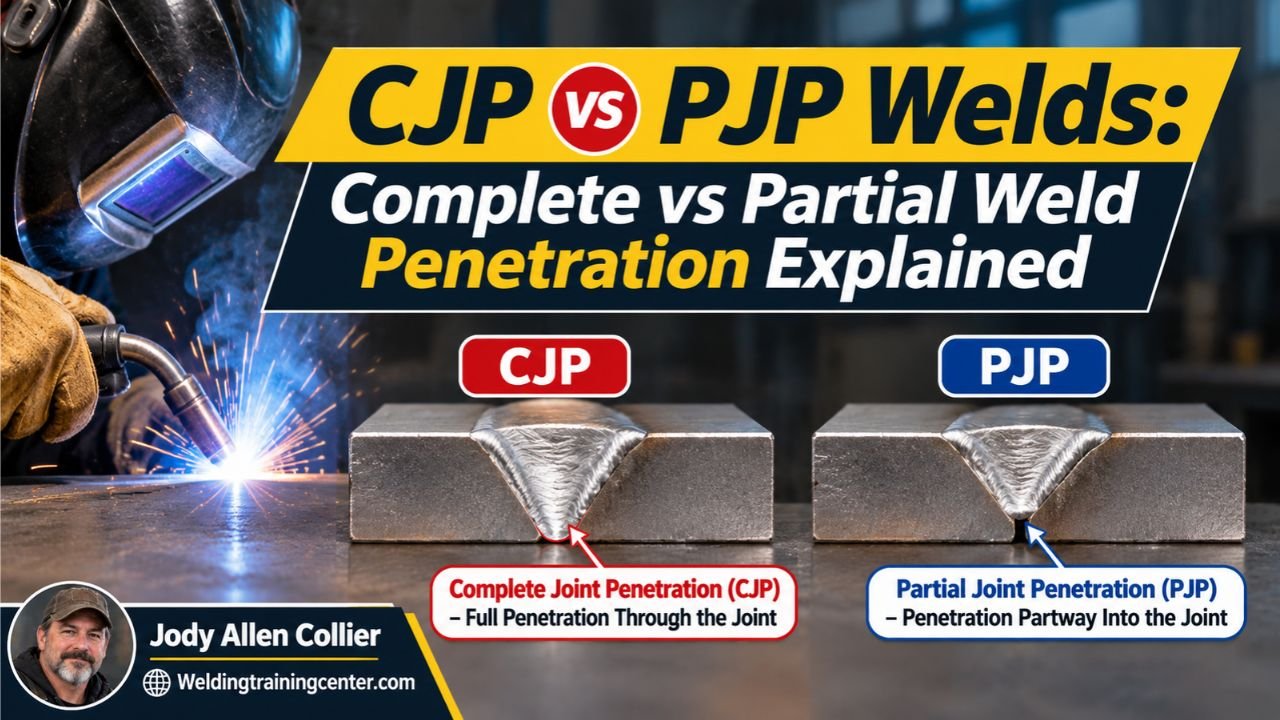
CJP means complete joint penetration, while PJP means partial joint penetration. A CJP groove weld reaches through the joint’s full thickness; a PJP groove weld has a specified effective depth that stops short of full thickness.
The difference matters because the weld designation is tied to the joint’s design, not just how large the bead looks. A deep-looking weld isn’t automatically a CJP weld, and a PJP weld isn’t automatically defective.
Joint penetration describes how far the weld metal extends into the joint. If you’re getting familiar with what penetration means in welding, keep the key distinction in mind: penetration is about the depth of fusion into the joint, while the visible bead is only the part you can inspect from the outside.
A groove weld joins pieces along edges that have been prepared with a groove. Common groove shapes include square, bevel, V, and U, and each can affect access and the amount of filler metal needed. A groove weld joint may be designed as either CJP or PJP, depending on the plans.
| Feature | CJP weld | PJP weld |
|---|---|---|
| Penetration | Through the full joint thickness | Partway through the joint |
| Design basis | Full joint penetration as specified by the design | Required effective weld size or throat |
| Typical prep | Often needs more access or groove preparation | May need less groove depth, depending on design |
| Cost factors | More prep, weld metal, access, or inspection may be needed | Can use less weld metal, but still needs correct sizing |
| Main risk if misread | An incomplete joint may not meet the intended design | A too-small effective weld may not meet the required strength |
A PJP weld’s effective throat is the design depth used to determine the weld’s capacity. The drawing, welding procedure, and applicable project requirements control that depth; don’t guess it from the face width or bead height.
CJP welds are often specified where the joint needs to develop the required strength across the full joint, but the label alone doesn’t tell you every design detail. Loads, materials, joint geometry, and the governing code or project specification all matter.
How to Read the Weld Callout and Joint Details
The welding symbol and its supporting notes tell you whether the weld is CJP or PJP and what preparation is required. Check the entire callout, including groove dimensions, root opening, backing, and any notes on the drawing.
To read the details without skipping a key requirement:
- Find the groove-weld symbol and identify the joint type.
- Check for a stated weld size, depth, or other dimension.
- Read the notes for CJP or PJP requirements, backing, and backgouging.
- Confirm which side or sides need welding and whether the drawing calls for a specific sequence.
- Compare the callout with the approved welding procedure and project requirements.
A symbol may show a groove shape and dimensions, but a drawing note can add the penetration requirement. If the callout seems incomplete or two details conflict, stop and ask the engineer or responsible project contact before welding. Guessing can leave you with a joint that looks tidy but doesn’t match the design.
The root is the deepest part of the joint where the pieces meet. Root opening, groove angle, and root face affect how a welder reaches that area, so a change in fit-up can change the result even when the bead looks consistent.
The fundamentals of how welding works help explain why joint geometry and welding settings affect fusion. Voltage, wire feed, travel speed, process, and technique all play a part, but the approved procedure sets the working limits for a specific job.
What if a symbol shows a groove size but doesn’t clearly say CJP or PJP? Don’t treat the groove dimensions as a substitute for the missing design requirement; get clarification before you start.
Pro Tip: Keep the drawing and the applicable welding procedure together at the work area. A symbol can make sense on its own and still leave out a project-specific requirement written elsewhere.
When CJP or PJP Makes Sense
CJP and PJP welds serve different design needs, so the engineer’s joint design determines which one belongs on the job. A CJP weld is used when the design requires full joint penetration; a PJP weld is used when the design calls for a specified partial depth.
CJP welds can require more preparation and access than PJP welds. Depending on the joint and procedure, the work may call for a deeper groove, welding from both sides, backing, or backgouging, which means removing material from the back side before welding it.
PJP welds may use less weld metal when the design permits a partial-depth joint. But they still need the required size and proper fusion. Smaller doesn’t mean casual, and a bead that’s too small can leave the joint short of its intended capacity.
A welder shouldn’t swap one designation for the other just because the joint seems easier to reach from one side. The design may depend on the specified weld’s strength, stiffness, and load path, and only the responsible design authority can approve a change.
I once saw a crew start preparing a joint before checking whether the back side was accessible for the required work. The delay came from setting up around a detail that the drawing already covered. That’s why I’d check access early, before parts are fit together and the easy options disappear.
Are you weighing a PJP weld to save time or weld metal? That can be a sensible design choice when it’s permitted, but the specified effective throat still has to meet the design and code requirements.
Fit-Up, Welding, and Inspection
Good penetration starts with correct fit-up and a suitable welding procedure, but visual appearance alone can’t prove a weld is CJP. Follow the approved procedure, keep the joint dimensions within their allowed limits, and use the inspection method required by the plans or governing code.
Before welding, check that the pieces match the drawing and that the joint is clean and accessible. Confirm the root opening, groove angle, alignment, and backing details where the design calls for them.
During welding, maintain the approved procedure’s settings and technique. If the arc isn’t reaching the root, the joint has shifted, or the fit-up is outside the permitted range, pause and resolve the problem rather than trying to hide it under another pass.
Incomplete penetration means the weld hasn’t reached the depth required by the design. It can result from poor access, an incorrect root opening, unsuitable settings, excessive travel speed, or joint prep that doesn’t match the procedure. The condition may be visible, but some defects require an approved inspection method to detect. Incomplete weld penetration is a defect when it falls short of the specified requirement, not simply because the joint is PJP.
A weld pass is one layer or run of weld metal. Multiple passes can build up a groove weld, but adding more passes doesn’t automatically correct a root that was never fused properly.
| What you notice | Possible issue | Sensible next step |
|---|---|---|
| Root area isn’t fused | Fit-up, access, or procedure problem | Stop and check the joint and procedure |
| Weld size looks undersized | PJP effective throat may be short | Measure and compare with the drawing |
| Drawing and field conditions don’t match | Revision, access, or fit-up conflict | Request clarification before continuing |
| Bead looks sound but requirement is uncertain | Visual appearance can’t confirm full depth | Follow the specified inspection plan |
Inspection requirements depend on the job. Visual inspection can check visible weld features, while other approved methods may be specified to look for internal discontinuities. Don’t assume every CJP weld receives the same testing; follow the contract documents, code, and project inspection plan.
Important Tip: If a defect is found, don’t just cover it with another pass. The repair method should follow the project’s approved procedure, especially for a structural joint.
Cost, Safety, and Common Misreads
CJP welds can take more time and material than PJP welds, but the actual difference depends on joint design, access, process, and inspection requirements. A shallow groove may take less preparation than a full-penetration joint, but the design must allow that choice.
The cost isn’t just filler metal. Joint preparation, fit-up time, welding position, access, backing, backgouging, and inspection can all affect the work. A PJP callout can reduce some of those demands, while a difficult-to-reach CJP joint may take careful planning and more passes.
Don’t use a cheaper weld designation as a field shortcut. A change from CJP to PJP, or the reverse, can affect the structural design and needs approval from the responsible engineer or authority.
Welding also brings arc radiation, hot metal, fumes, electric shock, and fire risks. Use the required protective equipment and ventilation, follow the shop or site safety rules, and clear or protect combustible materials before welding. If the work involves an unfamiliar process, confined space, or questionable fume controls, stop and get qualified guidance.
A few mix-ups cause trouble again and again:
- Assuming a larger-looking bead means full penetration.
- Treating the groove depth as the effective throat without checking the design.
- Skipping a drawing note about backing or backgouging.
- Continuing when the joint fit-up doesn’t match the procedure.
- Assuming every PJP weld is weak or every CJP weld is automatically sound.
- CJP reaches through the joint; PJP reaches only the specified partial depth.
- The drawing, procedure, and project requirements set the details.
- A clean-looking bead doesn’t prove full penetration.
FAQs About CJP vs PJP
Is a CJP weld stronger than a PJP weld?
Not automatically in every real-world situation. A CJP weld is designed to penetrate through the full joint thickness, while a PJP weld has a specified effective size. The design loads, materials, geometry, workmanship, and applicable requirements determine whether the finished joint provides the strength it needs.
Can a PJP weld be used instead of a CJP weld?
Only when the design and project requirements permit a PJP weld. A welder or fabricator shouldn’t substitute PJP for a CJP callout to save time or material. Ask the responsible engineer or project authority to review the change before modifying the joint.
How can I tell if a weld is CJP?
Check the welding symbol, drawing notes, and applicable project documents for the penetration requirement. The finished bead’s appearance alone can’t confirm full joint penetration. If the specified inspection plan requires testing, use that method and follow its acceptance criteria.
Does a CJP weld always need backgouging?
No. Whether backgouging is needed depends on the joint design, welding sequence, backing details, and approved procedure. Some CJP joints can be made using other approved arrangements.
Follow the drawing and procedure rather than assuming every full-penetration weld needs the same preparation.
Is PJP the same as incomplete penetration?
No. PJP is an intentional design choice with a specified partial depth. Incomplete penetration is a defect when a weld fails to meet its required depth.
A PJP weld can be acceptable when it meets its design requirements; a weld that misses those requirements needs evaluation and, if needed, repair.
Make the Callout Your Starting Point
CJP and PJP aren’t competing bead styles; they’re design requirements for how deeply a groove weld must penetrate. The right choice comes from the drawings and engineering requirements, while the welding procedure explains how to produce the specified joint.
In my view, the safest habit is also the simplest: check the penetration requirement before setting up the joint. That one pause can prevent wasted prep, avoid a repair, and catch a mismatch before it gets buried under weld metal.
If a callout is unclear, don’t fill in the blanks yourself. Mark the question, hold the work at that joint, and get direction from the responsible project contact. Once the requirement is clear, match the joint prep, welding, and inspection to it.