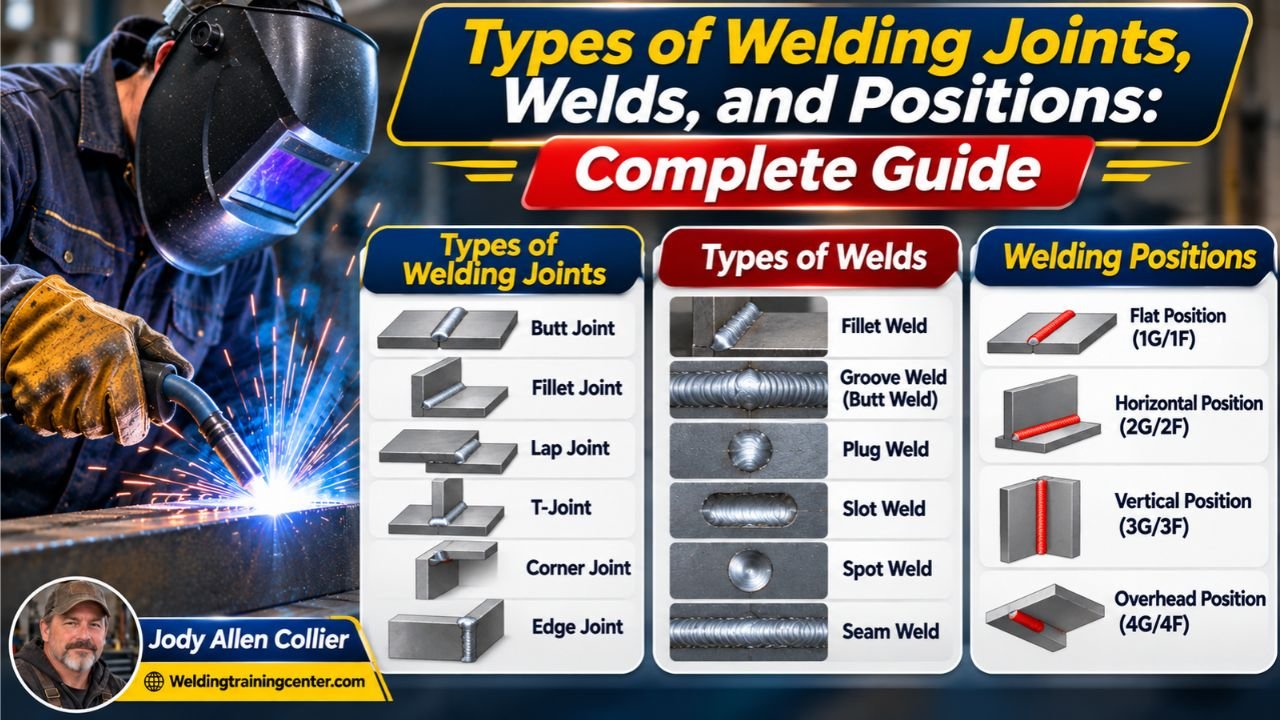
Types of Welding Joints, Welds, and Positions: Complete Guide
The five basic types of welding joints are butt, tee, corner, lap, and edge joints. The right choice depends on the part’s shape, the loads it must handle, how much access you have, and the weld detail your drawing calls for.
Are you trying to tell a joint apart from the weld that joins it, or figure out why a simple-looking connection is awkward to reach? Those are common snags, especially when you’re learning from drawings or setting up a repair.
I once treated a tight corner as a simple fit-up problem and started welding before checking the torch angle. The bead looked tidy from the front, but the back side was poorly fused and needed rework. That’s a common mistake, not a dumb one.
I wrote this guide to make the names, choices, and setup details easier to sort out without assuming you already speak shop shorthand. It’s for anyone learning to weld, reading a print, or trying to make a sound joint without wasting time on the wrong setup.
Get the joint right and you’ll have a clearer plan for fit-up, access, and weld placement. Skip those checks and you can end up with poor fusion, unnecessary distortion, or a repair that takes longer than the original job.
This guide takes about 12 minutes to read. By the end, you’ll be able to:
- Tell the five joint types apart by how the pieces meet.
- Match common weld types to the joint they’re used on.
- Spot how welding position changes access and technique.
- Check fit-up and drawings before striking an arc.
Types of Welding Joints: How to Choose the Right One
The five types of welding joints describe how two or more pieces meet: butt, tee, corner, lap, and edge. Choose the joint that fits the part layout and loading, then follow the drawing or applicable procedure for the weld size, preparation, and placement.
A joint is the arrangement of the parts before welding; a weld type describes the weld deposited to connect them. A butt joint can use a groove weld, while a tee joint often uses a fillet weld. That distinction clears up a lot of confusion when a print names both the joint and the weld.
If you’re still getting comfortable with basic processes and shop terms, a broad welding basics guide can help put joint names in context.
| Joint type | How the pieces meet | Common weld choice | Typical reason to use it |
|---|---|---|---|
| Butt | Edges meet in roughly the same plane | Groove weld, sometimes a fillet weld | To join plates, pipe, or other aligned parts |
| Tee | One part meets another at about a right angle | Fillet weld, sometimes a groove weld | To attach a stiffener, bracket, or crosspiece |
| Corner | Parts meet at an angle at an outside or inside corner | Fillet or groove weld | To form a box, frame, or corner assembly |
| Lap | One piece overlaps another | Usually a fillet weld | To join overlapping sheet or plate |
| Edge | Parallel or near-parallel edges sit together | Edge weld, if the design permits | To join edges where the application allows it |
Butt joints join parts edge to edge
A butt joint places two pieces in the same plane, with their edges meeting. You’ll see this setup in plate, pipe, and sheet work when the parts need a continuous connection across their seam.
Thin material may need little or no edge preparation, depending on the design and process. Thicker material may need a bevel or another prepared edge so the weld can reach the required depth. Don’t guess at the groove shape or root opening; use the drawing or welding procedure.
A gap that’s too wide can cause burn-through or excess filler use, while a gap that’s too tight can make fusion harder. The joint details matter just as much as how neat the tack welds look.
Tee and corner joints create angles
A tee joint forms when one part meets the face of another, usually close to a right angle. A bracket attached to a plate is a familiar setup, and T-joint welding tips can help with the fit-up and weld placement specific to that arrangement.
A corner joint brings two pieces together at an inside or outside angle. It’s common in frames and box-like assemblies, where keeping the parts square during welding can be a bigger challenge than laying down the bead.
These joints often use fillet welds, but that doesn’t mean every connection should get the same bead. The drawing controls the required size and location. A bulky weld can add heat and distortion without improving a design that calls for a smaller weld.
Lap and edge joints suit different layouts
A lap joint has one part overlapping another. The overlap gives you room for weld placement, but moisture or dirt can collect in an unsealed gap, so the joint’s exposure and service needs matter.
An edge joint places edges beside each other, often parallel. It can work for certain light-duty designs, but it isn’t a general stand-in for a stronger joint; the design must suit the load and material thickness.
A joint choice affects more than appearance. Welding joint design helps connect the part layout, expected forces, and access needs before you commit to a setup.
Match Joint Preparation and Weld Type to the Job
A good joint starts with clean, correctly positioned parts and a weld type suited to the design. Surface condition, material thickness, edge shape, root opening, and the required weld size all affect how the connection turns out.
Before you weld, check for oil, paint, rust, moisture, and coatings that can interfere with the process or create hazardous fumes. Cleaning needs vary by metal and coating, so follow the procedure and use the right protective equipment. Don’t weld unknown coatings or sealed containers unless a qualified person has assessed the hazards and approved the work.
Prepare the joint before welding
Joint preparation means getting the edges and surfaces ready for welding. That might involve cleaning, cutting, beveling, setting a root gap, and clamping the parts so they stay aligned.
- Check the drawing or procedure. Confirm the material, joint details, weld size, and any required inspection.
- Clean the weld area. Remove contaminants using a method suited to the material and shop rules.
- Prepare the edges if required. Use the specified bevel or other edge shape; don’t copy a preparation from a different thickness.
- Set the fit-up. Align the parts and hold the specified gap and position with clamps or fixtures.
- Tack and recheck. Use tacks that hold the assembly without blocking weld access, then check alignment again before completing the weld.
I once skipped a careful recheck after tacking a small frame, assuming the clamps had kept every corner square. The last side pulled just enough to make the frame rock on a flat bench, and I had to straighten the assembly before moving on. Since then, I check the full fit-up after tacking, not just the first corner.
Good preparation pays off because welding adds heat, and heat can pull parts out of position. Welding joint preparation steps cover the details that help prevent poor fit-up from turning into a repair.
Choose the weld type, not just the joint name
Fillet welds are roughly triangular in cross-section and commonly join parts in tee, lap, and corner joints. Groove welds fill a groove between edges, often in butt joints, and their required depth depends on the design.
Other weld types include plug welds, which fill holes in one part to connect it to an underlying part, and slot welds, which fill elongated openings for a similar purpose. An edge weld joins edges along a shared edge area when the design permits that approach. The part arrangement alone doesn’t tell you which weld the drawing requires.
When the print uses unfamiliar symbols, look up the symbol details before welding rather than guessing from the joint shape. A welding symbols chart can help decode common callouts, including where the weld goes and what information the symbol provides.
For a wider comparison of weld forms, types of welds explained separates fillet, groove, plug, slot, and other welds from the joint arrangements they connect.
Pro Tip: Write down the material, thickness, joint type, and required weld size before setup. That short check can keep you from applying a familiar weld to the wrong joint.
Fit-up affects the result
Fit-up is how closely the parts match the required position and spacing before welding. Poor fit-up can leave a gap, make the root hard to reach, or force you to compensate with a bead that doesn’t match the drawing.
Clamping helps, but a clamp can also hide a mismatch or block access. Check the joint from the side you’ll weld, and make sure you can hold the torch or electrode at a workable angle throughout the seam.
If a joint repeatedly gives you poor access, pause before changing the weld technique. The joint design may need review, or the assembly may need a different sequence or fixture. A small adjustment to the setup is often cleaner than trying to rescue an awkward connection with a heavy bead.
Welding Position Changes Access and Technique
A welding position describes how the joint sits while you weld, such as flat, horizontal, vertical, or overhead. The same joint can feel straightforward on a bench and much harder after the assembly is fixed in place.
| Position | What the work feels like | Common challenge |
|---|---|---|
| Flat | Weld area faces upward | Keeping a steady travel speed and consistent bead |
| Horizontal | Weld runs across a vertical surface | Managing sag and keeping the bead in place |
| Vertical | Weld runs up or down a vertical surface | Controlling the weld pool and progression |
| Overhead | Weld area sits above you | Working safely while controlling the pool and protecting yourself |
These are plain-language descriptions, not a substitute for a code position designation or a qualified welding procedure. The applicable process, material, joint, and qualification rules can affect what positions are allowed.
A flat position often gives you the best view and easiest access. Vertical and overhead work add gravity and awkward body position to the task, so a setup that’s comfortable on the bench may need more planning once it’s installed. Welding positions explained covers the common position names and how they affect the work.
What changes when the joint sits overhead? You have less room to brace, and the weld pool can behave differently, so body position, travel control, and protection from sparks matter more. Don’t take on overhead work without suitable training, protective gear, and a safe work area.
Control torch angle and bead movement
The work angle is the angle across the joint, while the travel angle is the angle in the direction you move along the weld. Together, they affect where the heat and filler go, and a poor angle can leave one side underfilled or poorly fused.
A tee joint may need a different work angle than a butt joint because the parts meet differently. Keep your view of the weld pool clear and use the angle and travel technique specified for the process and joint. Work angle and travel angle explains how to distinguish the two and manage bead placement.
A stringer bead is a relatively narrow weld pass made with little side-to-side movement. A weave bead moves across the joint as you travel, but the correct pattern depends on the procedure, material, and weld position; extra motion isn’t automatically better.
If you’re deciding between a narrow pass and a weave, follow the approved procedure rather than choosing by appearance alone. Weave bead versus stringer bead explains the tradeoffs and when each approach may suit the job.
Important Tip: Wear the protective gear required for your process, including eye and face protection, gloves, and suitable clothing. Keep sparks away from combustibles, provide appropriate ventilation, and follow shop safety rules before welding.
Common problems and what to check
A weld can look smooth and still have a problem hidden at the edges or root. Check the joint and the procedure first, then inspect the finished weld using the method required for the job.
| What you notice | Possible cause | What to check |
|---|---|---|
| Parts shift or pull out of square | Heat distortion or weak restraint | Tack placement, sequence, clamping, and alignment |
| Weld sits mostly on one part | Angle or access problem | Joint fit-up, torch angle, and weld placement |
| Excessive gaps or uneven edges | Inconsistent preparation | Edge shape, cutting, and root opening |
| Bead piles up or sags | Position or travel-control issue | Position, travel speed, and approved technique |
| Porosity or visible contamination | Surface or process problem | Cleaning, shielding, consumables, and procedure |
Don’t try to correct a defect by adding weld metal until you know what caused it. A larger bead can hide the problem without fixing poor fusion, contaminated surfaces, or a joint that doesn’t meet the design.
FAQs About Types of Welding Joints
What are the five basic types of welding joints?
The five basic types of welding joints are butt, tee, corner, lap, and edge joints. The names describe how the parts meet before welding, not the shape of the weld bead. A single joint type may use different weld types depending on the drawing, material, and design requirements.
Which welding joint is strongest?
No joint type is automatically strongest in every application. Strength depends on the design, material, weld size, preparation, workmanship, and the direction and type of loading. Use the drawing or a qualified design rather than choosing a joint based on appearance or adding more weld metal without approval.
What is the difference between a joint and a weld?
A joint is the arrangement of the parts being connected, such as a butt or tee joint. A weld is the deposited connection, such as a fillet or groove weld. The distinction matters because a print can specify both the part arrangement and the weld required to join it.
What welding joint is easiest for a beginner?
A flat-position joint with clear access is often easier to learn than a vertical or overhead joint, but the best starting point depends on the welding process and training setup. Practice on suitable material under proper supervision, and follow the procedure rather than treating one joint type as universally easy.
Can a lap joint be welded on both sides?
A lap joint can be welded on one or both sides if the design and procedure call for it. Access, material thickness, loading, and the intended use affect the choice. A two-sided weld isn’t automatically better, since extra heat can add distortion and may not be needed for the design.
Choose the Joint That Fits the Work
The best joint is the one that fits the part, the design requirements, and the way you can safely reach the weld. Butt, tee, corner, lap, and edge joints are useful names to know, but the name alone doesn’t tell you the required weld size or preparation.
I’d put the drawing and fit-up ahead of personal preference. A neat-looking bead can’t make up for an incorrect joint, poor access, or a weld that misses the specified requirements.
Your next step is simple: identify how the parts meet, check the weld callout, and confirm the joint is clean and aligned before you strike an arc. That little pause can save you a crooked assembly, wasted filler, and a long afternoon of grinding.