Edge Joint Welding: When to Use It and How to Make It Strong
An edge joint joins two parallel or nearly parallel edges by placing a weld along the shared edge. It suits some sheet-metal seams and low-load parts, but it’s a poor choice when the joint must carry heavy or peel-like forces.
Are you trying to join thin sheet without adding a bulky seam? Or wondering why a weld along the edge can look tidy but still feel like the weak point?
I once rushed a small edge-joint repair because the pieces looked straight enough to weld as they sat. The seam pulled out of line as it cooled, and I had to grind it back and reset the fit-up. That’s a common mistake, not a dumb one; a tiny gap or mismatch can change the whole job.
I wrote this to help you decide whether an edge joint fits your project, choose a sensible weld, and avoid the setup problems that make a neat-looking seam unreliable. You’ll get a clearer idea of what the joint can handle and when another design is the safer call.
Get the fit-up right, and you can make a clean seam with less distortion and rework. Skip the design check, though, and the weld may crack, burn through thin material, or fail under a load it was never meant to carry.
This takes about 9 minutes to read. By the end, you’ll be able to:
- Tell an edge joint from a butt or corner joint.
- Choose a weld style that suits the material and service load.
- Set up, weld, and inspect the joint without guessing at the basics.
- Spot conditions that call for a stronger joint design.
Edge Joint: When It Works and How to Weld It
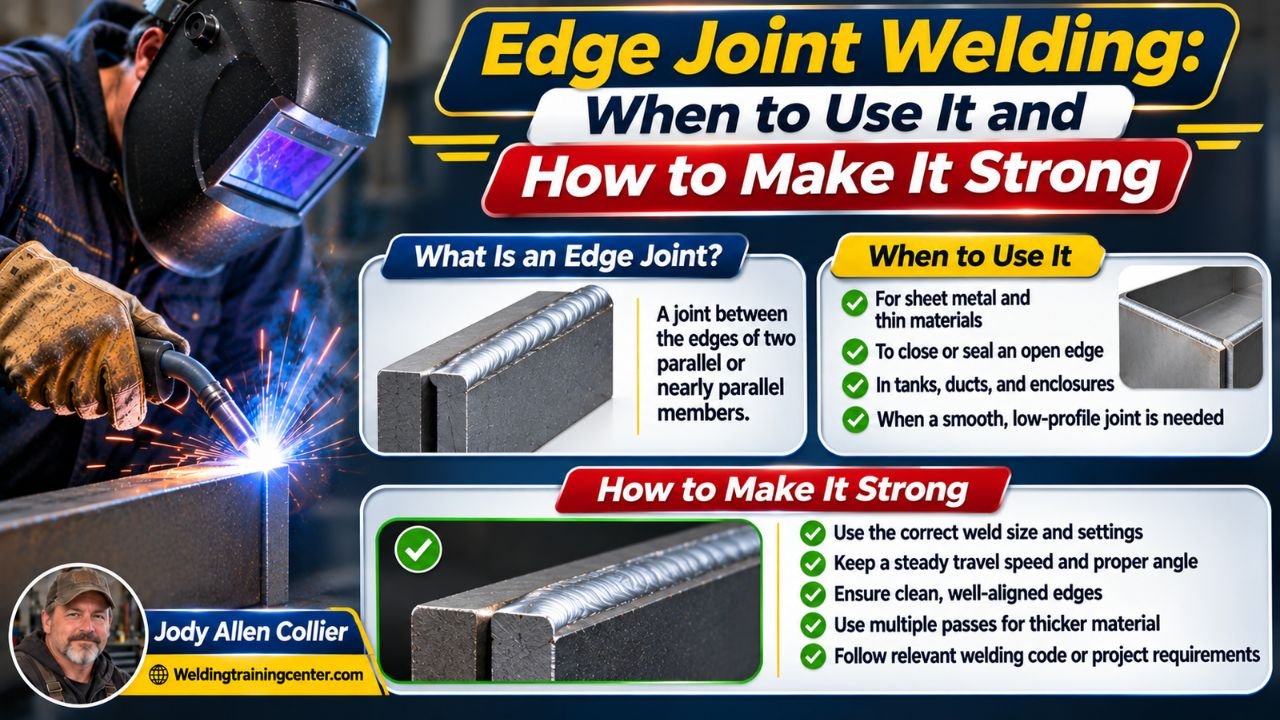
An edge joint places two members side by side, with their edges parallel or nearly parallel, then welds along one or both edges. It works best for thin material, seams, flanges, and parts that don’t face high structural loads; two thin panels joined along a common edge are a typical use.
A joint describes how the pieces meet, while a weld describes how they’re fused together. An edge joint can use different weld forms, but the weld and the joint both need to suit the job.
The main steps are straightforward:
- Check the design and load. Confirm that an edge joint is suitable for the part’s function and loading. A seam that only holds a light cover together is a different problem from a joint carrying a machine’s weight.
- Prepare the edges. Remove oil, paint, rust, and other contamination from the weld area. Use the cleaning method and edge preparation required for the material and welding procedure.
- Fit and hold the pieces. Align the edges and clamp the parts so they don’t shift. A consistent gap matters because a gap that opens up mid-weld can lead to burn-through or an uneven bead.
- Tack and weld. Place small tacks to hold alignment, then weld using the process and settings suited to the material, thickness, and position. Follow the applicable Welding Procedure Specification (WPS), the written instructions for the welding job, when one is required.
- Inspect the seam. Look for visible gaps, undercut, burn-through, cracks, and places where the weld missed an edge. A pretty surface doesn’t prove the joint is strong enough for its intended job.
The five basic joint arrangements include edge, butt, corner, lap, and T-joints. If you’re sorting out the names and how each arrangement differs, this guide to types of welding joints gives the broader picture.
An edge joint isn’t the same as a butt joint. In a butt joint, the members meet end to end, and the weld joins the abutting edges; in an edge joint, the edges sit alongside each other. That difference changes where the weld goes and how the parts carry force.
Edge joints can also appear near a formed flange or at the edge of a sheet-metal assembly. Don’t mistake a similar-looking corner arrangement for the same joint: a corner joint weld joins parts that meet at a corner, and its geometry may call for a different weld setup.
Choose a Weld That Matches the Job
The best edge-joint weld depends on the material, thickness, access, required strength, and service conditions. A small, neat bead isn’t automatically strong, and adding more weld metal won’t fix a joint that’s poorly suited to the load.
Common options include groove welds, which fuse material in a prepared space between edges, and edge welds, which run along the adjoining edges. Some sheet-metal joints have flanged edges that are welded together; the shape and fit of the flange affect the approach.
| Weld arrangement | Where it may fit | What to watch |
|---|---|---|
| Square-edge weld | Thin pieces with edges that fit closely | A large gap can cause burn-through or lack of fusion |
| Groove weld | Edges prepared to create a groove for weld metal | The required groove shape depends on the job and procedure |
| Flanged-edge weld | Sheet-metal parts with formed edges | Poor flange contact can leave an uneven or weak seam |
| Welds on both sides | Parts and designs that allow access to both faces | More heat can increase distortion on thin material |
This table is a starting point, not a design specification. A drawing, WPS, material requirements, and applicable code can set the weld size, preparation, and acceptance limits.
What if the parts are thin enough to distort just from tacking? Use short, balanced welds and let the heat spread rather than running a long pass in one direction, if the approved procedure allows that sequence. Clamping and tack placement help, but clamps don’t cancel out excess heat.
The joint’s shape is only one part of the decision. A sound welding joint design accounts for how the load acts, how much material is available, the working environment, and whether the joint can be inspected.
I once watched an edge seam start to curl after too much heat built up along one side. The fix wasn’t a bigger bead; it was slowing down, correcting the sequence, and getting the parts held evenly. Thin sheet can be unforgiving, so heat control deserves as much attention as bead appearance.
Pro Tip: On thin material, test the planned settings and technique on a matching scrap piece first. A test coupon shows whether the weld puddle is controllable before you risk the finished panel.
Prepare and Weld Without Creating New Problems
Good edge-joint welding starts before you strike an arc. Clean material, stable fit-up, and a welding process suited to the job give you a better chance of getting fusion without excessive distortion.
Before welding, check the material identification, thickness, joint drawing, and WPS if one applies. Don’t guess at settings from a different metal or thickness; welding parameters that work on heavier steel can burn through thin sheet.
Safety warning: Welding can expose you to intense light, hot metal, fumes, electric shock, and fire. Before welding, wear the protective gear required for your process, keep bystanders out of the arc’s path, and clear or shield combustibles; provide suitable ventilation, and follow the equipment maker’s safety instructions.
A practical setup looks like this:
- Clean both edges and the surrounding weld area.
- Check that the parts sit flat and line up along the seam.
- Clamp or fixture the work so it can’t move as you weld.
- Place tacks where they’ll hold alignment without blocking access.
- Confirm the welding process, filler, and settings against the job requirements.
The right fit-up is the way the parts meet before welding. If the edges touch in one spot and spread apart in another, the weld won’t have a consistent opening to fill, and the heat may pull the pieces further out of line.
Use a steady travel speed and a controlled weld puddle. A slow pass can add too much heat, while moving too quickly can leave incomplete fusion; the correct speed depends on the process, material, thickness, and approved procedure.
Don’t use filler or a larger bead to cover a bad joint gap without checking the procedure. A weld can look full while still failing to fuse properly into one of the parts.
If the edge joint will be loaded, exposed to vibration, or used as part of a pressure-retaining or safety-critical assembly, stop and confirm the design requirements before welding. A qualified welding professional or engineer can help assess whether the joint and procedure are suitable.
Inspect the Seam and Know When to Change the Design
A quick visual check can catch obvious edge-joint defects, but appearance alone can’t prove strength. Check the weld against the drawing, procedure, and inspection requirements for the work.
Look for visible signs such as:
- Cracks along the weld or at its ends.
- Burn-through, holes, or excessive melt-through.
- Undercut, a groove melted into the base metal beside the weld.
- Missed edges or a bead that doesn’t tie into both parts.
- Distortion that leaves the parts bowed or out of position.
Some defects need more than a surface glance to find. If the joint has a required inspection method, such as a specified nondestructive test, follow that requirement rather than treating a visual check as a substitute.
A useful way to judge an edge joint is to ask what force the seam must resist. Loads that pull the parts apart across the weld, bend the edge, or repeatedly flex the assembly can be a poor match for a simple edge seam.
An edge joint often makes sense for a seam joining sheet or a flange that isn’t carrying a major load. If the part needs to carry substantial force, a different joint arrangement, more material, or a designed reinforcement may be needed.
Important Tip: Don’t add reinforcement by instinct on a safety-critical part. Extra weld metal can add heat and distortion without solving the underlying load path.
If the seam is meant to seal liquid or gas, confirm that the design and inspection method address leakage, not just visible weld appearance. The required acceptance criteria depend on the assembly and its governing requirements.
FAQs About Edge Joint
What is an edge joint in welding?
An edge joint in welding joins two parallel or nearly parallel edges by welding along their shared edge. The arrangement is common in sheet-metal work and some light-duty seams, but its strength depends on the design, weld form, material, and applied load.
Is an edge joint strong?
An edge joint can be suitable for its intended job, but strength depends on the weld, material, fit-up, and direction of force. A simple edge seam may be a poor choice for heavy or repeated loading, so check the design rather than judging strength by bead size.
What’s the difference between an edge joint and a butt joint?
An edge joint places the edges alongside each other and welds along the shared edge. A butt joint places the parts end to end, with the weld joining the edges where they meet. The parts’ arrangement changes the weld location and the way the joint handles force.
Which weld is used for an edge joint?
An edge joint may use an edge weld, a groove weld, or another form suited to the joint design. The right choice depends on the material, thickness, access, load, and applicable procedure; the joint name alone doesn’t determine the weld type.
Can an edge joint be used on thin sheet metal?
Yes, edge joints are often used with thin sheet, provided the design and welding method suit the material and load. Thin sheet can burn through or warp from excess heat, so clean fit-up, controlled heat, and a test on matching scrap can help prevent rework.
Make the Joint Fit the Job
An edge joint is useful when two edges need a clean seam and the design doesn’t ask that seam to carry more load than it can handle. I’d choose it for a suitable sheet-metal seam, but I wouldn’t rely on a tidy bead to make an undersized or poorly loaded joint safe.
The sensible next step is to check the part’s drawing or design requirements, then match the weld preparation and procedure to the material and service conditions. If the seam carries a serious load or failure could put someone at risk, get a qualified professional to review the joint before you weld. That small check can spare you a lot of grinding, guesswork, and regret.